Model iH36 under cabinet kitchen system for your iPod ® WARNING: The iH36 shuffle port is ONLY for use with an iPod shuffle. DO NOT connect any other device such as iPod or iPhone to this port as doing so can cause damage to the iH36, iPod/iPhone or both.
1
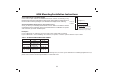
Table of Contents Caution Information........................................................................................................................................................................ 3 A Consumer Guide to Product Safety ....................................................................................................................................... 4-6 Safety Instructions FCC Information iH36 Mounting / Installation Instruction.....................................................
CAUTION RISK OF ELECTRIC SHOCK DO NOT OPEN CAUTION: TO REDUCE THE RISK OF ELECTRIC SHOCK, DO NOT REMOVE COVER (OR BACK). NO USER-SERVICEABLE PARTS INSIDE. REFER SERVICING TO QUALIFIED SERVICE PERSONNEL. WARNING: TO REDUCE THE RISK OF FIRE OR ELECTRIC SHOCK, DO NOT EXPOSE THIS APPLIANCE TO RAIN OR MOISTURE.
A Consumer Guide to Product Safety When used in the directed manner, this unit has been designed and manufactured to ensure your personal safety. However, improper use can result in potential electrical shock or fire hazards. Please read all safety and operating instructions carefully before installation and use, and keep these instructions handy for future reference. Take special note of all warnings listed in these instructions and on the unit. 1.
A Consumer Guide to Product Safety 8. Objects and Liquid Entry – Care should be taken so that objects do not fall and liquids are not spilled into any openings or vents located on the product. 9. Attachments – Do not use attachments not recommended by the product manufacturer. 10. Lightning and Power Surge Protection – Unplug the unit from the wall outlet and disconnect the antenna or cable system during a lightning storm or when it is left unattended and unused for long periods of time.
A Consumer Guide to Product Safety FCC Information This device complies with Part 15 of the FCC Rules. Operation is subject to the following two conditions: (1) this device may not cause harmful interference, and (2) this device must accept any interference received, including interference that may cause undesired operation. Warning: Changes or modifications to this unit not expressly approved by the party responsible for compliance could void the user’s authority to operate the equipment.
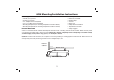
iH36 Mounting/Installation Instructions Parts Supplied • 4 Small (1/2") Spacers • 8 Large (1") Spacers • 4 3 " Phillips head screws/bolts • 4 4 1/2 " Phillps head screws/bolts • Mounting Template A (for mounting template from inside cabinet) • Mounting Template B (for mounting template from below cabinet) Tools Required • Drill and 1/4" Drill Bit • Masking Tape • Scissors • Nail or Awl • Phillips head Screwdriver • Tape Measure or Ruler • Safety Goggles BEFORE MOUNTING Select a convenient kitchen cabinet
iH36 Mounting/Installation Instructions Step 1. Measure the overhang height Use a ruler or tape measure to determine the exact amount of overhang, if any. Measure from the front inside bottom edge of the cabinet bottom straight down to the end of the overhang (see figure 1) to determine the height of the overhang. Step 2.
iH36 Mounting/Installation Instructions MOUNTING THE iH36 We recommend the unit be mounted flush to the front edge of the cabinet. 1. Select and Set Template and Drill holes a. Using a Template First, decide which mounting method/template you prefer, the inside the cabinet template (Mounting Template A) or the under the cabinet template (Mounting Template B). Next, cut out the selected template on the line indicated depending on whether your cabinet has an overhang or not.
Getting Started Thank you for purchasing the iHome iH36 kitchen Stereo System for your iPod. Designed specifically to work with your iPod or Shuffle, this system provides high quality audio and radio performance that invites your music to come out and play. It also has a factory preset clock with the correct time already preset at the factory so you just need a few steps to make it work. Please read the instructions carefully before operating the appliance and keep it for future reference.
Getting Started Install/Replace Backup Batteries If Backup Batteries are installed and a power failure occurs or the AC cord is accidentally disconnected, the current time and radio preset station settings will be temporarily maintained. Otherwise, you must reset the time and radio preset station settings. Three backup batteries are installed in the unit before shipping to keep the clock running.
Controls and Indicators Manual Dock Release Tab Power On LED Power On/Off Button Select Up/FF Button Timer Button iPod Play/Pause Button Dock Open/Close Button Preset Button Select Down/Rew Button Radio Mode Button Volume – Button Volume + Button Mute Button Power On/Off Button Play/Pause Button Radio Mode Button Select Up/FF Button Volume + Button Select Down/Rew Button Volume – Button Timer Button DST Switch +1 Mute Button Preset Button Clock Adj Button 12
Maintenance • Place the unit away from sources of direct sunlight or excessive heat. • Clean your unit with a soft cloth moistened only with mild soap and water. Stronger cleaning agents, such as Benzine, thinner or similar materials can mar the surface of the case. Setting Up This unit has a Clock which is preset at the factory. It takes just a few steps to match the clock setting to where you live. 1.
Listening to Your iPod Note: iPod Shuffle operation differs from that of other iPods. (See the Shuffle section below for more on using your Shuffle). 1. Dock the already playing iPod. The iH36 will automatically turn on and you will hear the music playing from your iPod. Note: If the playing song/ music loudness on the iPod itself is too low, the iH36 may not detect that the iPod is in play mode.
Listening to FM Radio, TV and Weather Note: Extend FM wire antenna fully for best reception. 1. Press the Radio Mode Button on the main unit or the remote control to play the radio. The radio frequency/channel will appear on the lower part of the display. 2. Press the Radio Mode Button to select the desired band. Each press changes the band as follows: FM1 FM2 TV Weather By using FM1 or FM2 preset mode, you may listen to FM band radio on either mode (see Presetting Your Favorite Station below). 3.
Operating the Cooking Timer The cooking timer can be set at one minute intervals between 1-120 minutes. 1. Press the Timer Button once to activate the cooking timer. 2. You will see "60" on the display (meaning the cooking timer will sound after 60 minutes). To adjust the timer, press and hold the Timer Button until the display flashes. Then press the Select Up/FF or Select Down/Rew Button until the time you want is displayed. 3.
Trouble Shooting Symptom iPod didn’t charge up Possible Problem iPod is not installed properly iPod is locked up. Problem with iPod battery batteryroblem Solution Remove your iPod from the dock and check for obstruction on the connectors in the dock and on your iPod. Then reseat it in the dock. Please make sure your iPod is working properly before dock into the unit. Please refer to your iPod manual for detail.
Solucionando problemas Síntoma La unidad no funciona (no circula corriente eléctrica) Causa Solución La unidad se encuentra desconectado del tomacorrientes Conecte la unidad al tomacorrientes El tomacorriente no funciona Coloque otro aparato en ese mismo tomacorriente para confirmar si el que no funciona es el tomacorriente No ha colocado el encastre del iPod, o está utilizando el encastre incorrecto.
Solucionando problemas Síntoma El iPod no carga Causa Solución El iPod no está instalado correctamente Quite el iPod del encastre y retire la posible obstrucción del encastre o de su iPod. Vuelva a colocar el iPod dentro del encastre. El iPod está trabado/no responde Por favor asegúrese de que su iPod funcione correctamente antes de colocarlo en el encastre. Refiérase al manual de su iPod para mayor información.
Limited 90-Day Warranty Information iHome Products, a division of SDI Technologies Inc. (hereafter referred to as SDI Technologies), warrants this product to be free from defects in workmanship and materials, under normal use and conditions, for a period of 90 days from the date of original purchase. Should this product fail to function in a satisfactory manner, it is best to first return it to the store where it was originally purchased.