
User manual


English
12
Acoustic instruments
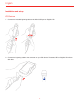
Thanks to its features and its high-quality components, iRig Mic HD can also be used for recording acoustic
instruments with studio-quality sound. For example, place iRig Mic HD so that it’s facing the neck of an acoustic
guitar— right where the neck joins the body (usually around the 12th or 14th frets) — for a balanced sound with
plenty of sparkling high-end. Place the microphone in front of the soundhole to capture a blend of low-end. Or,
for more high-end detail, place the microphone farther from the guitar either at the same neck position or above
the instrument near the guitarist’s head. Experiment with different positions and reach the sound you want.
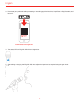
An all around microphone
What do you want to record with your iRig Mic HD? Thanks to its wide gain range it is possible to record an
extremely broad range of instruments: guitar amplifiers, drums, wind instruments — you name it, iRig Mic HD is
a true all-around microphone.
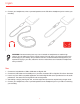
Troubleshooting
I have connected iRig Mic HD to my iOS device, but it is not recognized and none of my audio apps work
with it.
Remember to always connect the 30-pin or Lightning cable to the iRig Mic HD before connecting it to the iOS
device.
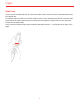
Sound is distorted.
Check that the input level on iRig Mic HD has been set properly. If the red LED is lighting when you talk or sing
decrease the input level as described in this guide.
The iRig Mic HD status LED is always dark blue and I don’t get any sound.
In order for iRig Mic HD to turn on, a Core Audio-compatible audio app must first be launched on your iOS
device or Mac.
iOS: Be sure you are using an app that works with digital audio input from the 30-pin or Lightning dock
connector.
Mac: Be sure you have set “iRig Mic HD” as the audio input device on the audio app you are using.