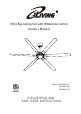
HVLS Big Ceiling Fan with IR Remote Control Owner's Manual Models: ILG8HVLS78/ ILG8HVLS102/ ILG8HVLS120 PLEASE READ AND SAVE THESE INSTRUCTIONS
IMPORTANT SAFETY INSTRUCTIONS
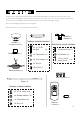
BEFORE INSTALLATION ¡ ¢ 5 Hardware installed at downrod Hardware for bracket installation x4 M4 Wood Screw x 2 1/4 x50 mm Wo
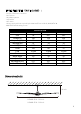
¤ ( ): £ Model# Size Voltage(V) Frequency (Hz) Wattage(W) AMPS(A) RPM CFM Blades Blade Angle Speeds Net Weight(LBS) Certification SPECIFICATION ILG8HVLS78 ILG8HVLS102 78" 102" 120 120 60 60 74 78 0.92 1.2 135 90 13,200 17,800 6 6 10 10 6 6 23.7 25.
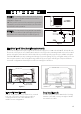
INSTALLATION INSTRUCTIONS ¢ Figure 1 11-7/8 in WALL 10 ft Figure 2
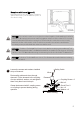
Deep box with brace (Figure 5)
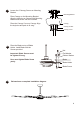
2 Loosen the bolts and nuts installed at the downrod, and save them for further installation(Step 4 & 5). Assemble the coupling cover, canopy cover, and the canopy through downrod. Canopy Canopy Cover Coupling Cover 3 Mounting bracket installation.
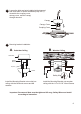
4 Install the Hex Bolt, Flat Washer, Lock Washer, Nut and Clevis Pin into the bottom hole on top of the Downrod. Installation Instruction Note: The Hex Bolt, Flat Washer, Lock Washer, Nut and Clevis Pin are from step 2#. 6 5 Insert the Hex Bolt into the upper hole on Downrod and secure with Flat Washer, Lock Insert the Bolt into the upper Washer and Nut. hole on Downrod and secure with Flat Washer, Lock Washer and Nut. Tighten the 2 bolts. Tighten the 2 bolts.
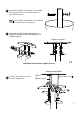
7 Loosen the 2 Canopy Screws on Mounting Bracket. Place Canopy on the Mounting Bracket. Align the keyholes on Canopy with Mounting Bracket and secure with the 2 screws. Place the Canopy Cover on Canopy. Align the keyholes and push in till sung. Mounting Bracket Canopy Canopy Screws Canopy Cover 8 Place the Blade on top of Blade Holder. Install Blade with the Screws provided. Nut Important: Blade Screws must be tighten till snug. Flat Washer Rubber Washer User must tighten Blade Screw yearly.
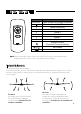
REMOTE CONTROL Button LED LIGHT 3 2 1 4 5 6 1 2 3 4 5 6 Description Lights up when any button is pressed.
Wiring Diagram Circuit Diagram Power Supply 110 - 120V~ 60Hz 120V~ 60Hz BLACK (HOT) WHITE (NEUTRAL) BLACK ("AC IN L") WHITE ("AC IN N") GREEN OR BARE COPPER (GROUND) GROUND (CONNECT TO (GREEN) GROUND WIRE ON HANGER BRACKE IF NO HOUSE GROUND WIRE EXISTS.
Warranty Information This product comes with a 1-YEAR LIMITED COMPONENT WARRANTY. If your unit does not appear to be working properly, please contact our service center by calling 1-800-317-1688. Prior to your call, we encourage you to visit our service related website www.ilivingusa.com for troubleshooting tips and service instructions if needed. Register your product at our website: Or visit iLivingUSA.com/register-product Feedback Love it? Help us make the product more for you.