
Installation Guide


For any inquiries or additional help, please contact support@illuminatevintage.com
1
2
4
5
1
6
7
3
* Shorter screws available for
no charge upon request *
Please note: It is always recommended that a licensed electrician install electrical xtures. MAKE SURE THE ELECTRICITY IS OFF.
Pendant xtures would follow the same installation
instructions as the chandeliers, however you can
adjust the wire length as needed for your installation.
Loosen the black
plastic set screw with
a small at head screw
driver to adjust the cord length.
Our brass is raw and unlacquered. Brass is particularly susceptible to tarnishing with oils from our hands and chemicals like ammonia
in Windex. Use gloves while installing these xtures to prevent ngerprinting. If cleaning the brass is needed, we use Brasso. If you
choose, you may clear coat the brass to prevent any tarnishing with a clear spray lacquer. After extensive testing, our favorite is Krylon
ColorMaster CoverMax Clear Gloss.
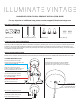
Acorn Nuts (2)8-32 Crossbar Screws (2) Wire Nuts (3)Fixed Crossbar
A SPECIAL NOTE ABOUT RAW BRASS
INSTALLATION INSTRUCTIONS
CHANDELIER/SEMI-FLUSH PENDANT
INCLUDED HARDWARE (WALL SCONCES ON THE REVERSE SIDE)
CHANDELIER, SEMI-FLUSH & PENDANT INSTALLATION GUIDE
GND
Thread black & white wires through
down rod then attach to canopy.
Secure xture using the acorn nuts.
Secure white and black wires
with the provided wire nuts.
Screw the provided 8-32 Crossbar
Screws into the innermost threaded holes.
Wrap ground wire around ground
screw on crossbar, then attach to ground
wire from electrical box with wire nut.
Use screws provided with electrical
box to attach crossbar to electrical
box. *NOT INCLUDED*