
Operation Manual


iLuv
TM
Stereo Audio System for Your iPod V11M11_IM_EN_10172007
www.i-Luv.com - 6 -
GETTING STARTED
Power Source
• This system is designed to operate on 120V AC 60Hz house current only.
• Connecting this system to any other power source may cause damage to the system and such damage is not covered by your warranty.
• Main plug is used as the disconnect device, the disconnect device shall remain readily operable.
Note: The system has an AC plug and will only fit into matching AC outlets. This is a safety feature to reduce the possibility
of electric shock. If the plug will not fit in your AC outlets, you should have the outlet changed by a qualified, licensed
electrician. Do not use an adapter to make the plug fit into your outlet. This defeats the safety feature and could expose you
to electric shock.
Protect your Furniture
This model is equipped with non-skid rubber 'feet' to prevent the product from moving when you operate the controls. These 'feet' are made from non-
migrating rubber material specially formulated to avoid leaving any marks or stains on your furniture. However certain types of oil based furniture polishes,
wood preservatives, or cleaning sprays may cause the rubber 'feet' to soften, and leave marks or a rubber residue on the furniture. To prevent any damage
to your furniture we strongly recommend that you purchase small self-adhesive felt pads, available at hardware stores and home improvement centers
everywhere, and apply these pads to the bottom of the rubber 'feet' before you place the product on fine wooden furniture.
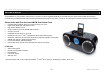
Installing the Remote Control Battery
The remote control battery has been previously installed and ready for operation for the first time use. When the remote control
stops functioning, replace the battery with a new one. To do so, locate the battery compartment and follow the steps below:
1. Slide out the battery holder from the remote control case.
2. Insert a “CR2025” 3V lithium battery making certain to follow the correct polarity. Observe the corresponding symbols (+/-).
3. Secure battery and push the battery holder back into the remote control until it is fully inserted.