
Owner's Manual
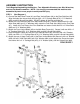
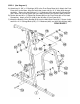
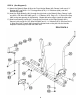

STEP 2 (See Diagram 2)
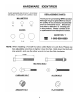
A.) Place two Rubber Bumpers (#72) onto the Main Base Frame (#1). Align the holes and push
two Guide Rods (#8) through the Bumpers into the Main Base Frame (#1).
B.) Install fourteen Weight Plates (#42). To install the plate, hold the plate at an angle and place
it in between the two Guide Rods then drop it down. NOTE: Make sure the groves on the
plastic covers all face up. Insert the Selector Rod (#41) into the center hole on the plates.
Slide the Selector Stem (#40) onto the Guide Rods (#8) from the top. Align the holes and
secure the Selector Stem (#40) to the Selector Rod (#41) with a M10 x 1 ¾” Allen Bolt (Full
Thread) (#101).
C.) It is strongly recommended to spay lubricant such as WD-40 on the two Guide Rods to
minimize friction. Please note this machine comes with 14 plates. You can purchase
another 5 more plates (Model no. WK51) in the future to increase the weights.
D.) Attach the Top Socket Assembly (#5) to the top of the Guide Rods (#8). Secure the
Assembly to the Upper Frame (#3) with a 4 ¾” Bracket (#27), two M10 x 2 ¾” Carriage Bolts
(#79), two ∅ ¾” Washers (#94), and two M10 Aircraft Nuts (#96).
E.) Insert the Weight Selector Pin (#39) into the selected stack of Weight Plates to obtain the
desired weights for exercise. Make sure the magnet on the Pin faces up.
F.) Securely tighten all the nuts and bolts previously installed.
DIAGRAM 2
5