
Owner's Manual

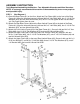
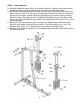
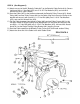

STEP 5 (See Diagram 5)
A.) Insert a ∅ 5/8” x 9 3/8” Axle (#31) halfway through the hole on the Base Frame (#1).
B.) Attach the Front Press Left Base (#9) and the Front Press Right Base (#10) onto the
Axle (#31) from both sides. Secure the Axle with two ∅ 13/16” Flat Washers (#75), M10
Aircraft Nuts (#78), and M10 Cone Shape Caps (#51).
C.) Attach the Front Press (#8) to the Front Press Base (#9 & #10). Secure it with one M10
x 3” Hex Bolt (#66), one M10 x 2 9/16” Hex Bolt (#67), three ∅ 13/16” Flat Washers
(#75), one 2” x 4” Bracket (#28), and one M10 Aircraft Nut (#78) on each side of the
Front press.
D.) Lubricate the inside of the Foam Grips (#44) with water and slide them onto the
handlebars on the Front Press.
E.) Attach the Leg Developer (#16) to the Leg Developer Holder (#17). Secure it with one
M12 x 3 3/8” Hex Bolt (#64), two ∅ 1” x ∅ ½” Bushings (#80), two ∅ 15/16” Flat
Washers (#74), and one M12 Aircraft Nut (#77).
F.) Insert a Foam Roll Tube (#42) halfway through the hole on the Leg Developer (#16).
Push two Foam Rolls (#43) onto the Tube from both ends. Push two ∅ 3” Round Plugs
(#59) onto both ends of the Tube.
G.) Insert an L Shape Pin (#35) through the hole on the Leg Developer (#16) to lock it in
place. Remove the Pin when using the Leg Developer.
DIAGRAM 5
8