
Owner manual

3
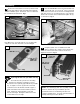
Adjust the Miter Bar
Adjust the miter bar at each of the (6) expansion
mechanism locations for a good fit in your table saw's
miter slot. Turning the screw clockwise expands the
mechanism. You'll find (3) of the expansion locations in front
of the fence and (1) underneath the fence. (You'll need to
remove the fence for access.) Adjust these (4) front
expansion points first, expanding a little at each of the
locations until the bar slides smoothly, Fig. 5.
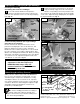
Adjust Fence Mounting Bracket 90° to Saw
Blade
Set the protractor head to read 0°, engaging the tooth
on the actuator firmly into the 0° notch on the protractor
head, Fig. 7. Tighten the large clamping knob and the
small actuator thumbscrew.
Using the supplied
5
⁄ 32" hex key, loosen the (3) #10-24 x
5
⁄16" socket head screws that secure the fence mounting
bracket to the protractor head. Unplug your table saw, then
use a reliable machinist square to set the fence at 90° to the
saw blade, Fig. 8. Tighten the (3) socket head screws.
This one-time calibration prepares your INCRA Miter
1000
for
work in either miter slot. Just remember that the accuracy of
the INCRA Miter
1000
at any subsequent setting is dependent
upon the accuracy of your initial 90° calibration. Verify this
calibration with a test cut and fine-tune as necessary.
Zeroing the Sliding Stop to the Blade
Set the protractor head to 0° and clamp the sliding
stop to the fence about 10" from the blade. Crosscut a piece
of scrap stock with this setup and measure the resulting cut.
Slide the scale on the fence to read this measurement under
the cursor. Fig. 9.
Note: To zero the stop for angles other than 90°, the test cut
must be made at the selected angle.
1
Calibration
2
FIG. 5
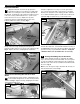
Finally, remove the large clamping knob and pivot the
protractor head to gain access to the (2) rear expansion points,
Fig. 6. Replace the fence, clamping knob, and washer.
FIG. 6
FIG. 7
3
FIG. 8
FIG. 9
Square
fence to
blade
Fence removed
for access
Adjust (4)
front expansion
points
Remove knob
and rotate
protractor
head for
access
Adjust (2) rear
expansion points
Actuator
thumbscrew
Actuator tooth engaged at 0°
Measure test cut length
Slide scale to read
board’s length
under cursor
Loosen (3) socket
head screws