Operating Instructions OVEN Contents GB English,1 RS Ðóññêèé, 12 Installation, 2-3 Positioning Electrical connection Technical data Description of the appliance, 4 Overall view Control panel Display Start-up and use, 5 Setting the clock Setting the timer Starting the oven Cooking modes, 6-8 7OIF 997 K.A RU 7OIF 997 K.
Installation Before operating your new appliance please read this instruction booklet carefully. It contains important information concerning the safe operation, installation and maintenance of the appliance. Please keep these operating instructions for future reference. Pass them on to any new owners of the appliance. Ventilation To ensure adequate ventilation is provided, the back panel of the cabinet must be removed.
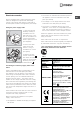
Electrical connection Ovens equipped with a three-pole power supply cable are designed to operate with alternating current at the voltage and frequency indicated on the data plate located on the appliance (see below). Fitting the power supply cable 1. Open the terminal board by inserting a screwdriver into the side tabs of the cover. Use the screwdriver as a lever by pushing it down to open the cover (see diagram). 2. Loosen the cable clamp screw and remove it, using a screwdriver as a lever (see figure).
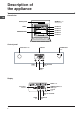
Description of the appliance GB Overall view GUIDES for the sliding racks Control panel position 5 position 4 position 3 position 2 position 1 GRILL DRIPPING PAN Control panel DISPLAY SELECTOR knob LIGHT button THERMOSTAT knob TIME SETTING button TIMER knob Display MODE icons Preheating indicator TEMPERATURE and TIME digits CLOCK icon END OF COOKING icon TIMER icon 4 DURATION icon
Start-up and use The first time you use your appliance, heat the empty oven with its door closed and at its maximum temperature for at least half an hour. Make sure that the room is well ventilated before switching the oven off and opening the oven door. The appliance may emit a slightly unpleasant odour caused by protective substances used during the manufacturing process burning away.
Cooking modes GB Cooking modes All cooking modes have a default cooking temperature which may be adjusted manually between 40°C and 250°C as desired. In the GRILL mode, the default power level value is indicated as a percentage (%) and may also be adjusted manually. FREASY COOK mode Preheating is not necessary for this cooking mode. This mode is particularly suitable for cooking prepacked food quickly (frozen or pre-cooked). The best results are achieved using one cooking rack only.
Programming cooking Practical cooking advice A cooking mode must be selected before programming can take place. Do not place racks in position 1 and 5 during fanassisted cooking. This is because excessive direct heat can burn temperature sensitive foods. Programming the cooking duration 1. Press the button several times until the icon and the three digits on the display begin to flash. 2. Turn the TIMER KNOB towards + and - to adjust the duration as desired. 3. Press the button again to confirm.
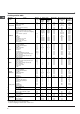
GB Cooking advice table Cooking modes Foods Weight (in kg) Rack position Sliding Standard guide guide rails rails 1 2 1 2 1 2 1 2 1 2 1 2 1 and 3 2 and 4 1 and 3 2 and 4 1 and 3 2 and 4 1 and 3 1 and 2/3 1 2 1 1 or 2 1 2 1 and 3 2 and 4 1 and 3 2 and 4 1 and 3 2 and 4 1 and 3 1 and 3 Preheating Recommended Temperature (°C) Cooking duration (minutes) 70-80 200-210 Yes 1,5 Duck 60-70 200-210 Yes 1,5 Chicken 70-75 200 Yes 1 Roast veal or beef Convection 70-80 200-210 Yes 1 Roast pork 15-20 180 Yes Bisc
Precautions and tips This appliance has been designed and manufactured in compliance with international safety standards. The following warnings are provided for safety reasons and must be read carefully. General safety The appliance was designed for domestic use inside the home and is not intended for commercial or industrial use. The appliance must not be installed outdoors, even in covered areas. It is extremely dangerous to leave the appliance exposed to rain and storms.
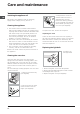
Care and maintenance GB Switching the appliance off Disconnect your appliance from the electricity supply before carrying out any work on it. F Cleaning the appliance The stainless steel or enamel-coated external parts and the rubber seals may be cleaned using a sponge that has been soaked in lukewarm water and neutral soap. Use specialised products for the removal of stubborn stains. After cleaning, rinse and dry thoroughly. Do not use abrasive powders or corrosive substances.
Assistance Warning: The appliance is fitted with an automatic diagnostic system which detects any malfunctions. Malfunctions are indicated on the display, by messages of the following type: F followed by numbers. Call for technical assistance if a malfunction occurs. Never use the services of an unauthorised technician. GB Please have the following information to hand: The type of problem encountered. The appliance model (Mod.). The serial number (S/N).
Èíñòðóêöèè ïî èñïîëüçîâàíèþ ÄÓÕÎÂÎÉ ØÊÀÔ Ñîäåðæàíèå RS GB English, 1 RS Ðóññêèé, 12 Óñòàíîâêà, 13-14 Ðàñïîëîæåíèå Ýëåêòðè÷åñêîå ïîäêëþ÷åíèå Òåõíè÷åñêèå äàííûå Îïèñàíèå èçäåëèÿ, 15 Îáùèé âèä Êîíñîëü óïðàâëåíèÿ Äèñïëåé Âêëþ÷åíèå è ýêñïëóàòàöèÿ, 16 Íàñòðîéêà ÷àñîâ Íàñòðîéêà òàéìåðà Âêëþ÷åíèå äóõîâîãî øêàôà Ïðîãðàììû, 17-19 7OIF 997 K.A RU 7OIF 997 K.
Ìîíòàæ Âàæíî ñîõðàíèòü äàííîå ðóêîâîäñòâî äëÿ åãî ïîñëåäóþùèõ êîíñóëüòàöèé.  ñëó÷àå ïðîäàæè, ïåðåäà÷è èçäåëèÿ èëè ïðè ïåðååçäå íà íîâîå ìåñòî æèòåëüñòâà íåîáõîäèìî ïðîâåðèòü, ÷òîáû ðóêîâîäñòâî îñòàâàëîñü âìåñòå ñ èçäåëèåì, äëÿ òîãî ÷òîáû åãî íîâûé âëàäåëåö ìîã îçíàêîìèòüñÿ ñ ïðàâèëàìè ýêñïëóàòàöèè è ñ ñîîòâåòñòâóþùèìè ïðåäóïðåæäåíèÿìè. Âíèìàòåëüíî ïðî÷èòàéòå èíñòðóêöèè: â íèõ ñîäåðæàòñÿ âàæíûå ñâåäåíèÿ î ìîíòàæå èçäåëèÿ, åãî ýêñïëóàòàöèè è áåçîïàñíîñòè.
RS Ýëåêòðè÷åñêîå ïîäêëþ÷åíèå Äóõîâûå øêàôû, óêîìïëåêòîâàííûå òðåõïîëþñíûì ñåòåâûì êàáåëåì, ðàñ÷èòàíû íà ôóíêöèîíèðîâàíèå ñ ïåðåìåííûì òîêîì ñ íàïðÿæåíèåì è ÷àñòîòîé ýëåêòðîïèòàíèÿ, óêàçàííûìè íà ïàñïîðòíîé òàáëè÷êå ñ äàííûìè (ñì. íèæå). Ïîäñîåäèíåíèå ñåòåâîãî êàáåëÿ 1. Îòêðîéòå çàæèìíóþ êîðîáêó, íàæàâ ïðè ïîìîùè îòâåðòêè íà âûñòóïû ñ áîêîâ êðûøêè: ïîòÿíèòå è îòêðîéòå êðûøêó (ñì. ñõåìó). 2. Îòâèíòèòå âèíò êàáåëüíîãî ñàëüíèêà è âûíüòå åãî, ïîääåâ îòâåðòêîé (ñì. ñõåìó). 3.
Îïèñàíèå èçäåëèÿ Îáùèé âèä Панель управления РЕШЕТКА ПРОТИВЕНЬ RS ВЫДВИЖНЫЕ НАПРАВЛЯЮЩИЕ для противеней и решеток положение 5 положение 4 положение 3 положение 2 положение 1 Êîíñîëü óïðàâëåíèÿ Äèñïëåé 15
Âêëþ÷åíèå è ýêñïëóàòàöèÿ RS Ïðè ïåðâîì âêëþ÷åíèè äóõîâîãî øêàôà ðåêîìåíäóåì ïðîêàëèòü åãî ïðèìåðíî â òå÷åíèå ÷àñà ïðè ìàêñèìàëüíîé òåìïåðàòóðå ñ çàêðûòîé äâåðöåé. Çàòåì âûêëþ÷èòå äóõîâîé øêàô, îòêðîéòå äâåðöó è ïðîâåòðèòå ïîìåùåíèå. Çàïàõ, êîòîðûé âû ìîæåòå ïî÷óâñòâîâàòü, âûçâàí èñïàðåíèåì âåùåñòâ, èñïîëüçîâàííûõ äëÿ ïðåäîõðàíåíèÿ äóõîâîãî øêàôà. Íàñòðîéêà ÷àñîâ ×àñû ìîæíî íàñòðîèòü êàê ïðè âûêëþ÷åííîì äóõîâîì øêàôó, òàê è ïðè âêëþ÷åííîì, ïðè óñëîâèè, ÷òî íå áûëî çàäàíî âðåìÿ îêîí÷àíèÿ ïðèãîòîâëåíèÿ.
Ïðîãðàììû Ïðîãðàììû ïðèãîòîâëåíèÿ ! Êàæäàÿ ïðîãðàììà èìååò çàäàííóþ òåìïåðàòóðó ïðèãîòîâëåíèÿ. Òåìïåðàòóðà ìîæåò áûòü íàñòðîåíà âðó÷íóþ, îò 40°C äî 250°C.  ïðîãðàììå ÃÐÈËÜ çàäàííîå çíà÷åíèå ÿâëÿåòñÿ óðîâíåì ìîùíîñòè, âûðàæåííîé â %. Ýòîò óðîâåíü ìîæåò áûòü òàêæå íàñòðîåí âðó÷íóþ. Ïðîãðàììà ÒÐÀÄÈÖÈÎÍÀËÜÍÀß ÄÓÕÎÂÊÀ  ðåæèìå òðàäèöèîíàëüíîãî ïðèãîòîâëåíèÿ ðåêîìåíäóåòñÿ èñïîëüçîâàòü òîëüêî îäèí óðîâåíü: ïðè èñïîëüçîâàíèè íåñêîëüêèõ óðîâíåé ðàñïðåäåëåíèå òåìïåðàòóðû áóäåò íåîïòèìàëüíûì.
RS Ïðîãðàììèðîâàíèå ïðèãîòîâëåíèÿ Çàïðîãðàììèðîâàòü ïðèãîòîâëåíèå ìîæíî òîëüêî ïîñëå âûáîðà ïðîãðàììû ïðèãîòîâëåíèÿ. Ïîðÿäîê íàñòðîéêè ïðîäîëæèòåëüíîñòè ïðèãîòîâëåíèÿ 1. Íàæìèòå íåñêîëüêî ðàç êíîïêó äî òåõ ïîð, Ïðàêòè÷åñêèå ñîâåòû ïî ïðèãîòîâëåíèþ  ðåæèìå âåíòèëèðóåìîãî ïðèãîòîâëåíèÿ íå èñïîëüçóéòå 1-ûé è 5-ûé óðîâíè: îíè ïîäâåðãàþòñÿ ïðÿìîìó âîçäåéñòâèþ ãîðÿ÷åãî âîçäóõà, êîòîðûé ìîæåò ñæå÷ü äåëèêàòíûå ïðîäóêòû. ïîêà íà ÄÈÑÏËÅÅ íå çàìèãàåò ñèìâîë è òðè öèôðîâûå çíà÷åíèÿ; 2.
Òàáëèöà ïðèãîòîâëåíèÿ Ïðîãðàììû Ïðîäóêòû RS Âåñ (êã) Óðîâåíü ñòàíäàðòíûå âûäâèæíûå íàïðàâëÿþùèå íàïðàâëÿþùèå 1 2 1 2 1 2 Ïðåäâàðèòåëüíûé íàãðåâ 1,5 Óòêà 1,5 Êóðèöà 1 Æàðêîå èç òåëÿòèíû èëè Òðàäèöèîíàëüíûé ãîâÿäèíû ðåæèì 1 2 1 Æàðêîå èç ñâèíèíû 1 2 Ïå÷åíüå (ïåñî÷íîå) 1 2 1 Ïåñî÷íûé òîðò ñ íà÷èíêîé 1è3 2è4 Ïèööà (íà 2-õ óðîâíÿõ) 1è3 2è4 Ïåñî÷íûé òîðò íà 2-õ óðîâíÿõ/òîðòû íà 2-õ óðîâíÿõ 1è3 2è4 Áèñêâèò (íà 2-óõ óðîâíÿõ) 1è3 1 è 2/3 1+1 Æàðåíàÿ êóðèöà ñ êàðòîøêîé 1 2 1 Áàðàíèíà Îäíîâðåìåííîå 1 1 èëè 2 1 Ñê
Ïðåäîñòîðîæíîñòè è ðåêîìåíäàöèè RS Èçäåëèå ñïðîåêòèðîâàíî è èçãîòîâëåíî â ñîîòâåòñòâèè ñ ìåæäóíàðîäíûìè íîðìàòèâàìè ïî áåçîïàñíîñòè. Íåîáõîäèìî âíèìàòåëüíî ïðî÷èòàòü íàñòîÿùèå ïðåäóïðåæäåíèÿ, ñîñòàâëåííûå â öåëÿõ âàøåé áåçîïàñíîñòè. Îáùèå ïðàâèëà áåçîïàñíîñòè Äàííîå èçäåëèå ïðåäíàçíà÷àåòñÿ äëÿ íåïðîôåññèîíàëüíîãî èñïîëüçîâàíèÿ â äîìàøíèõ óñëîâèÿõ. Çàïðåùàåòñÿ óñòàíàâëèâàòü èçäåëèå íà óëèöå, äàæå ïîä íàâåñîì, òàê êàê âîçäåéñòâèå íà íåãî äîæäÿ è ãðîçû ÿâëÿåòñÿ ÷ðåçâû÷àéíî îïàñíûì.
Òåõíè÷åñêîå îáñëóæèâàíèå è óõîä Îáåñòî÷èâàíèå èçäåëèÿ Ïåðåä íà÷àëîì êàêîé-ëèáî îïåðàöèè ïî îáñëóæèâàíèþ èëè ÷èñòêå îòñîåäèíèòå èçäåëèå îò ñåòè ýëåêòðîïèòàíèÿ. F ×èñòêà èçäåëèÿ Íàðóæíûå ýìàëèðîâàííûå ýëåìåíòû èëè äåòàëè èç íåðæàâåþùåé ñòàëè, à òàêæå ðåçèíîâûå óïëîòíåíèÿ ìîæíî ïðîòèðàòü ãóáêîé, ñìî÷åííîé â òåïëîé âîäå èëè â ðàñòâîðå íåéòðàëüíîãî ìîþùåãî ñðåäñòâà. Äëÿ óäàëåíèÿ îñîáî òðóäíûõ ïÿòåí èñïîëüçóéòå ñïåöèàëüíûå ÷èñòÿùèå ñðåäñòâà, èìåþùèåñÿ â ïðîäàæå.
Ñåðâèñíîå îáñëóæèâàíèå RS Âíèìàíèå: Èçäåëèå îñíàùåíî ñèñòåìîé àâòîìàòè÷åñêîé äèàãíîñòèêè, ïîçâîëÿþùåé âûÿâèòü âîçìîæíûå íåèñïðàâíîñòè. Íåèñïðàâíîñòè ïîêàçûâàþòñÿ íà äèñïëåå ïîñðåäñòâîì ñëåäóþùèõ ñîîáùåíèé: F ñ ïîñëåäóþùèì íîìåðîì.  ýòîì ñëó÷àå íåîáõîäèìî âûçâàòü òåõíèêà èç öåíòðà ñåðâèñíîãî îáñëóæèâàíèÿ. Íèêîãäà íå îáðàùàéòåñü ê íåóïîëíîìî÷åííûì òåõíèêàì. Ïðè îáðàùåíèè â Öåíòð Ñåðâèñíîãî îáñëóæèâàíèÿ ñîîáùèòå: Òèï íåèñïðàâíîñòè; Ìîäåëü èçäåëèÿ (Ìîä.) Íîìåð òåõ.
RS 23
11/2009 - 195079895.