
Installation Sheet
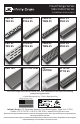

7
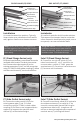
Mortar Bed
Sub-oor
Waterproong
Membrane
Mortar Bed
Sub-oor
Waterproong
Membrane
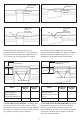
Before nishing material • Antes que el material esté terminado
Tile
Assure that
grate is
lower than
installed tile
Tile
Assure that
grate is
lower than
installed tile
After nishing material • Después que el material esté terminado
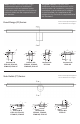
6. Place nished top grate (A) into the
installed bottom channel (C). Use adjustable
feet (B) to raise or lower the top grate to be
1/16” below the nishing material height.
6. Coloque la rejilla superior (A) en la parte
inferior del canal instalado (C). Utilicé ajustables
pies para levantar o bajar la rejilla a ser 1/16”
debajo de la altura del material terminado.
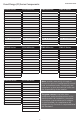
Model
Minimum
Height
Maximum
Height
FFED25/FFED65/
FFDG25/FFDG65/
FFMN25/FFMN65/
FFAS25/FFAS65/FFAS125
1/” 1/”
FFTIF 65
1³/” 1/”
Model
Minimum
Height
Maximum
Height
FTED25/FTED65/FTDG25/
FTDG65/FTMN25/
FTMN65/FTAS25/FTAS65/
FTAS125
1/” 1/”
FTTIF 65
1³/” 1/”
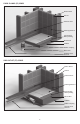
(B) Adjustable Feet
Grate can be raised an
additional ½”
(B) Adjustable Feet
Grate can be raised an
additional ½”
7. FFTIF 65/FTTIF 65 INSTALL. Spread a layer
of mortar into the Tile Insert Frame (TA65),
allowing for thinset and and nishing material
to nish 1/16” above the metal frame. Allow to
dry, spread thinset and lay material.
7. FFTIF 65/FTTIF 65 INSTALACION. Extender
una capa de mortero en Tile Insert Frame
(TA65), permitiendo el thinset y material
terminado que termine 1/16” arriba del marco
del metal. Permita que se seque, extienda
thinset y coloca material.