Installation Guide FOR ALL SIZE AND POST CONFIGERATIONS
THANK YOU FOR PURCHASING FROM INTEGRA PATIOS Your purchase is engineered by nearly 45 years of commercial and residential product design proudly manufactured in the USA from responsibly sourced materials in our own state-of-the-art manufacturing facilities. Your Integra Patios Carport purchase is covered by our exclusive Limited Lifetime warranty. Learn more about our products at www.integrapatios.
WELCOME The Integra Patios multi-use storage & carport cover installation guide recommends 1-to-2 physically fit individual(s) with some experience in Doit-Yourself (DIY) home projects and should complete installation within 1 weekend with proper planning and support. Please review this installation guide thoroughly and understand each step’s task before the start of the installation process.
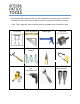
TOOLS Recommended & required tools are not included but necessary for a successful installation of this solid cover patio kit as each structure & location is unique.
ORGANIZE Organize and familiarize yourself with inventory of all hardware materials and “Step” before you begin the installation process. Each “Step” page begins with Components List & Tools Required to complete the step task.
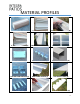
MATERIAL PROFILES HARDWARE BUNDLE 2.
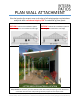
PLAN WALL ATTACHMENT Plan the location for carport cover to be clear of all swinging doors and windows and finish with a minimum height of 6’8” to underside of front fascia.
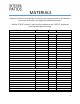
MATERIALS Organize & check-in all materials received in your shipment within a safe distance from work area before you begin the installation process.
SKIP THIS STEP FOR WIDTH BELOW 16 ft Components List Tools Required Front fascia rails (D) Front fascia splice (E)* Tek screws Sealant tub & gun This step only applies to carport covers with a total front width that is greater than 16 feet wide due to shipping limitations. Installer needs to splice two front fascia pieces together by inserting a “front fascia splice” insert.
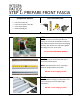
STEP 1: PREPARE FRONT FASCIA Components Needed Tools Recommended Front fascia rails (D) Front fascia splice insert (B)* Fascia dams (foam) Sealant tube & gun FIRST: Inter-connect by inserting the hanging channel into the front fascia parallel and evenly on a flat level non-abrasive surface or slab. Make sure both front fascia and hanging channel rails remain even and flush together by taping every 15” across span.
STEP 2: PREPARE FRONT FASCIA Components Needed Tools Recommended Front fascia rails (D) Front fascia splice insert (B)* Fascia drains (F) Fascia dams (foam) Sealant tube & gun Top post connector (G) FIRST: Determine post spacing across entire bottom of front fascia by marking 1’ 3” from both ends of front fascia as top post connector as guide. Measure distance between the two end post locations. Evenly space remaining post within opening to provide proper support.
STEP 3: HANGING CHANNEL Components Needed Tools Recommended Hanging rail (A) Hanging channel (C) #12 x 2-1/2” Determine and Measure center point for installation on desired structure wall FIRST: Place hanging rail in desired position on structure wall or roof fascia board and mark first hole to be drilled in hanging rail relative to rafters or wall studs. Widths greater than 16 ft will require two hanging rails connected at center point.
STEP 4: ATTACH FRONT FASCIA Components Needed Tools Recommended Front fascia (D) Sealant tube & gun Post Top Brackets (G) FIRST: Determine post spacing across entire bottom of front fascia by marking 15” from both ends of front fascia with post top bracket connector (G) as guide. Mark equal spacing for remaining post by dividing entire space by number of openings between the post (4 post = 3 openings). Drill ¼” holes on marks in bottom side of fascia.
STEP 5: PREPARE POST Components Needed Tools Recommended Front fascia (D) Bottom post bracket Square post (H) A minimum of ½” per foot slope recommended for proper water drainage FIRST: Slide on & fasten the square post to the top post connector previously installed to fascia. Drill two 3/8” diameter holes through both post and post connector. Use two 3/8” x 31/2” bolt & nuts to fasten. SECOND: Front fascia profile shown must be “level” across width of patio cover.
STEP 6: FIRST ROOF PANELS Components Needed Tools Recommended 13” wide “W” roof panels (J) Sealant tube & gun #10 x 3/8” sheet metal screw FIRST: Begin this step on far RIGHT side of hanging channel when facing the structure. Begin with “female” lock edge (see Step #8) of panel flush to hanging channel and front fascia. Top of panel slides below ledge of hanging channel to sit on groove for screw location.
STEP 7: LAST ROOF PANELS Components Needed Tools Recommended 13” wide “W” roof panels (J) #10 x 3/8” sheet metal screw FIRST: Begin this step on far LEFT side of hanging channel when facing the structure leaving large space from first roof panel. Last roof panel needs “male” lock edge (see Step #8) flush to outside edge of hanging channel and front fascia. Top of panel slide below top ledge of hanging channel to sit on groove for screw location.
STEP 8: SNAPPING PANELS Components Needed Tools Recommended 13” wide “W” roof panel (J) #10 x 3/8” sheet metal screw Sealant tube & gun FIRST: YOU MUST ALWAYS ADJUST THE INTERLOCKING JOINT BETWEEN THE TWO PANELS TO ALIGN WITH THE 12” MARKS ON THE HANGING CHANNEL AND THE FRONT FASCIA. SECOND: Remove the sheet metal screw from the installed first roof panel from the “male” side of panel at the front fascia.
STEP 9: ALL ROOF PANELS Components Needed Tools Recommended 13” wide “W” roof panel (J) #10 x 3/8” sheet metal screw Preformed flashing (N) Sealant tube & gun FIRST: Slide new roof panel back into hanging channel and firmly into foam rubber gasket. Seal panel ends to foam rubber gasket. Align new roof panel on 12” mark before securing with #10 x 3/8” sheet metal screw in panel “valley” at front fascia.
STEP 10: SECURE POSTS Components Needed Tools Recommended Square Posts (H) Bottom Post Brackets (I) 3/8” x 2-3/4” anchors FIRST: Attach square post at ground to secure assembly. Each post must be plumb in all directions. Mark bottom post bracket position on slab at desired location for pre-drilled holes. SECOND: Using the pre-drilled holes in bottom bracket as a guide, mark both holes on the slab or surface.
STEP 11: ATTACH SIDE FASCIA Components Needed Tools Recommended Side fascia (K) Sealant tub & gun #10 x 3/8” sheet metal screw FIRST: With assistance, press firmly to place the top flange of the side fascia over the front fascia top flange at the hanging channel against the wall. Secure side fascia from bottom and top and seal seams generously where needed. SECOND: With assistance, press firmly to place the top flange of the side fascia over the hanging channel at the front fascia.
STEP 12: SIDE CORNERS Components Needed Tools Recommended Corner angles (L) Sealant tub & gun #10 x 3/8” sheet metal screw FIRST: Place each corner angle (L) flush to front/side fascia bottom covering the seam. SECOND: Mark desired height of each corner angle (L) and cut with tin snips or metal saw. THIRD. Attach the corner angles (L) to the front and side fascia using the socket drive and four #8 x 5/8” tek screws. Seal seams generously. Need help with installation? www.homedepot.
STEP 13: FASCIA PAN CLIPS Components Needed Tools Recommended Fascia clips (M) Sealant tub & gun #10 x 3/8” sheet metal screw FIRST: Secure top of roof panel pans to front fascia with fascia clips at top of roof panels. Place top of clip over top leg in fascia where pans connect together and secure using #10 x 3/8” sheet metal screw. SECOND: Continue across full width of patio cover and seal screw heads generously. CONGRATULATIONS AND ENJOY YOUR NEW INTEGRA PATIO SOLID MULTI-USE CARPORT COVER.
SHARE YOUR REVIEW Care and Maintenance Your solid roof cover system has a paint finish to resist the effects of damaging weather and aging. It is recommended you clean at least twice a year by using a soft brush with water/mild dish detergent mixture rinsed off with water. THANK YOU FOR CHOOSING AN INTEGRA PATIOS OUTDOOR PRODUCT Need help with installation? www.homedepot.