User Guide Yoga 7i (14″, 5) and Yoga 7i (15″, 5)
Read this first Before using this documentation and the product it supports, ensure that you read and understand the following: • Appendix A “Important safety information” on page 35 • Safety and Warranty Guide • Setup Guide First Edition (July 2020) © Copyright Lenovo 2020. LIMITED AND RESTRICTED RIGHTS NOTICE: If data or software is delivered pursuant to a General Services Administration “GSA” contract, use, reproduction, or disclosure is subject to restrictions set forth in Contract No. GS35F-05925.
Contents About this guide . . . . . . . . . . . . . iii Chapter 1. Meet your computer . . . . . 1 Front . . . . . . . . . . . . . Base . . . . . . . . . . . . . Left . . . . . . . . . . . . . Right . . . . . . . . . . . . . Bottom . . . . . . . . . . . . Features and specifications . . . . Statement on USB transfer rate . Operating environment . . . . . . . . . . . . . . . . . . . . . . . . . . . . . . . . . . . . . . . . . . . . . . . . . . . . . . . . . . . . 1 2 3 4 6 7 8 8 Chapter 2.
ii User Guide
About this guide • This guide applies to Lenovo product model(s) listed below. Illustrations in this guide may look slightly different from your product model. Model name Machine type (MT) Yoga 7 14ITL5 82BH Yoga 7 15ITL5 82BJ • This guide may contain information about accessories, features, and software that are not available on all models. • This guide contains instructions that are based on the Windows 10 operating system.
iv User Guide
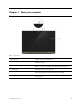
Chapter 1. Meet your computer Front Figure 1. Front view 1. Microphones Capture or record sound and voice. 2. Camera Capture still and moving images for taking photos, recording videos, and video chatting. 3. Camera cover slider Move the slider to cover or uncover the camera lens. Note: The camera cover helps you better protect your privacy. 4. Camera light If the light is on, the camera is in use. 5.
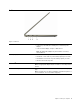
Base Figure 2. Base view—Yoga 7 14ITL5 Figure 3. Base view—Yoga 7 15ITL5 1. Wireless antennas Send and receive radio waves for the built-in wireless LAN (local area network) and Bluetooth module. Note: The antennas are not visible from the outside of the computer. 2. Speakers Produce sound. 3. Numeric keypad * To enable or disable the numeric keypad, press the Num Lock key. 4. Keyboard Enter characters and interact with programs.
Left Figure 4. Left view 1. Power/USB-CTM connector • Connect to power with the included power cord and ac power adapter. • Connect external display, storage, or data devices. Note: An appropriate adapter may be needed for connecting external devices. 2. Charging light Indicate whether the computer is connected to ac power. • Solid white: Connected to ac power; battery capacity 91%–100% • Solid amber: Connected to ac power; battery capacity 1%–90% • Off: Not connected to ac power 3.
Right Figure 5. Right view—Yoga 7 14ITL5 Figure 6. Right view—Yoga 7 15ITL5 1. USB (3.2 Gen 1) Type-A connector Connect to a USB-compatible device, such as a USB keyboard, a USB mouse, a USB storage device, or a USB printer. 2. USB (3.2 Gen 1) Type-A connector (always-on) The always-on connector can charge external devices when the computer is turned off, in sleep or hibernation mode. The always-on function can be turned on or off in the UEFI/BIOS setup utility.
3. Power button 4. Power light Press the button to turn on the computer or put the computer into sleep mode. • On: The computer is turned on. • Off: The computer is turned off or in hibernation mode. • Blinking: The computer is in sleep mode. Chapter 1.
Bottom Figure 7. Bottom view 1. Novo button hole Press the Novo button to open the Novo Button menu. From the menu, you can choose to open the UEFI/BIOS setup utility, the Boot menu, or the Windows startup options screen. 2. Ventilation slots (inlet) Maintain the incoming airflow to dissipate internal heat. Attention: Do not block the ventilation slots. Otherwise, the computer may overheat.
Features and specifications Dimensions • Yoga 7 14ITL5 – Width: 320.4 mm (12.61 inches) – Depth: 214.6 mm (8.44 inches) – Thickness – Thickest: 15.68 mm (0.61 inches) – Thinnest: 17.7 mm (0.69 inches) • Yoga 7 15ITL5 – Width: 356.46 mm (14.03 inches) – Depth: 235.65 mm (9.27 inches) – Thickness – Thickest: 17.97 mm (0.70 inches) – Thinnest: 19.25 mm (0.75 inches) ac power adapter • Input: 100 V ac–240 V ac, 50 Hz–60 Hz • Output: 20 V dc, 3.
Keyboard • Function keys • Hotkeys • Numeric keypad * • Keyboard backlight Connectors and slots • Combo audio jack • USB Type-A connector * • USB Type-A connector (with Always-On function) • USB-C connector × 2 – Support data transfer rates up to 40 Gbps for USB4 – Support data transfer rates up to 40 Gbps for Thunderbolt 4 – Support DisplayPort Security features • Fingerprint reader • UEFI/BIOS passwords – Administrator password – User password – Master hard disk password – User hard disk password Wi
Temperature • At altitudes up to 2438 m (8000 ft) – Operating: 5°C to 35°C (41°F to 95°F) – Storage: 5°C to 43°C (41°F to 109°F) • At altitudes above 2438 m (8000 ft) – Maximum temperature when operating under the unpressurized condition: 31.3°C (88°F) Note: When you charge the battery, its temperature must be no lower than 10°C (50°F). Relative humidity • Operating: 8% to 95% at wet-bulb temperature 23°C (73°F) • Storage: 5% to 95% at wet-bulb temperature 27°C (81°F) Chapter 1.
10 User Guide
Chapter 2. Get started with your computer Get started with Windows 10 Learn the basics of Windows 10 and start working with it right away. For more information about Windows 10, see the Windows help information. Windows account You must create at least one account to use the Windows operating system. It can be either a local account or a Microsoft account. Local accounts A local account is created on a particular Windows-enabled device and it can only be used on that device.
Note: To add family members, you need to sign in with a Microsoft account. Step 3. Set the user name and password for the user account. Set up face recognition If your computer includes a Windows Hello-compatible infrared camera, you can set up face recognition to sign in with your face. Step 1. Open the Start menu and select Settings ➙ Accounts ➙ Sign-in options. Note: If you are using a local account, the account must be password protected. Otherwise, you cannot set face recognition. Step 2.
Windows desktop 1. Account Change account settings, lock the computer, or sign out of the current account. 2. Documents Open the Documents folder, a default folder to save your received files. 3. Pictures Open the Pictures folder, a default folder to save your received pictures. 4. Settings Open Settings. 5. Power Shut down, restart, or put the computer into sleep mode. 6. Start button Open the Start menu. 7.
Open Control Panel • Open the Start menu and select Windows System ➙ Control Panel. • Use Windows Search. Open an app • Open the Start menu and select the app you want to open. • Use Windows Search. Windows Updates Microsoft periodically releases feature and security updates to the Windows operating system. Updates that are applicable to your version of Windows are downloaded automatically when your computer is connected to the Internet.
Connect to Wi-Fi networks If your computer includes a wireless LAN module, you can connect your computer to Wi-Fi® networks. The wireless LAN module on your computer may support different standards. For some countries or regions, use of 802.11ax may be disabled according to local regulations. Step 1. Click the network icon in the Windows notification area. A list of nearby networks is displayed. Note: If no network is displayed, check to ensure that the airplane mode is not turned on. Step 2.
Step 2. Open the LCD screen and press the Novo button. Note: Alternatively, turn off the computer. Press Fn and the power button to open the Novo Button menu. Yoga modes The screen of your computer can open up to an angle of 360 degrees, enabling you to use your computer for different purposes.
Mode Suitable for Tent mode Watching movies Tablet mode Playing touch-enabled games Turn on screen rotation lock In stand, tent, or tablet mode, auto rotation is turned on so that the orientation of the screen changes based on how you place or hold the computer. However, you can turn on rotation lock to keep the screen in a fixed orientation. Step 1. Select the action center icon in the Windows notification area. Step 2. Select the Rotation lock icon to turn it on.
Turn on or off tablet mode Windows 10 provides the tablet mode that makes touch operations more friendly. When rotating your computer screen to switch to tablet, stand, or tent mode, you will be prompted to switch to Windows tablet mode. You can also manually turn on or off Windows tablet mode. Step 1. Select the action center icon in the Windows notification area. Step 2. Select the Tablet mode icon to turn it on or off.
Hotkey Function Go to the previous media file in the playlist or folder. Turn on/off or adjust the brightness of the keyboard backlight. Note: This hotkey must be used with the Fn key. Hotkey mode Some hotkeys share keys with function keys (F1 to F12). The hotkey mode is a UEFI/BIOS setting that changes how hotkeys (or function keys) are used. Hotkey mode setting How to use hotkeys How to use function keys Disabled Hold down the Fn key and press one of the hotkeys. Press the function keys directly.
Tap and hold Open a shortcut menu. Slide Scroll through items, such as lists, pages, and photos. Drag an item to the location you want Move an object. Move two fingers closer together Zoom out. Move two fingers farther apart Zoom in. Swipe in from the right edge Open the action center to see your notifications and quick actions.
Swipe in from the left edge View all your open windows in task view. • Swipe downwards shortly from the top edge (for full-screened app or when your computer is in the tablet mode) Show a hidden title bar. • Swipe in from the top edge to the bottom edge (when your computer is in the tablet mode) Close the current app. Chapter 2.
22 User Guide
Chapter 3. Explore your computer Manage power Use the information in this section to achieve the best balance between performance and power efficiency. Check the battery status The battery status icon or is in the Windows notification area. You can check the battery status, view the current power plan, and access battery settings quickly. Click the battery status icon to display the percentage of battery power remaining and change the power mode. A warning message is displayed when the battery is low.
Change or create a power plan A power plan is a set of power saving settings. You can choose a pre-defined power plan or you can create your own plans. Step 1. Right-click the battery status icon in the Windows notification area. Step 2. Select Power Options ➙ Change plan settings. Set performance mode Your computer can work in different performance modes. The performance and power consumption of the computer vary in different performance modes. Press Fn + Q to cycle through different performance modes.
Step 1. Open the UEFI/BIOS setup utility. Step 2. Select Configuration ➙ Always On USB and press Enter. Step 3. Change the setting to Disabled or Enabled. Step 4. Select Exit ➙ Exit Saving Changes. Set passwords in UEFI/BIOS setup utility This section introduces the types of passwords that you can set in the UEFI (Unified Extensible Firmware Interface) or BIOS (Basic Input/Output System) setup utility. Password types You can set various types of passwords in the UEFI/BIOS setup utility.
Step 1. Open the UEFI/BIOS setup utility using the administrator password. Step 2. Select Security ➙ Set Administrator Password and press Enter. Step 3. Enter the current password. Step 4. In the Enter New Password text box, enter the new password. Step 5. In the Confirm New Password text box, enter the new password again. Note: If you want to remove the password, press Enter in both text boxes without entering any character. Step 6. Select Exit ➙ Exit Saving Changes.
Note: If you start the setup utility using the user password, you cannot set hard disk password. Step 3. Follow on-screen instructions to set both master and user passwords. Note: The master and user hard disk passwords must be set at the same time. Step 4. Select Exit ➙ Exit Saving Changes. If the hard disk password is set, you must provide the correct password to start the operating system. Change or remove hard disk password Step 1. Open the UEFI/BIOS setup utility. Step 2. Select Security.
System Restore creates restore points: • automatically (when it detects changes to Windows system files) • at regular intervals (if set up by the user) • at any time (if initiated manually by the user) Note: In order for System Restore to create restore points, system protection must be turned on for the system drive. Create a system restore point manually You can use Windows System Restore to create a restore point at any time. Step 1.
Attention: Previous files on the drive will be deleted. Back up personal files before using it to create a recovery drive. When the recovery drive is created, you may see a Delete the recovery partition from your PC option. If you want to free up drive space on your computer, select it and then select Delete. Otherwise, select Finish. Use a recovery drive to restore or reset Windows If Windows cannot start, you can use a recovery drive (created in advance) to restore or reset Windows. Step 1.
30 User Guide
Chapter 4. Help and support Frequently asked questions How do I open the Control Panel? • Open the Start menu and select Windows System ➙ Control Panel. • Use Windows Search. How should I turn off my computer? Open the Start menu and select Power ➙ Shut down. How do I partition my storage drive? Refer to https://support.lenovo.com/solutions/ht503851 What should I do if my computer stops responding. Press and hold the power button until the computer turns off. Then restart the computer. 1.
Resources How to access? Lenovo Support Web site with the latest support information of the following: • Drivers and software • Diagnostic solutions Visit https://support.lenovo.com • Product and service warranty • Product and parts details • Knowledge base and frequently asked questions • Open the Start menu and select Get Help or Tips. • Use Windows Search or the Cortana® personal assistant. Windows help information • Microsoft support Web site: https:// support.microsoft.
Call Lenovo If you have tried to correct the problem yourself and still need help, you can call Lenovo Customer Support Center. Before you contact Lenovo Record product information and problem details before you contact Lenovo.
Purchase additional services During and after the warranty period, you can purchase additional services from Lenovo at https:// www.lenovo.com/services. Service availability and service name might vary by country or region.
Appendix A. Important safety information Safety notices This information can help you safely use your computer. Follow and retain all information included with your computer. The information in this document does not alter the terms of your purchase agreement or the Limited Warranty. For more information, see "Warranty Information" in the Safety and Warranty Guide that comes with your computer. Customer safety is important. Our products are developed to be safe and effective.
Protect yourself from the heat generated by the ac power adapter. When the ac power adapter is connected to an electrical outlet and your computer, it generates heat. Extended contact with your body, even through clothing, may cause a skin burn. • Do not place the ac power adapter in contact with any part of your body while it is in use. • Never use it to warm your body. • Do not wrap the cords around the ac power adapter while in use. Prevent your computer from getting wet.
Handle your computer gently. Do not drop, bump, scratch, twist, hit, vibrate, push, or place heavy objects on your computer, display, or external devices. Carry your computer carefully. • Use a quality carrying case that provides adequate cushioning and protection. • Do not pack your computer in a tightly packed suitcase or bag. • Before putting your computer in a carrying case, make sure that it is off, in sleep mode, or in hibernation mode.
• Power cords, plugs, power adapters, extension cords, surge protectors, or power supplies that are cracked, broken, or damaged. • Signs of overheating, smoke, sparks, or fire. • Damage to a battery (such as cracks, dents, or creases), discharge from a battery, or a buildup of foreign substances on the battery. • A cracking, hissing, or popping sound, or strong odor that comes from the product.
When replacing CRUs, be cautious of sharp edges or corners that might cause injury. If you suffer an injury, seek medical care immediately. Power cords and power adapters DANGER Use only the power cords and power adapters supplied by the product manufacturer. The power cords shall be safety approved. For Germany, it shall be H03VV-F, 3G, 0.75 mm2, or better. For other countries, the suitable types shall be used accordingly. Never wrap a power cord around a power adapter or other object.
Plugs and outlets DANGER If a receptacle (power outlet) that you intend to use with your computer equipment appears to be damaged or corroded, do not use the outlet until it is replaced by a qualified electrician. Do not bend or modify the plug. If the plug is damaged, contact the manufacturer to obtain a replacement.
General battery notice DANGER Batteries supplied by Lenovo for use with your product have been tested for compatibility and should only be replaced with approved parts. A battery other than the one specified by Lenovo, or a disassembled or modified battery is not covered by the warranty. Battery abuse or mishandling can cause overheating, liquid leakage, or an explosion. To avoid possible injury, follow these instructions: • Do not open, disassemble, or service any battery.
Lithium coin-cell battery notice DANGER Danger of explosion if battery is incorrectly replaced. If the coin-cell battery is not a CRU, do not attempt to replace the coin-cell battery. Replacement of the battery must be done by a Lenovo-authorized repair facility or technician. The Lenovo-authorized repair facilities or technicians recycle Lenovo batteries according to local laws and regulations.
This device is classified as a Class 1 laser product per EN/IEC 60825-1:2014. This device complies with FDA performance standards for laser products except for conformance with IEC 60825-1 Ed. 3, as described in Laser Notice No. 56, dated May 8, 2019. CAUTION: This device contains a laser that could be damaged during repair or disassembly, which could result in hazardous exposure to infrared laser emissions. There are no user serviceable parts with the device.
Electrical current safety information DANGER Electric current from power, telephone, and communication cables is hazardous. To avoid a shock hazard: • Do not use your computer during a lightning storm. • Do not connect or disconnect any cables or perform installation, maintenance, or reconfiguration of this product during an electrical storm. • Connect all power cords to a properly wired and grounded electrical outlet. • Connect properly wired outlets to any equipment that will be attached to this product.
Laser safety information CAUTION: When laser products (such as CD-ROMs, DVD drives, fiber optic devices, or transmitters) are installed, note the following: • Do not remove the covers. Removing the covers of the laser product could result in exposure to hazardous laser radiation. There are no serviceable parts inside the device. • Use of controls or adjustments or performance of procedures other than those specified herein might result in hazardous radiation exposure.
Choking hazard notice CHOKING HAZARD – Product contains small parts. Keep away from children under three years. Plastic bag notice DANGER Plastic bags can be dangerous. Keep plastic bags away from babies and children to avoid danger of suffocation. Glass parts notice CAUTION: Some parts of your product may be made of glass. This glass could break if the product is dropped on a hard surface or receives a substantial impact. If glass breaks, do not touch or attempt to remove it.
Appendix B. Accessibility and ergonomic information This chapter provides information about accessibility and ergonomics. Accessibility information Lenovo is committed to providing users who have hearing, vision, and mobility limitations with greater access to information and technology. This section provides information about the ways these users can get the most out of their computer experience. You also can get the most up-to-date accessibility information from the following Web site: https://www.
keyboard with all the standard keys. You can select keys using the mouse or another pointing device, or you can tap to select the keys if your computer supports multi-touch screen. • High Contrast High Contrast is a feature that heightens the color contrast of some text and images on your screen. As a result, those items are more distinct and easier to identify. • Personalized keyboard Adjust keyboard settings to make your keyboard easier to use.
– Change the size of all the items on your screen. 1. Right-click a blank area on the desktop and then click Display settings ➙ Display. 2. Change the item size by following the on-screen instructions. For some applications, your configuration might not take effect until you sign out and then sign in again. – Change the size of the items on a Web page. Press and hold Ctrl, and then press the plus-sign key (+) to enlarge or the minus-sign key (–) to reduce the text size.
Display: Position the display to maintain a comfortable viewing distance of 510 mm to 760 mm (20 inches to 30 inches). Avoid glare or reflections on the display from overhead lighting or outside sources of light. Keep the display screen clean and set the brightness to levels that enable you to see the screen clearly. Press the brightness control keys to adjust display brightness. Head position: Keep your head and neck in a comfortable and neutral (vertical, or upright) position.
Appendix C. Compliance information This appendix provides the various compliance statements for Lenovo products. Radio frequency compliance statements Computer models equipped with wireless communications comply with the radio frequency and safety standards of any country or region in which it has been approved for wireless use. Besides this document, ensure that you read the Regulatory Notice for your country or region before using the wireless devices contained in your computer.
Yoga 7i (15″, 5) Brazil Este equipamento não tem direito à proteção contra interferência prejudicial e não pode causar interferência em sistemas devidamente autorizados. This equipment is not protected against harmful interference and may not cause interference with duly authorized systems.
Korea 무선설비 전파 혼신 (사용주파수 2400∼2483.5 , 5725∼5825 무선제품해당) 해당 무선설비가 전파혼신 가능성이 있으므로 인명안전과 관련된 서비스는 할 수 없음 SAR 정보 본 장치는 전파 노출에 대한 가이드라인을 충족합니다. 본 장치는 무선 송수신기 입니다. 본 장치는 국제 가이드라인으로 권장되는 전파 노출에 대한 제한을 초과하지 않도록 설계되었습니다. 장치 액세서리 및 최신 부품을 사용할 경우 SAR 값이 달라질 수 있 습니다. SAR 값은 국가 보고 및 테스트 요구 사항과 네트워크 대역에 따라 다를 수 있습니다. 본 장치 는 사람의 신체에서 20mm 이상의 거리에서 사용할 수 있습니다. Environmental information by countries and regions This section provides environmental, recycling, and RoHS information about Lenovo products.
For additional WEEE information, go to: https://www.lenovo.com/recycling WEEE information for Hungary Lenovo, as a producer, bears the cost incurred in connection with the fulfillment of Lenovo’s obligations under Hungary Law No. 197/2014 (VIII.1.) subsections (1)-(5) of section 12.
Recycling information for Brazil Declarações de Reciclagem no Brasil Descarte de um Produto Lenovo Fora de Uso Equipamentos elétricos e eletrônicos não devem ser descartados em lixo comum, mas enviados à pontos de coleta, autorizados pelo fabricante do produto para que sejam encaminhados e processados por empresas especializadas no manuseio de resíduos industriais, devidamente certificadas pelos orgãos ambientais, de acordo com a legislação local.
Disposing of battery packs from Lenovo products Your Lenovo device might contain a lithium-ion battery pack or a nickel metal hydride battery pack. You can find details on the battery pack in the product documentation. If you need to dispose of a battery pack, insulate it with vinyl tape, contact Lenovo sales, service, or your place of purchase, or a waste-disposal operator, and follow their instructions. You also can refer to the instructions provided in the user guide for your product.
Ukraine Цим підтверджуємо, що продукція Леново відповідає вимогам нормативних актів України, які обмежують вміст небезпечних речовин Mainland China 为满足中国电子电器产品有害物质限制相关的法律法规和其他要求,联想公司对本产品中有害物质按部件分 类,声明如下。 Table 1.
Taiwan 單元Unit 限用物質及其化學符號 Restricted substances and its chemical symbols 鉛Lead (Pb) 汞 Mercury (Hg) 鎘 Cadmiu m (Cd) 六價鉻 Hexavalent chromium (Cr +6) 多溴聯苯 Polybrominated biphenyls (PBB) 多溴二苯醚 Polybrominated diphenyl ethers (PBDE) 外殼 - ○ ○ ○ ○ ○ 電路板組件 - ○ ○ ○ ○ ○ 機械部件 - ○ ○ ○ ○ ○ 顯示螢幕 - ○ ○ ○ ○ ○ 電源供應器 - ○ ○ ○ ○ ○ 儲存裝置 - ○ ○ ○ ○ ○ 輸入裝置 - ○ ○ ○ ○ ○ 配件 - ○ ○ ○ ○ ○ 備考1. “超出0.1 wt %”及“超出0.01 wt %”係指限用物質之百分比含量超出百分比含量基準值。 Note 1:"Exceeding 0.
Model name Machine type (MT) Yoga 7 14ITL5 82BH Yoga 7 15ITL5 82BJ This equipment has been tested and found to comply with the limits for a Class B digital device, pursuant to Part 15 of the FCC Rules. These limits are designed to provide reasonable protection against harmful interference in a residential installation.
EU ErP (EcoDesign) Directive (2009/125/EC)–external power adapters (Regulation (EU) 2019/1782) Lenovo products are designed to work with a range of compatible power adapters. Access https:// www.lenovo.com/us/en/compliance/eu-doc to view the compatible power adapters. For the detailed power adapter specifications for your computer, go to https://support.lenovo.com.
TCO Certified Selected models are TCO Certified and bear the TCO Certified logo. Note: TCO Certified is an international third-party sustainability certification for IT products. For details, go to https://www.lenovo.com/us/en/pdf/social_responsibility/tco_certified.pdf. Export classification notice This product is subject to the United States Export Administration Regulations (EAR) and has an Export Classification Control Number (ECCN) of 5A992.c.
Brazil audio notice Ouvir sons com mais de 85 decibéis por longos períodos pode provocar danos ao sistema auditivo. ENERGY STAR ENERGY STAR is a joint program of the U.S. Environmental Protection Agency and the U.S. Department of Energy aimed at saving money and protecting the environment through energy efficient products and practices. Lenovo is proud to offer products with the ENERGY STAR certified designation.
Appendix D. Notices and trademarks Notices Lenovo may not offer the products, services, or features discussed in this document in all countries. Consult your local Lenovo representative for information on the products and services currently available in your area. Any reference to a Lenovo product, program, or service is not intended to state or imply that only that Lenovo product, program, or service may be used.
Any performance data contained herein was determined in a controlled environment. Therefore, the result obtained in other operating environments may vary significantly. Some measurements may have been made on development-level systems and there is no guarantee that these measurements will be the same on generally available systems. Furthermore, some measurements may have been estimated through extrapolation. Actual results may vary.