
Intel Technical Advisory

This Technical Advisory describes an issue which may or may not affect the customer’s product
Intel Technical Advisory TA-0935-1
5200 NE Elam Young Parkway
Hillsboro, OR 97124
June 29, 2009
Careful Removal and Installation of Thermal Solution Required
Information in this document is provided in connection with Intel products. No license, express or implied, by estoppel or otherwise, to
any intellectual property rights is granted by this document. Except as provided in Intel's Terms and Conditions of Sale for such
products, Intel assumes no liability whatsoever, and Intel disclaims any express or implied warranty, relating to sale and/or use of Intel
products including liability or warranties relating to fitness for a particular purpose, merchantability, or infringement of any patent,
copyright or other intellectual property right. Intel products are not intended for use in medical, life saving, or life sustaining
applications. Intel may make changes to specifications and product descriptions at any time, without notice. The “Product Affected”
may contain design defects or errors known as errata which may cause the product to deviate from published specifications. Current
characterized errata are available on request.
Products Affected
SE22554 / SE24717
MFS5520VI / MFS5520VIB
BB5500BC / S5500BC / SR1630BC
BBS5500WB / BBS5500WB12V / S5500WB/ S5500WB12V
BB5500HCV / BB5520HC / BB5520SC / S5500HCV / S5520HC/ S5520SC
BB5520UR / SR1600UR / SR1600URHS / SR1625UR / SR1625URSAS / SR2600URBRP / SR2600URLX
/SR2625URBRP / SR2625URLX / SR2625URSAS
Description
Improper removal and installation of the heatsink can break screws during the integration of the server platforms.
Please review this information before performing any system integration and perform the steps outlined below for
installation and removal of the heatsink, to avoid damage.
Corrective Action / Resolution
CAUTION: The heatsink screw installation must be done at low Revolutions Per Minute (RPM). Use of Power drivers is
not recommended.
Removing the Heatsink
To remove the heatsink, follow these steps:
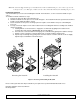
1. Loosen the four captive screws on the heatsink corners in a diagonal manner according to the numbers shown
in Figure 1 as follows:
a. Starting with the screw at location 1, loosen it by giving it two rotations in the anticlockwise direction and
stop. (IMPORTANT: Do not fully loosen.)
b. Proceed to the screw at location 2 and loosen it by giving it two rotations and stop.
c. Loosen screws at locations 3 and 4 by giving each screw two rotations and then stop.
d. Repeat steps 1a through 1c by giving each screw two rotations each time until all screws are loosened.
2. Lift the heatsink from the board.
3. Remove and discard the spacer (see letter “C” in Figure 1).