
Operation Manual


En
5
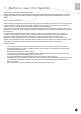
3.1 INSPECTION
Open the packaging box, check if all accessories are in the box according to the packing list, and if the device
has any visible damage, please contact the agent.
3.2 OPERATING VOLTAGE
Do not connect AC power until you have veried that the line voltage is correct and the proper fuses are
installed. The device’s power supply is tted with a wide-ranging power supply. It is suitable for supply voltages
of 100-240 Vac -10% +6% at 50/60 Hz nominal. Be sure the supply voltage is within the specied range.
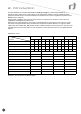
POWER REQUIREMENT
Input voltage 90-250 Vrms auto select
Frequency 47 to 63 Hz
Power 50 VA max. / 30 VA typical.
Current 110 V/0.27A or 240 V/0.125A typical
3.3 THE FUSES
The recognized recommended fuses are size 5 by 20 mm, rate T 2.0A, 250 V (UL and IEC approved).
The line fuse is housed in a small container besides the power connector on the rear panel. To check the fuse,
insert the tip of a screwdriver in the slot at the middle of the container and pry gently to extend the fuse where
there is a little tap and pull out the fuse gently. The fuse is attached to the line module and cannot be removed.
3.4 CONNECTING UP THE DEVICE
Always use the specied cables supplied for signal integrity and compliance with EMC requirements.
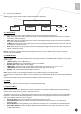
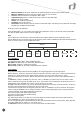
The rear panel is directly related to the input and output options tted. Below gure shows a typical rear panel.
MANAGEMENT
1. LAN port for software update
ASI OUT22. Group2 ASI output port (one for back-up)
ASI OUT13. Group1 ASI output port (one for back-up)
ASI2 IN4. ASI2 input port
SDI25. SDI2 output port
SDI16. SDI1 output port
HDMI7. HDMI output port
CVBS8. CVBS BNC output port
CVBS9. CVBS RCA output port
L-Audio-R210. Group2 RCA audio output port
AUDIO211. AES/EBU and Balance Audio output port1 (need to use the RS232-to-XRL converting
cable in accessories)
GND12. Grounding terminal
Power Socket13. AC 90~250V 50-60Hz input
Switch14. Power switch
TS/IP IP15. input/output port
RS-23216. serial port for printing information
ASI1 IN17. ASI1 input port
YPbPr18. YPbPr output port
3. Installation
1 2 3 4 5 6 7 8 9 1 0 1 1 12 13 14
15 16 17 18 19 20 21 22