
Owner's manual


3
QUICKSTART GUIDE (ENGLISH)
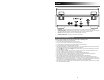
BOX CONTENTS
Make sure that the items
listed below are included in
the box:
• CD DIRECT
• EZ Vinyl Software Disc
• Software Quickstart
Guide
• USB Cable
• Quickstart Guide
• Safety Instructions & Warranty Information Booklet
READ SAFETY INSTRUCTION BOOKLET BEFORE USING THE PRODUCT
INTRODUCTION
CD DIRECT easily converts your treasured vinyl records and external audio sources to CD. CD DIRECT can also
connect to a computer through its USB port. We have included two software packages to aid you in converting your
vinyl recordings. You should install one of the following applications to take advantage of computer recording:
• EZ Vinyl/Tape Converter (PC only) is the quickest and easiest way to turn your recordings into digital media.
EZ Vinyl/Tape Converter conveniently saves your recordings in your iTunes* library. Novice users may find this
application preferable. We have included a handy Software Quickstart Guide with step-by-step instructions on
software installation and operation.
• EZ Audio Converter (Mac only) is a basic converter application for Mac OS X and is ideal for novice users.
Please refer to the included Software Quickstart Guide for step-by-step instructions on software installation and
operation.
To install the software: simply insert the included CD into your computer and follow the on-screen instructions. After
you finish converting your vinyl, you can then burn to CD or load onto portable media devices.
Visit http://www.ionaudio.com/computer-optimization
for more information on optimizing your computer for audio.
* iTunes is a trademark of Apple, Inc., registered in the U.S.A. and other countries.
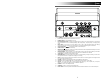
Windows Vista and Windows 7 Audio Setup:
Once the EZ Converter software is installed on your computer, connect the CD DIRECT to an available USB
port on your computer using the included USB cable.
1. Click the Windows Start button in the lower-left of your screen, and select Control Panel.
2. Double-click Hardware and Sound.
3. Double-click Sound.
4. Select the Playback tab. Choose your computer’s soundcard (such as Speakers – High Definition
Audio Device or Headphones – High Definition Audio Device. Some common PC soundcard
names are Realtek, Soundmax, and Sigmatel.
5. Click Set Default.
6. Select the Recording tab at the top of the Sound Control Panel window. Under Recording, choose
Microphone – USB Audio Codec as the default device.
7. Click Set Default.
8. Select the Advanced tab.
9. Set the Default Format setting to 2-channel, 16 bit 44100 Hz (CD Quality).
10. Un-check the two boxes listed under Exclusive Mode. Then Click Apply.
11. Select the Levels tab from the top of the window.
12. Under Levels, set the level slider to 5.
13. Click Apply, and then click Ok to close the window.
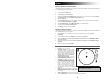
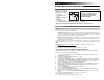
ATTENTION:
Before using the turntable, loosen
the "transport screw" (at the far end
of the platter, near the tonearm) by
turning it CLOCKWISE.