
Owner's manual


4
Windows XP Audio Setup Procedure:
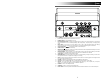
Once the EZ Converter is installed on your computer, connect the CD DIRECT using the included USB cable
to an available USB port on your computer.
1. Select the Windows Start menu.
2. Select Settings then Control Panel.
3. Double-click the Sounds and Audio Devices control panel. If you do not see a choice called Sounds
and Audio Devices, choose the Switch to Classic View option.
4. Select the Audio tab.
5. Under Sound Playback, choose your computer’s internal soundcard. Some common PC soundcard
names are Realtek, Soundmax, and Sigmatel.
6. Under Sound Recording, select USB Audio Codec for your default device.
7. Check the box titled Use only default devices.
8. Click Apply (if possible), and then click OK.
Mac Audio Setup Procedure:
Once the EZ Converter is installed on your computer, connect the CD DIRECT using the included USB cable
to an available USB port on your computer.
1. Click the Apple icon in the upper-left corner of your computer screen and choose System
Preferences.
2. In the window that opens, under Hardware, click the item labeled Sound.
3. Click on the Input tab. Underneath Choose a device for sound input, select USB AUDIO CODEC (or
USB AUDIO DEVICE).
4. Click on the Outputs tab. Underneath Choose a device for sound input, select Headphones (Built-
in Output).
5. Close the system preferences Window.
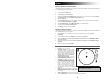
TOP PANEL
1. PLATTER – Place your record here.
2. TRANSPORT SCREW – Secures the platter
and tonearm assembly to prevent damage
during transport. If you transport the turntable,
tighten the screw to re-secure the platter and
tonearm assembly. Before first using the
turntable, please turn the TRANSPORT
SCREW clockwise to loosen it.
3. 45 RPM ADAPTER HOLDER – Holds the
included 45 RPM adapter. When not using the
adapter, please place it in this holder.
4. TONEARM – CD DIRECT comes with a ready
to use pre-balanced TONEARM and cartridge.
The TONEARM can be raised and lowered by
hand, or by pressing the RAISE / LOWER
LEVER. Please note that the TONEARM
needs to be moved away from its resting
position (on the ARM CLIP) for the turntable
motor to activate. When the TONEARM is
placed back in its resting position, the turntable motor
will deactivate.
5. ARM CLIP – This specially designed arm clip secures
the tone arm while at rest or when not in use. The arm
clip has been designed to remain in the up position
while unlocked.
6. RAISE / LOWER LEVER – Raises and lowers the tonearm.
7. 33 / 45 / 78 RPM SWITCH – This switch controls the RPM of the turntable platter.
2
1
3
6
5
4
7
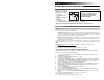
Remove the plastic cartridge cover (needle cover)
before operating the turntable.