
Owner's manual


5
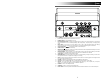
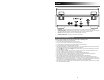
FRONT PANEL
1. LCD – Displays information about CD DIRECT's functions.
2. POWER ON/OFF – Turns CD DIRECT on or off.
3. PLAY MODE SELECTORS – Selects what media format you want to use. Press this button to cycle through
and set CD DIRECT to be in turntable (PHONO), LINE IN jack (AUX), computer (USB), or CD player (CD)
mode.
4. MUSIC SKIP – Press one of these buttons once to skip to the previous/next track when playing
music from a CD. Press and hold one of these buttons to scan back/forward through the current track.
5. STOP/PLAY/PAUSE f – Controls the operation of the CD transport.
6. OPEN/CLOSE s
– Opens/closes the CD tray.
7. MANUAL/AUTO – Selects the volume level (in dB) at which tracks will be separated automatically or the track
can be manually separated using this button.
8. FINALIZE/ ERASE – Press this button once to either finalize a CD (you will not be able to add any more tracks
to a finalized CD) or double press the button to erase one track or all tracks from a CD-RW.
9. TRACK SPLIT – Creates a new track while recording.
10. ENTER/RECORD – Press the left side of this button to confirm recording, erasing or finalizing of a CD. Press
the right side of this button to prepare the CD player for recording.
11. LEVEL – Adjusts the signal level being recorded to CD as well as the incoming signal sent through the USB
port, the Line input and the Aux input.
12. VOLUME – Adjusts the internal speaker volume and headphone output volume.
13. CD TRAY – Use the OPEN/CLOSE button to open/close the tray and place your disc here.
14. LINE IN – Use a 1/8" stereo cable to connect another audio device (e.g., iPod, computer, etc.) to this jack,
allowing you to record and/or play it through CD DIRECT's speakers.
15. PHONES – Connect 1/8" headphones here.
16. SPEAKER – Listen to your music source through here.
17. DUST COVER – This cover protects the turntable from dust and abuse while not in use or while in transport.
1
2
3 4
5
6
7
8
9
10
11
17
12
13
14
15
16
16