
Owner's manual


6
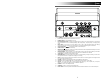
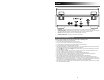
BACK PANEL
1. USB PORT – Connect a USB cable from the CD DIRECT to a computer to record or listen to audio.
2. GAIN ADJUSTMENT – Before recording through a USB connection, use this knob to adjust the recording gain.
The level should be high enough so that the loudest part of the song does not distort or "clip".
3. AUX OUT – RCA Audio outputs to connect to external speakers or an amp.
4. POWER CONNECTION – The built-in power cable is located here.
BEFORE RECORDING TO CD
Before you start recording, make sure that you understand the following points:
• CD specifications limit the number of tracks to 99.
• You can not create recording tracks shorter than 10 seconds.
• Once you have recorded on a CD-R disc, the data cannot be erased.
• A recorded CD-R can be played back in a regular CD player only after finalizing.
• To add more recordings to a finalized CD-RW, unfinalize it.
• When all available space on a CD-RW has been recorded, you can record additional tracks by erasing previously
recorded tracks. Note that you can only erase all tracks or the last track.
• If the STOP button or PLAY/PAUSE f button is pressed within 10 seconds from the beginning of recording,
the unit will not stop recording.
• When the recording is finished, “REC” and “- ENd –“ blink for a few seconds, and the unit then goes into stop
mode. Do not apply any shock or vibration to the unit during blinking.
• If the disc reaches the end during recording, the unit will automatically finalize the disc.
• If the disc reaches the end of the 99th track during recording, the unit will finalize the disc automatically.
• The recording time of a track may differ slightly from the original source.
• When a partially recorded disc is inserted, recording will begin after the last recorded track.
• The AUTO REC function automatically separates tracks when it detects the volume level (in dB) set by the
MANUAL/AUTO button. When using this function, your CD may have more or fewer tracks than its source due to
unexpected quiet or noisy parts, which may trigger -- or not trigger -- the automatic track separation in unexpected
ways. If this occurs, use the MANUAL/AUTO button to adjust the volume level appropriately.
• When the disc which was recorded by this unit is played back by some other players, a small noise may be heard
at the point that the track is divided.
1
2
3
4