
Owner's manual


7
RECORDING
Recording audio from the turntable or AUX sources on the CD recorder:
1. Press the PHONO/AUX/USB button repeatedly to select which source is to be recorded, either PHONO or
AUX.
2. Press the OPEN/CLOSE s button and place a recordable CD-R or CD-RW disc into the disc tray with the
printed label side up, and then press the OPEN/CLOSE s
button to close the disc tray.
Note: Make sure “NO TOC” and “CD-R” (or “CD-RW“) indicators lights on the display, or the RECORD
button will not work.
3. Select the mode of track number assignment using the MANUAL/AUTO REC button. When the
MANUAL/AUTO REC button is pressed once, the current mode is displayed. Press the MANUAL/AUTO REC
button repeatedly to select any other mode.
• (MANUAL)
In this mode track numbers are not given automatically. Use the TRACK SPLIT button to divide tracks.
MANUAL is recommended for recording an analog source such as a record. The settings will be reset to
“Manual” when the unit is powered off.
• –20db, –30db or –40db (AUTO REC)
In this mode the unit will automatically insert a track division in the recorded material when the sound
level has dropped below the threshold for more than 2 seconds, and sound has re-started. “–20db”
requires a louder signal to trigger the track increment. “–30db” means that a relatively quiet signal will
trigger the track increment. “–40db” is suitable for recording a noiseless source such as a CD. When
recording from a source with unwanted noise or an analog source in auto track setting, more track
numbers may be assigned than actual tracks recorded. In this case, use the “Manual” setting and press
the TRACK SPLIT button to assign the track numbers at the points that you want.
• AUTO REC may not work properly with analog sources that contain low-level noises.
AUTO REC may not work properly with some genres (classical musical, spoken word, etc.) that have
extended periods of silence within a single track.
• The AUTO TRACK indicator lights when –20dB, –30dB or –40dB is selected.
• The default setting is MANUAL (off). When the unit is turned on or the OPEN/CLOSE button is pressed,
the setting is automatically reset to MANUAL (off).
• The MANUAL/AUTO REC button does not work during recording.
• Use of the MANUAL/AUTO REC mode is disabled when a disc is being inserted in the drive. Use of this
mode is possible when “NO TOC” is displayed.
4. Press the RECORD button. The unit will enter record pause mode. During recording, the indicator lights red.
In record pause mode, the “REC” indicator blinks and the Pause indicator lights on the display.
• Button presses will not work while “bUSY” is displayed. Wait about 10 seconds until “bUSY” disappears
from the display.
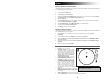
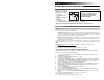
5. Adjusting the recording level. Once the Record button has
been pressed, play the source to be recorded as a test to
adjust the recording level so that the loudest sound does not
exceed the “OVER” indicator on the level meter. The level can
be adjusted from –8 (–12dB) to +8(+12dB).
• The default setting is 0. Every time the recording is
finished, the setting is automatically reset to 0.
• Different sources (Phono, Line In, CD) have different
volumes.
In order to record at the optimal volume for
different sources, it is necessary to adjust the recording
level for each source. Adjust the recording level so that
the loudest sound does not exceed the “OVER”
indicator on the level meter.
LCD while recording