Quickstart Guide English ( 3 – 9 ) Guía de inicio rápido Español ( 10 – 17 ) Guide d’utilisation rapide Français ( 18 – 25 ) Guida rapida Italiano ( 26 – 33 ) Schnellstart-Anleitung Deutsch ( 34 – 41 ) Snelstartgids Nederlands ( 42 – 49 ) Appendix English ( 50 )
Quickstart Guide (English) Introduction Thank you for purchasing Game Day Lights. At ION, your entertainment is as important to us as it is to you. That’s why we design our products with one thing in mind—to make your life more fun and more convenient. Note: Before you first use the product, please fully charge the battery. Your unit was purposely shipped with a reduced battery charge to ensure safe transit.
Quick Setup Getting Started 1. Make sure all items listed in the Box Contents are included in the box. 2. READ THE SAFETY & WARRANTY MANUAL BEFORE USING THE PRODUCT. 3. MAKE SURE THE BATTERY IS COMPLETELY CHARGED PRIOR TO FIRST USE FOR MAXIMUM BATTERY LIFE. 4. Study the connection diagram. 5. Ensure the Master Volume on Game Day Lights is at zero. 6. Connect your devices. 7. Raise the volume to a comfortable level. 8. Return the Master Volume to zero when you are finished using Game Day Lights.
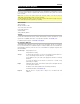
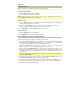
Features Front Panel Note: North America/Japan model shown here. 1 11 2 13 8 5 12 4 1 7 9 10 3 6 1. Microphone Input with Volume Control (1/4"): This mono input accepts a 1/4" (6.35 mm) audio source such as a microphone, guitar, or other musical instrument. 2. Auxiliary Input (1/8”): This stereo 3.5 mm (1/8”) input can be used to connect a CD player, MP3 player, or other audio source. 3. Bluetooth Button: Press and release the Bluetooth button to pair to a Bluetooth device.
If a front panel button is not pressed within 60 seconds, the battery level indicator will turn off (to save energy). The battery level indicator will reappear when any button is pressed. Also, when the battery gets to the lowest battery icon segment, the battery level indicator will turn back on. o • Lightning Bolt Icon: The lightning bolt icon will illuminate when the power cable is connected to wall power.
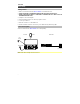
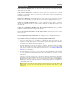
11 Rear Panel 5 12 iPA80A 1 6 1. Power Cable Input: Insert the included power cable here to charge the unit. Note that the Game Day Lights can be used with the power cable while it simultaneously charges the battery. Operation Pairing a Bluetooth Device 1. Turn on your Bluetooth device. 2. Power on Game Day Lights. Press and release the Bluetooth button to enter Bluetooth pairing mode.* 3. Navigate to your Bluetooth device’s setup screen, find Game Day Lights and connect.
Using the Radio Note: This section for use with North America/Japan models only. Selecting a Radio Station: 1. Press the Radio button to choose AM/FM. 2. Select a radio station using the –/+ buttons. Note: If there is poor AM reception, disconnect AC power for optimal AM radio reception. To further adjust AM reception, move the entire unit. Saving a preset: 1. Press the Radio button to choose AM/FM and select a radio station that you want to save to a preset location using the –/+ buttons. 2.
Troubleshooting If the unit is not charging: Make sure the power cable is properly connected to the power input and the power outlet. If the sound is distorted: Try lowering the volume control of your sound source, musical instrument, or microphone. Also, try to reduce the overall volume of Game Day Lights using the Master Volume knob. If there is too much bass: Try adjusting the tone or EQ control on your sound source to lower the bass level.
Guía de inicio rápido (Español) Introducción Gracias por comprar el Game Day Lights. En ION, su entretenimiento es tan importante para nosotros como para usted. Por eso es que diseñamos nuestros productos con una sola cosa en mente—hacer que su vida sea más divertida y cómoda. Nota: Antes de utilizar por primera vez el producto, cargue completamente la batería. Su unidad se despachó intencionalmente con una carga reducida de la batería por razones de seguridad en el tránsito.
Instalación rápida Para comenzar 1. Asegúrese de que todos los artículos indicados en Contenido de la caja estén incluidos en ella. 2. LEA EL MANUAL SOBRE LA SEGURIDAD Y LA GARANTÍA ANTES DE UTILIZAR EL PRODUCTO. 3. PARA ASEGURAR UNA MÁXIMA VIDA ÚTIL DE LA BATERÍA, ASEGÚRESE DE QUE ESTÉ COMPLETAMENTE CARGADA ANTES DE UTILIZARLA POR PRIMERA VEZ. 4. Estudie el diagrama de conexión. 5. Asegúrese de que el volumen maestro del Game Day Lights esté en cero. 6. Conecte sus dispositivos. 7.
Características Panel frontal Nota: Aquí se muestra el modelo para Norteamérica/Japón. 1 11 2 13 8 5 12 4 1 7 9 10 3 6 1. Entrada para micrófono con control de volumen (1/4 pulg.): Esta entrada mono admite una fuente de audio de 1/4" (6,35 mm) tal como un micrófono, una guitarra u otro instrumento musical. 2. Entrada auxiliar (1/8 pulg.): Esta entrada de 3,5 mm (1/8 pulg.) estéreo se puede usar para conectar un reproductor de CD, MP3 u otra fuente de audio. 3.
o Cuando el nivel de la batería sea bajo, parpadeará el segmento inferior de la batería. o Si no se pulsa ningún botón del panel delantero en los siguientes 60 segundos, el indicador de nivel de batería se apagará (para ahorrar energía). El indicador de nivel de la batería volverá a aparecer cuando se pulse algún botón. Además, c uando la batería llegue al segmento más bajo del icono de la batería, el indicador de nivel de la batería volverá a encenderse.
Panel superior 1 1. NFC: Toque ligeramente aquí su dispositivo NFC (comunicación de campo cercano) soportado y habilitado para aparear su teléfono tocando suavemente el logo de la ‘N’. 11 Panel trasero 5 12 iPA80A 1 6 1. Entrada del cavo de alimentación: Inserte aquí el cable de alimentación incluido para alimentación la unidad. Tenga en cuenta que el Game Day Lights puede funcionar con el adaptador de potencia mientras se carga simultáneamente la batería.
Cómo aparear un dispositivo Bluetooth usando NFC La tecnología NFC (comunicación de campo cercano) permite el intercambio de datos entre dispositivos, tal como el apareamiento, juntándolos suavemente. Compruebe en el manual de su dispositivo si se soporta esta característica. Cómo usar NFC para aparearse con el Game Day Lights: 1. A fin de usar NFC, su dispositivo debe estar encendido y desbloqueado. 2.
Cómo realizar el enlace estéreo entre dos altavoces Game Day Lights* Cómo enlazar dos altavoces Game Day Lights entre sí para lograr un sonido estéreo: 1. Mantenga pulsado el botón Link (enlace) en ambos altavoces para ingresar al modo de enlace estéreo. Se escuchará un tono y la palabra LINK parpadeará cuando esté en proceso de apareamiento con el segundo altavoz. Una vez establecido el enlace, la palabra LINK quedará encendida permanentemente.
Solución de problemas Si la unidad no se carga: Asegúrese de que el cable de alimentación esté conectado correctamente a la entrada de corriente y a la toma de corriente. Si el sonido está distorsionado: Pruebe bajando el control de volumen de su fuente de sonido o instrumento musical. Pruebe también reduciendo el volumen general del Game Day Lights.
Guide d'utilisation rapide (Français) Présentation Merci d’avoir fait l’acquisition de l'enceinte Game Day Lights. Chez ION, votre divertissement est aussi important pour nous qu’il l’est pour vous. C’est pourquoi nous concevons nos produits avec une seule chose en tête — rendre la vie plus amusante et plus pratique. Remarque : Veuillez vous assurer d'avoir complètement chargé la batterie du produit avant sa première utilisation.
Installation Mise en route 1. Veuillez vous assurer que tous les articles énumérés dans le Contenu de la boîte de ce guide sont inclus dans la boîte. 2. VEUILLEZ LIRE LE LIVRET DES CONSIGNES DE SÉCURITÉ ET DES INFORMATIONS SUR LA GARANTIE AVANT D'UTILISER LE PRODUIT. 3. VEUILLEZ VOUS ASSURER D'AVOIR COMPLÈTEMENT CHARGÉ LA BATTERIE AVANT LA PREMIÈRE UTILISATION AFIN D'AUGMENTER SA DURÉE DE VIE. 4. Veuillez examiner le schéma de connexion. 5.
Caractéristiques Panneau avant Remarque : Modèle nord-américain/japonais illustré. 1 11 2 13 8 5 12 4 1 7 9 10 3 6 1. Entrée microphone 6,35 mm avec commande de volume : Cette entrée mono 6,35 mm (1/4 po) permet de brancher un microphone, une guitare, ou autres instruments de musique. 2. Entrée auxiliaire 3,5 mm : Cette entrée stéréo 3,5 mm (1/8 po) permet de brancher un lecteur de disques compacts, lecteur MP3 ou autres sources audio. 3.
o Lorsque la batterie est faible, le dernier segment de l'indicateur de niveau de charge de la batterie clignote. o Lorsqu'aucune des touches du panneau avant n'est enfoncée pendant plus de 60 secondes, l'indicateur de niveau de charge de la batterie s'éteint (pour économiser de l'énergie). L'indicateur de niveau de charge de la batterie se rallume lorsqu'une des touches du panneau avant est enfoncée.
Panneau supérieur 1 1. NFC : Effleurez l’appareil doté de la fonctionnalité CCP (communication en champ proche) sur le logo « N » afin de le jumeler. Panneau arrière 11 5 2 iPA80A 1 6 1. Entrée du câble d'alimentation : Brancher le câble d'alimentation ci-inclus ici pour d'alimentation l'appareil. Sachez qu'il est possible d'utiliser le Game Day Lights tout en le rechargeant à l'aide de l'adaptateur d'alimentation. Fonctionnement Jumelage d'un périphérique Bluetooth 1.
Jumelage Bluetooth à l'aide de la technologie CCP La communication en champ proche (CCP) permet l'échange de données entre appareils, tel que le jumelage, en effleurant les appareils l'un contre l'autre. Vérifiez le guide d'utilisation de votre périphérique afin de déterminer si cette fonctionnalité est prise en charge. Jumelage de l'enceinte Game Day Lights à l'aide de la technologie CCP : 1. Afin d'utiliser la fonctionnalité CCP, le périphérique doit être activé et son écran déverrouillé. 2.
Raccordement en série de deux enceintes Game Day Lights* Raccorder deux enceintes Game Day Lights pour un son stéréo : 1. Maintenez la touche Link enfoncée pour accéder au mode de raccordement en série. Un signal sonore retentit et le mot LINK clignote durant le processus de raccordement en série. Lorsque le lien est établi, le mot LINK reste allumé. Remarque : Le processus de raccordement en série peut prendre jusqu’à une minute.
Dépannage Si l’appareil ne se recharge pas : Veuillez-vous assurer que le câble d’alimentation secteur est correctement branché à l’entrée d’alimentation et à une prise secteur. Lorsqu'il y a de la distorsion : Essayez de diminuer le volume sur l'appareil d'entrée audio ou l'instrument de musique. Essayez également de diminuer le volume de la Game Day Lights.
Guida rapida (Italiano) Introduzione Grazie per aver acquistato il Game Day Lights. Per noi di ION, il tuo divertimento è importante quanto lo è per te. Ecco perché progettiamo i nostri dispositivi con un unico obiettivo in mente: rendere la tua vita più comoda e divertente. Nota bene: prima di utilizzare per la prima volta il prodotto, ricaricare a fondo la batteria. L’apparecchio è stato appositamente spedito con una carica ridotta della batteria per garantire un trasporto sicuro.
Configurazione rapida Per iniziare 1. Assicurarsi che tutti gli elementi elencati nel paragrafo Contenuti della confezione siano contenuti nella confezione stessa. 2. LEGGERE ATTENTAMENTE IL LIBRETTO DI SICUREZZA E GARANZIA PRIMA DI UTILIZZARE IL PRODOTTO. 3. PER GARANTIRE LA MASSIMA DURATA DELLA BATTERIA, ASSICURARSI DI AVERLA CARICATA COMPLETAMENTE PRIMA DEL PRIMO UTILIZZO. 4. Studiare lo schema dei collegamenti. 5. Assicurarsi che il Volume Master del Game Day Lights sia su zero. 6.
Caratteristich Pannello anteriore Nota bene: modello per Nord America/Giappone nell’illustrazione. 1 11 2 13 8 5 12 4 1 7 9 10 3 6 1. Ingresso microfono con controllo del volume (1/4"): questo ingresso mono accetta fonti audio da 6,35 mm (1/4") quali un microfono, una chitarra o un altro strumento musicale. 2. Ingresso ausiliario (1/8"): questo ingresso stereo da 3,5 mm (1/8”) può essere utilizzato per collegare un lettore CD o altre fonti audio. 3.
8. Display: mostra la stazione radio corrente, lo stato della batteria, e lo stato del Bluetooth. • Indicatori di carica: o Quando il cavo di alimentazione è collegato, il movimento dei segmenti della batteria al livello dell'indicatore di carica indica che la batteria è in carica. o Una volta completata la ricarica, tutti i segmenti della batteria saranno accesi senza lampeggiare. o Quando la batteria è scarica, il segmento inferiore dell’indicatore lampeggia.
Pannello superiore 1 1. NFC: siforare il dispositivo NFC (comunicazione in prossimità) supportato e abilitato a questo livello per collegare il telefono premendo con delicatezza sul logo ‘N’. Pannello posteriore 11 5 12 iPA80A 1 6 1. Ingresso cavo di alimentazione: inserire il cavo di alimentazione in dotazione per alimentazione l'apparecchio. Il Game Day Lights può funzionare con il cavo di alimentazione anche durante la ricarica della batteria.
Accoppiamento di un dispositivo Bluetooth servendosi dell'NFC L'NFC (comunicazione in prossimità) consente lo scambio di dati tra dispositivi, come nell'accoppiamento, mettendoli delicatamente insieme. Verificare nel manuale del proprio dispositivo se questa funzione è supportata. Per utilizzare l'NFC per l'accoppiamento con il Game Day Lights: 1. Per utilizzare l'NFC, il dispositivo deve essere acceso e sbloccato. 2.
Collegamento stereo di due altoparlanti Game Day Lights* Per collegare due altoparlanti Game Day Lights e ottenere un suono stereo: 1. Tenere premuto il tasto Link su entrambi gli altoparlanti per entrare in modalità Stereo Link. Si sentirà un suono e la scritta LINK lampeggerà durante il collegamento al secondo altoparlante. Una volta stabilito un collegamento, la scritta LINK sarà illuminata in maniera fissa. Nota bene: il processo di collegamento può richiedere fino a un massimo di un minuto.
Risoluzione di problemi Se l’apparecchio non si ricarica: assicurarsi che il cavo di alimentazione sia collegato adeguatamente all'ingresso di alimentazione e a una presa elettrica. Il suono è distorto: provare ad abbassare il volume della propria fonte audio o dello strumento musicale. Inoltre, provare a ridurre il volume complessivo del Game Day Lights. Eccessivi bassi: provare a regolare la tonalità o il comando EQ sul Game Day Lights o a livello della fonte audio per abbassare il livello dei bassi.
Schnellstart-Anleitung (Deutsch) Einführung Vielen Dank für den Kauf von Game Day Lights. Ihre Unterhaltung ist uns bei ION genauso wichtig wie Ihnen. Darum entwerfen wir unsere Produkte stets nur mit einem einzigen Ziel vor Augen: Ihr Leben einfacher und unterhaltsamer zu machen. Hinweis: Bevor Sie das Produkt zum ersten Mal verwenden, laden Sie bitte den Akku vollständig auf. Ihr Produkt wurde absichtlich mit einer reduzierten Batterieladung ausgeliefert, um einen sicheren Transport zu gewährleisten.
Schnelles Einrichten Erste Schritte 1. Stellen Sie sicher, dass alle im Lieferumfang aufgelisteten Teile in der Verpackung enthalten sind. 2. LESEN SIE DIE SICHERHEITSHINWEISE & GARANTIEINFORMATIONEN BEVOR SIE DAS PRODUKT VERWENDEN. 3. STELLEN SIE SICHER, DASS DER AKKU VOR DER ERSTEN VERWENDUNG VOLLSTÄNDIG AUFGELADEN IST, UM EINE MAXIMALE AKKULEBENSDAUER ZU ERZIELEN. 4. Werfen Sie einen Blick auf die Anschlussübersicht. 5. Stellen Sie sicher, dass die Gesamtlautstärke des Game Day Lights auf Null steht. 6.
Funktionen Vorderseite Hinweis: Hier wird das Modell für Nordamerika/Japan gezeigt. 1 11 2 13 8 5 12 4 1 7 9 10 3 6 1. Mikrofoneingang mit Lautstärkeregler (1/4"): Der Mono-Eingang nimmt einen 6,35 mm (1/4")-Audioquelle anzuschließen an, wie zum Beispiel ein Mikrofon, eine Gitarre oder ein anderes Musikinstrument. 2. Aux-Eingang (1/8"): Dieser 3,5 mm-Stereoeingang (1/8”) kann dazu verwendet werden, einen CD-Player, MP3-Player oder eine andere Audioquelle anzuschließen. 3.
o Wenn das Netzkabel abgezogen wird, zeigt das Akkusegment den Akkuladestand. Wenn nicht innerhalb von 60 Sekunden eine Taste auf der Frontplatte gedrückt wird, schaltet sich die Batteriestandsanzeige aus (um Energie zu sparen). Sobald eine Taste betätigt wird, erscheint die Batteriestandsanzeige wieder. Die Batteriestandsanzeige schaltet sich auch dann wieder ein, wenn die Batterie das niedrigste Segment des Batteriesymbols erreicht.
Oberseite 1 1. NFC: Tippen Sie auf Ihr NFC-unterstütztes Gerät (kabellose Nahbereichskommunikation), um es mit Ihrem Telefon zu koppeln, indem Sie es vorsichtig gegen das "N"-Logo stoßen. 11 Rückseite 5 12 iPA80A 1 6 1. Netzkabel-Eingang: Schließen Sie hier das mitgelieferte Netzkabel zum Netz der Batterie an. Der Game Day Lights kann mit dem Netzkabel betrieben werden und gleichzeitig die Batterie laden. Betrieb Koppeln eines Bluetooth-Geräts 1. Schalten Sie Ihr Bluetooth-Gerät ein. 2.
Koppeln eines Bluetooth-Geräts mit NFC NFC (kabellose Nahbereichskommunikation) ermöglicht den Datenaustausch von Geräten, wie z. B. die Kopplung durch leichtes Anstoßen. Lesen Sie in der Gebrauchsanleitung Ihres Geräts nach, ob diese Funktion unterstützt wird. So nutzen Sie NFC, um eine Verbindung mit dem Game Day Lights herzustellen: 1. Um NFC zu nutzen, muss das Gerät eingeschaltet und entsperrt werden. 2.
Stereo-Linking von zwei Game Day Lights-Lautsprechern* So verbinden Sie zwei Game Day Lights lautsprechern für die Stereowiedergabe: 1. Halten Sie die Link-Taste auf beiden Lautsprechern gedrückt, um in den Stereo LinkModus zu gelangen. Ein Ton wird zu hören sein und das Wort LINK beginnt zu blinken, wenn ein zweiter Lautsprecher verbunden wird. Sobald eine Verbindung hergestellt wurde, leuchtet das Wort LINK. Hinweis: Der Verknüpfungsvorgang kann bis zu einer Minute dauern.
Fehlerbehebung Wenn das Gerät nicht aufgeladen wird: Stellen Sie sicher, dass das Netzkabel ordnungsgemäß mit dem Netzeingang und einer Stromquelle verbunden ist. Der Ton klingt verzerrt: Drehen Sie den Lautstärkeregler an Ihrer Tonquelle oder dem Musikinstrument zurück. Versuchen Sie auch, das Gesamtvolumen des Game Day Lights zu reduzieren. Zu viel Bass: Versuchen Sie, den Ton- oder EQ-Regler des Game Day Lights oder Ihrer Tonquelle anzupassen, um den Bass zu verringern.
Snelstartgids (Nederlands) Inleiding Bedankt voor uw aankoop van de Game Day Lights. Bij ION vinden wij entertainment even belangrijk als u. Daarom ontwerpen wij onze producten met één doel voor ogen: u het leven leuker en aangenamer maken. Opmerking: De batterij volledig opladen voordat u het product voor het eerst gebruikt. Uw apparaat wordt speciaal verzonden met een lagere batterijlading om een veilig transport te garanderen.
Snelle opstelling Aan de slag 1. Zorg ervoor dat alle artikelen, opgesomd in Inhoud van de doos, zich in de doos bevinden. 2. LEES DE HANDLEIDING VEILIGHEID EN GARANTIE VOORALEER HET PRODUCT TE GEBRUIKEN. 3. ZORG ERVOOR DAT DE ACCU VOOR HET EERSTE GEBRUIK VOLLEDIG IS OPGELADEN, VOOR EEN MAXIMALE LEVENSDUUR. 4. Bestudeer het aansluitschema. 5. Zorg ervoor dat het hoofdvolume op Game Day Lights op nul staat. 6. Sluit uw apparaten aan. 7. Verhoog het volume tot een aangenaam niveau. 8.
Kenmerken Achterpaneel Opmerking: Hier wordt het Noord-Amerikaanse/Japanse model getoond. 1 11 2 13 8 5 12 4 1 7 9 10 3 6 1. Microfooningang met volumeknop (1/4"): Deze mono-ingang accepteert een 6,35 mm (1/4")-geluidsbron, zoals van een microfoon, gitaar of ander muziekinstrument. 2. Aux-ingang (1/8"): Deze stereo 3,5 mm (1/8")-ingang kan worden gebruikt om een cdspeler, mp3-speler of andere geluidsbron aan te sluiten. 3.
Als u binnen de 60 seconden geen knop op het voorpaneel indrukt, dan gaat de batterij-indicator uit (om energie te besparen). De batterij-indicator gaat opnieuw aan wanneer een knop wordt ingedrukt. Wanneer de batterij-indicator het laatste segment van het batterijpictogram bereikt, gaat de batterij-indicator opnieuw aan. o • Bliksempictogram: Wanneer de stroomkabel op het stopcontact is aangesloten, begint het pictogram met de bliksem te branden.
Achterpaneel 11 5 2 iPA80A 1 6 1. Stroomkabel-ingang: Steek de meegeleverde stroomkabel hierin om de unit op te stroom. Merk op dat de Game Day Lights kan worden gebruikt met de stroomkabel terwijl tegelijkertijd laadt de batterij. Operatie Een Bluetooth-apparaat koppelen 1. Zet uw Bluetooth-apparaat aan. 2. Aanzetten van Game Day Lights. Druk op de Bluetooth-knop en laat deze los om te koppelen met een Bluetooth-apparaat.* 3.
Een Bluetooth-apparaat koppelen met NFC NFC (near-field communication) maakt gegevensuitwisseling, zoals koppeling, mogelijk tussen apparaten door ze zachtjes tegen elkaar te stoten. Raadpleeg de handleiding van uw apparaat om te zien of deze functie wordt ondersteund. NFC gebruiken om te koppelen met de Game Day Lights: 1. Om NFC te gebruiken, moet uw apparaat zijn ingeschakeld en ontgrendeld. 2. Ga naar het menu Instellingen van uw apparaat en controleer of NFC Aanstaat (eenmalige handeling). 3.
Stereokoppeling van twee Game Day Lights-luidsprekers* Twee Game Day Lights-luidsprekers koppelen voor stereoklank: 1. Druk de Link-knop in op beide luidsprekers om de stereokoppelingsmodus te activeren. Er is een toon hoorbaar en het woord LINK begint te knipperen wanneer de tweede luidspreker wordt gekoppeld. Zodra de koppeling tot stand is gebracht, blijft het woord LINK permanent branden. Opmerking: Het koppelingsproces kan een minuut in beslag nemen.
Probleemoplossing Als het apparaat niet wordt opgeladen: Controleer of de stroomkabel naar behoren is aangesloten op de stroomingang en het stopcontact. Het geluid is vervormd: Probeer het volumeniveau van uw geluidsbron of muziekinstrument te verlagen. Probeer ook het algemene volume van Game Day Lights te verlagen. Er zijn teveel bassen: Probeer de toon- of EQ-bedieningsknop op Game Day Lights of uw geluidsbron bij te regelen om het basniveau te verlagen.
Appendix (English) Technical Specifications Output Power 50 W (peak) Drivers Low-Frequency: 6.5” / 165 mm woofer High-Frequency: 2.0” / 51 mm tweeter Dimensions 9.9” x 13.1” x 13.3” / 252 x 333 x 338 mm (Depth x Width x Height) Weight 13.5 lbs. / 6.15 kg Supported Bluetooth Profile A2DP, AVRCP Bluetooth Range Up to 100' / 30.5 m Linked Range Up to 50’ / 15 m Microphone Type Dynamic microphone Aux Input 1/8” (3.
ionaudio.com Manual Version 1.