
Quick Start Guide

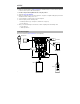
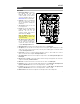
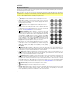
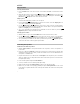
Table Of Contents

6
15. Power/Clip LEDs: The Power LED will be lit green when Power Glow 200 is powered on. The Clip
LED will flash red if the signal from the input jacks or Media Panel audio source is clipping. If this
happens, decrease the setting of the Master Volume knob or the volume knob for the Aux/Mic
Input (if a loud device is plugged into either).
16. Light Mode Button: Press this button to toggle between three modes for the lights on the front
panel:
• Color Cycle: The lights slowly glow and cycle through colors. This is the default mode when
Power Glow 200 is first powered on. Press and hold the light mode button to freeze the lights on
one color. Press and release the button to unfreeze.
• Beat Sync: The lights flash and change colors according to the tempo of the music playing on
the speaker.
• Off: The lights turn off.
17. Power Cable Input (IEC): Insert the included power cable here to charge the unit.
18. Battery Level LEDs: Use these LEDs to check the current battery level. When the battery is fully
charged, it can deliver a life of up to 25 hours (depending on how you’re using the Power Glow 200).
From left to right, the first three Battery Level LEDs (which light up in green) correspond
respectively to 75%, 50%, and 25% battery life. The fourth LED will be lit red when the battery has
less than 25% of its life left. When the battery is fully charged, all four Battery Level LEDs will be lit.
When Power Glow 200 is connected to wall power and the battery is charging, the Charging LED
will be lit green.
19. Fuse Holder: If the unit’s fuse is broken, remove the Fuse Holder and replace the broken fuse with
one that has the correct rating (as indicated on the Fuse Holder). Using a fuse with an incorrect
rating can damage the unit and/or fuse.
20. Power Switch: Turns Power Glow 200 on or off.