
User's Manual Part 1


5
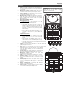
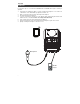
Features
1. Dome*: The lights in the dome can spin and react to
the music playing (depending on the Light Mode that
is selected).
2. Microphone Volume Control: Adjust this knob to
control the volume for microphone inputs 1 and 2.
3. Power ON/OFF: Press this button for one second to
turn Party Rocker Express on or off.
4. Master Volume Control: This adjusts the speaker’s
main mix volume, which includes the microphone
inputs, auxiliary input, and the audio of a paired
Bluetooth device.
5. Bluetooth/Light Mode Button:
Bluetooth Functions
• When the unit is first powered on, it will
automatically enter Pairing mode.
• The Paired LED will be lit when a device is
paired to Party Rocker Express. This LED will
not be lit when Party Rocker Express is first
powered on (unless it was previously paired
with a device).
• Press and hold the Bluetooth button for 3
seconds to disconnect a paired Bluetooth
device.
Light Mode Functions
• When the lights are activated, press and
release this button to cycle to the next light
mode.
• Play through all individual pattern loops or
select from one of the 7 individual pattern loops.
• The lights follow a mode-selected pattern and will react
to the music playback.
6. Lights: Press and release this button to turn the dome and
grille party lights on and off.
7. Echo: Now you can sound like a rock star in a huge arena!
Adjust this knob to control the amount of echo applied
to the mic inputs, making your voice reverberate and
sound spacious.
8. Speaker Grille: The audio playback is heard through
here. Also, the illuminated party lights are seen here.
9. Microphone Inputs: Connect 1/4" (6.35 mm)
microphones to these inputs.
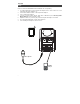
10. USB: Connect a smartphone or tablet here to charge.
11. Auxiliary Output: Connect this output to a home
stereo or an ION Block Rocker to increase the overall
volume.
12. Auxiliary Input: This stereo 1/8” input can be used to
connect a smartphone, MP3 player, or other audio
sources.
13. Battery Compartment: If powering with batteries,
install 8 “C” size batteries here.
14. Power Input: If powering with the power adapter,
connect the included power adapter here.
*WARNING: Do not look directly into the
dome light. Do not sit, stand, or apply
pressure on the dome light.
13
13
14
14
2 3
1
4
5
6
7
9
10
11
8
12
23
1
4
5
6
7
9
1010
1111
8
1212