PICS 2 PC USER GUIDE ENGLISH ( 1 – 6 ) GUÍA DEL USUARIO ESPAÑOL ( 7 – 12 ) GUIDE D’UTILISATION FRANÇAIS ( 13 – 18 ) GUIDA UTENTE ITALIANO ( 19 – 24 ) BEDIENUNGSANLEITUNG DEUTSCH ( 25 – 30 ) GEBRUIKERSHANDLEIDING NEDERLANDS ( 31 – 36 )
WELCOME Thank you for purchasing a PICS 2 PC film and slide scanner. Please take a moment to read through this manual in order to get the most out of your PICS 2 PC. PRECAUTIONS Before using PICS 2 PC, please ensure that you read and understand the safety precautions described below. Always ensure that the PICS 2 PC is operated correctly: Never operate PICS 2 PC inside of an aircraft or anywhere else where operation of such devices is restricted. Improper use creates the risk of serious accident.
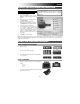
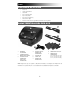
BOX CONTENTS PICS 2 PC Driver / Software CD USB cable Slide holder Film holder Photo holders (3) Quickstart Guide Safety Instructions & Warranty Information Booklet PICS 2 PC FEATURES 7 4 2 1 2 8 3 5 9 6 1. SCAN BUTTON 4. PHOTO HOLDER SLOT 8. FILM HOLDER 2. SCANNER MODE SWITCH 5. USB PORT 9. 6. USB CABLE 3. FILM / SLIDE HOLDER SLOT 7. SLIDE HOLDER PHOTO HOLDERS 3.
DRIVER AND SOFTWARE INSTALLATION To use the PICS 2 PC you must first install the drivers and software. Both of these items can be found on the included CD. 1. 2. 3. 4. 5. 6. 7. 8. Turn on the computer. Insert the installation CD into the CDROM drive and the installation menu will appear. * When you see the installation menu, click Install Driver. Follow the on-screen instructions. When the driver installation is complete, click BlazePhoto to install the software. Follow the on-screen instructions.
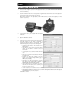
USING THE PICS 2 PC 1. Insert your slide, negative, or photo into the appropriate holder. (See USING THE INCLUDED HOLDERS for more information.) 2. Insert the holder into PICS 2 PC. If using a slide or negative holder, insert it into the slot on the right side. If using a photo holder, insert it into the slot on the top. Move the two switches to the appropriate position: "Film Scanner" (for slides and negatives) or "Photo Scanner" (for photos). 3.
6. The image you are about to scan will appear in the "Live View" window. You can adjust the color or brightness of the image by clicking the "Color/Brightness Adjustment" button. To scan the image, press PICS 2 PC's SCAN button or click "Capture" in the software. The image will appear on the bar at the top of the screen. Note: If you selected 3" x 5" (3.5" x 5") or 4" x 6", you will see the border of the photo holder, but the software will automatically crop this out when you scan it. 7.
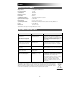
SPECIFICATIONS Image Sensor 5.1 megapixel CMOS sensor Lens Specification f = 4.83 Color Balance Automatic Exposure Control Automatic PC interface USB 2.0 Scan High Resolution 3,600 DPI interpolation resolution Light Source Back Light 3 white LED Photo Holders 3.5" x 5" / 4" x 6" / 5" x 7" System Requirements Windows® XP / Windows Vista™ (32-bit or 64-bit) / Windows 7 Power From USB port Dimensions 8.7" x 8.2" x 5.8" Specifications are subject to change without prior notice.
BIENVENIDO Gracias por adquirir un escáner de películas y diapositivas PICS 2 PC. Tómese un momento para leer este manual a fin de obtener lo máximo de su PICS 2 PC. PRECAUCIONES Antes de usar el PICS 2 PC, asegúrese de leer y entender las precauciones de seguridad descritas a continuación. Asegúrese siempre de operar correctamente el PICS 2 PC: Nunca opere el PICS 2 PC dentro de una aeronave ni en ningún otro lugar donde la operación de tales dispositivos esté restringida.
CONTENIDO DE LA CAJA PICS 2 PC CD de software/drivers Cable USB Soporte de diapositivas Soporte de película Soportes de fotografías (3) Guía de inicio rápido Folleto de instrucciones de seguridad e información sobre la garantía CARACTERÍSTICAS DEL PICS 2 PC 7 4 2 1 2 8 3 5 9 6 1. BOTÓN DE ESCANEADO 2. CONMUTADOR DE MODO DEL ESCÁNER 3. RANURA PARA EL SOPORTE DE PELÍCULA O DIAPOSITIVAS 4. RANURA PARA EL SOPORTE DE FOTOGRAFÍAS 5. PUERTO USB 6. CABLE USB 7.
INSTALACIÓN DE LOS DRIVERS Y EL SOFTWARE Para usar el PICS 2 PC debe instalar primero los drivers y el software. Ambos elementos se pueden encontrar en el CD incluido. 1. 2. 3. 4. 5. 6. 7. 8. * Si el menú de instalación no aparece automáticamente, abra My Computer (Mi PC), haga doble clic en el lector de CD de la computadora para abrir el disco y luego haga clic en la aplicación "autorun". Encienda la computadora. Inserte el CD de instalación en el lector de CD-ROM —aparecerá el menú de instalación.
CÓMO USAR EL PICS 2 PC 1. Introduzca la diapositiva, el negativo o la foto en el soporte apropiado. (Para más información, consulte CÓMO USAR LOS SOPORTES INCLUIDOS.) 2. Inserte el soporte en el PICS 2 PC. Si está usando el soporte de diapositivas o negativos, introdúzcalo en la ranura del lado derecho. Si está usando el soporte de fotografías, introdúzcalo en la ranura de la parte superior.
6. La imagen que va a escanear aparece en la ventana “Live View” (Vista en vivo). Puede ajustar el color o el brillo de la imagen haciendo clic en el botón "Color/Brightness Adjustment" (Ajuste de color/brillo). Para escanear la imagen, pulse el botón SCAN del PICS 2 PC o haga clic en "Capture" (Capturar) en el software. La imagen aparece en la barra de la parte superior de la pantalla. Nota: Si seleccionó 3" x 5" (3.5" x 5" = 8.9 cm x 12.7 cm) o 4" x 6" (10.2 cm x 15.
ESPECIFICACIONES Sensor de imagen Sensor CMOS de 5.1 mega pixels Especificación de la cubierta f = 4.83 Balance de color Automático Control de exposición Automático Interfaz de PC USB 2.0 Alta resolución del barrido 3.600 ppi por interpolación Fuente de luz de fondo 3 LED blancos Soportes de fotografías 3.5" x 5" (8.9 cm x 12.7 cm) 4" x 6" (10.2 cm x 15.2 cm) 5" x 7" (12.7 cm x 17.
BIENVENUE Nous vous remercions d’avoir fait l’achat d’un numériseur PICS 2 PC pour film et diapositives. Veuillez prendre un moment pour lire ce manuel en entier afin de tirer le plus d’avantages possibles de votre PICS 2 PC. MISES EN GARDE Avant d'utiliser le PICS 2 PC, veuillez vous assurer de lire et comprendre les mises en garde relatives à la sécurité décrites ci-dessous. Il est important de s'assurer que le PICS 2 PC est utilisé de façon adéquate.
CONTENU DE LA BOÎTE PICS 2 PC CD d’installation du logiciel/des pilotes CÂBLE USB Porte-diapositives Porte-négatifs Portes-photo (3) Guide d’utilisation simplifié Consignes de sécurité et informations concernant la garantie CARACTÉRISTIQUES DU PICS 2 PC 7 4 2 1 2 8 3 5 9 6 1. TOUCHE SCAN 4. EMPLACEMENT POUR PORTE-PHOTO 2. COMMUTATEUR DE MODE DE NUMÉRISATION 5. PORT USB 6. CÂBLE USB 7. PORTE-DIAPOSITIVES 3.
INSTALLATION DU LOGICIEL ET DES PILOTES Pour utiliser le PICS 2 PC, vous devez d’abord installer le logiciel et les pilotes. Le logiciel et les pilotes se trouvent sur le CD. 1. 2. 3. 4. 5. 6. 7. 8. * Si le menu d’installation ne s’affiche pas automatiquement, ouvrez Poste de travail et doublecliquez sur le lecteur où se trouve le CD afin de l’ouvrir, puis cliquez sur « autorun ». Mettre l’ordinateur sous tension.
UTILISATION DU PICS 2 PC 1. Placez vos diapositives, négatifs ou photo dans le support approprié. (Pour de plus amples informations, consultez la section UTILISATION DES SUPPORTS.) 2. Insérez le support dans le PICS 2 PC. Si vous utilisez un porte-diapositives ou un porte-négatifs, insérez-le dans l’emplacement situé sur le côté droit. Si vous utilisez un porte-photo, insérez-le dans l’emplacement situé sur le dessus de l'appareil.
6. L’image à numériser s’affichera dans la fenêtre « Live View ». Vous pouvez régler la couleur ou la luminosité de l’image en cliquant sur « Color/Brightness Adjustment ». Pour numériser l'image, appuyez sur la touche SCAN du PICS 2 PC ou sur « Capture » dans le logiciel. L’image devrait s’afficher dans la barre dans le haut de l’écran.
SPÉCIFICATIONS Capteur d’image 5.17 mégapixels capteur CMOS Spécification de lentille f=4.83 Équilibre des couleurs Automatique Intégrateur de lumière Automatique Interface PC USB 2.
BENVENUTI! Grazie per aver acquistato uno scanner PICS 2 PC per pellicole e diapositive. Dedichi un po’ di tempo alla lettura completa di questo manuale per ottenere il massimo dal Suo PICS 2 PC. PRECAUZIONI Prima di utilizzare PICS 2 PC, assicurarsi di aver letto e compreso a fondo le precauzioni d’uso descritte di seguito.
CONTENUTI DELLA CONFEZIONE PICS 2 PC CD recante i software / i driver Cavo USB Porta diapositive Porta pellicole Portafoto (3) Guida rapida Istruzioni di sicurezza e garanzia CARATTERISTICHE DEL PICS 2 PC 7 4 2 1 2 8 3 5 9 6 1. TASTO SCAN (SCANSIONE) 4. SLOT PER PORTAFOTO 2. INTERRUTTORE MODALITÀ SCANNER 5. PORTA USB 6. CAVO USB 3. SLOT PER PORTA PELLICOLE / PORTA DIAPOSITIVE 7. PORTA DIAPOSITIVE 8. PORTA PELLICOLE 9.
INSTALLAZIONE DRIVER E SOFTWARE Per poter utilizzare il PICS 2 PC occorre innanzitutto installare i driver ed il software. Entrambi si trovano nel CD in dotazione. 1. 2. 3. 4. 5. 6. 7. 8. * Se il menu d’installazione non compare automaticamente, aprire Risorse del computer e fare doppio clic sul drive CD del computer per aprire il disco, quindi cliccare su "autorun". Accendere il computer. Inserire il CD d’installazione nel drive CDROM: apparirà il menu d’installazione.
UTILIZZO DEL PICS 2 PC 1. Collocare la diapositiva, il negativo o la foto nel supporto adeguato. (Per maggiori informazioni, si veda il paragrafo “UTILIZZO DEI SUPPORTI IN DOTAZIONE”.) 2. Inserire il supporto nel PICS 2 PC. Se si utilizza un porta diapositive o un porta negativi, inserirli nello slot di destra. Se si utilizza un portafoto, inserirla nello slot in alto. Portare i due interruttori nella posizione adeguata: "Film Scanner" (per diapositive e negativi) o "Photo Scanner" (per le fotografie).
6. L’immagine che si sta per sottoporre a scansione apparirà nella finestra "Live View". Cliccando sul tasto "Color/Brightness Adjustment" (regolazione colore / luminosità) è possibile regolare il colore o la luminosità dell’immagine. Per effettuare la scansione dell’immagine, premere il tasto SCAN del PICS 2 PC oppure cliccare su "Capture" (acquisisci) nel software. L’immagine apparirà sulla barra a livello della parte superiore dello schermo.
SPECIFICHE TECNICHE Sensore immagini Specifiche relative alla lente Bilanciamento dei colori Controllo esposizione Interfaccia PC Risoluzione di scansione elevata Retroilluminazione sorgente luminosa Portaphoto Requisiti di sistema Alimentazione Dimensioni Sensore CMOS 5,17 mega pixel f = 4.83 Automatico Automatico USB 2.0 3.
WILLKOMMEN Besten Dank, dass Sie sich zum Kauf dieses Film- und Diascanners PICS 2 PC entschieden haben. Bitte nehmen Sie sich im Interesse einer optimalen Nutzung Ihres PICS 2 PC die Zeit, diese Gebrauchsanweisung durchzulesen. ACHTUNG Bitte lesen Sie vor der Inbetriebnahme Ihres PICS 2 PC die Sicherheitsvorschriften unten gründlich durch.
SCHACHTELINHALT PICS 2 PC Treiber-/ Programm-CD USB-Kabel Diahalter Filmhalter Fotohalter (3) Schnellanleitung Sicherheitshinweise & Garantiebestimmungen PICS 2 PC - FUNKTIONSELEMENTE 7 4 2 1 2 8 3 5 9 6 1. SCAN-TASTE 2. SCANNER-MODUS SCHALTER 3. SCHLITZ F. FILM-/ DIAHALTER 4. SCHLITZ F. FOTOHALTER 5. USB-ANSCHLUSS 6. USB-KABEL 7. DIAHALTER 8. FILMHALTER 9.
TREIBER- UND PROGRAMMINSTALLATION PICS 2 PC kann nur verwendet werden, wenn zuerst die Treiber und das Programm installiert werden, welche auf der beiliegenden CD vorhanden sind. 1. 2. 3. 4. 5. 6. 7. 8. * Erscheint das Installationsmenü nicht automatisch, Arbeitsplatz öffnen und per Doppelklick auf das CDLaufwerk die dort befindlichen Dateien abrufen und die Datei "autorun" aufrufen. PC einschalten. Installations-CD in das CD-ROM Laufwerk einlegen, woraufhin das Installationsmenü erscheint.
BILDERSCANNEN MIT PICS 2 PC 1. Dia, Negativ oder Foto in den dafür vorgesehenen Halter einlegen. (Weitere Informationen hierzu im Abschnitt VERWENDUNG DER BEILIEGENDEN HALTER.) 2. Halter in den PICS 2 PC einlegen. Wird der Dia- oder Negativ-Halter verwendet, diesen in den auf der rechten Seite befindlichen Schlitz einschieben. Bei Verwendung eines Fotohalters, diesen in den auf der Oberseite befindlichen Schlitz schieben.
6. Das Bilde, welches gescannt werden soll, wird nun im Fenster "Live View" angezeigt. Farben und Helligkeit des Bildes können durch Klick auf das Feld "Color / Brightness Adjustment" eingestellt werden. Um das Bild zu scannen, die SCANTaste des PICS 2 PC drücken oder im Programm auf "Capture" klicken. Das Bild erscheint nun in der oberen Leiste des Bildschirms.
TECHNISCHE DATEN Bildsensor 5,17 Megapixel CMOS-Sensor, Linse f = 4.83 Farbausgleich Automatisch Belichtungssteuerung Automatisch PC-Schnittstelle USB 2.
WELKOM Bedankt voor uw aanschaf van een PICS 2 PC film- en diascanner. Lees a.u.b. deze handleiding goed door om zo het meeste uit uw PICS 2 PC te halen. VOORZORGSMAATREGELEN Zorg ervoor dat u, voor u de PICS 2 PC gebruikt, onderstaande veiligheidsvoorzorgen gelezen hebt en begrijpt. Zorg ervoor dat de PICS 2 PC altijd juist bediend wordt: Bedien de PICS 2 PC nooit in een vliegtuig of ergens waar de bediening ervan beperkt of verboden is. Onjuist gebruik vergroot het risico op letsel.
INHOUD VERPAKKING PICS 2 PC Driver- en software-CD USB-kabel Diahouder Filmhouder Fotohouders (3) Snelstartgids Boekje met veiligheids- en garantie-informatie FUNCTIES PICS 2 PC 7 4 2 1 2 8 3 5 9 6 1. SCANKNOP 2. SCHAKELAAR SCANNERMODUS 3. SLEUF VOOR FILM/DIAHOUDER 4. SLEUF VOOR FOTOHOUDER 5. USB-POORT 6. USB-KABEL 7. DIAHOUDER 8. FILMHOUDER 9. FOTOHOUDERS 3,5" x 5" (8,9 cm x 12,7 cm) 4" x 6" (10,2 cm x 15,2 cm) 5" x 7" (12,7 cm x 17,8 cm) N.B.
INSTALLATIE VAN DRIVER- EN SOFTWARE Om de PICS 2 PC te gebruiken dienen eerst alle drivers en software te worden geïnstalleerd. Deze beide onderdelen zijn te vinden op de meegeleverde CD. 1. 2. 3. 4. 5. 6. 7. 8. *Als het installatiemenu niet automatisch verschijnt, open dan Mijn Computer en dubbelklik op het CDstation van de PC om de schijf te openen en klik daarna op toepassing "autorun". Schakel de PC in. Plaats de installatie-CD in het CD-ROMstation en het installatie-menu zal verschijnen.
GEBRUIK VAN PICS 2 PC 1. Plaats uw dia(s), negatief of foto in de juiste houder. MEEGELEVERDE HOUDERS voor meer informatie.) (Raadpleeg GEBRUIK VAN DE 2. Plaats de houder in de PICS 2 PC. Bij gebruik van een dia- of negatievenhouder wordt de houder in de sleuf aan de rechterzijde geplaatst. Bij gebruik van een fotohouder wordt de houder in de sleuf aan de bovenzijde geplaatst.
6. De afbeelding die bijna gescand gaat worden zal in venster "Live View" verschijnen. De kleur of helderheid van de afbeelding kan worden ingesteld door te klikken op knop "Color/Brightness Adjustment". Om de afbeelding te scannen wordt op de SCANknop van de PICS 2 PC gedrukt of op "Capture" gedrukt in de software. De afbeelding zal verschijnen in de balk bovenaan het scherm. N.B.
SPECIFICATIES Beeldsensor 5,17 megapixel CMOS-sensor, Specificatie lens f=4.83 Kleurenbalans Automatisch Belichtingscontrole Automatisch PC-interface USB 2.0 Scannen in hoge resolutie 3.
Made in China MANUAL VERSION 1.
www.ionaudio.