
Owner's manual


5
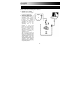
3. PHONO | LINE SWITCH – This switch should be set depending on the audio signal being
output from your record player. Most old record players output a weak audio signal, known
as a Phono-level signal, which needs to be amplified in order to be heard. In this case, the
switch should be set to ‘PHONO’. Some modern record players have the ability to output a
louder signal, also known as a Line-level signal. In this case, the switch should be set to
‘LINE’.
Tip: If the audio level is very low when you play your vinyl, it is possible that you are using a Phono-level
record player but have incorrectly set the switch to “LINE” – if this is the case, flip the switch to “PHONO”.
On the other hand, if the audio from your record player sounds extremely loud, distorted and unpleasant, it
is possible that you are using a Line-level record player but have incorrectly set the switch to “PHONO” – if
this is the case, flip the switch to “LINE”.
4. RECORDING LEVEL KNOB – This knob can be used to adjust the volume of the recording.
As you record your vinyl, be careful about recording too loud or “hot” of a signal – this may
result in unpleasant distortion in your recordings. Use this knob to adjust the volume so the
audio level meters in the recording application never hit the red.
Tip: Many songs have quiet introductions which may often be misleading when trying to determine the
optimal recording level. For example, you may have set the recording level so the level meters in the
software never hit the red during the introduction of a song. However, when a loud part of the song begins
playing, the meters start hitting the red and “clipping” the audio signal, resulting in distorted audio. We
recommend that, before you begin the actual recording, you find a loud moment in the music and adjust the
recording level so the meters never go into the red. This will ensure that your entire recording will sound
crisp and clear, without distorting.
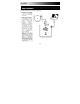
5. USB CONNECTION – This is the connection to your computer. Use the included USB cable
to connect this port to an available USB port on your computer. The square side of the cable
should be connected to the USB Recorder, while the flat side of the cable should be
connected to your computer. The USB Recorder is a plug-and-play device so there are no
special drivers or software needed – it should be ready to use as soon as it is plugged into
your computer.