VIDEO 2 GO DIGITAL VIDEO CONVERSION SYSTEM QUICKSTART GUIDE ::: ENGLISH ( 2 – 10 ) ::: MANUAL DE INICIO RÁPIDO ::: ESPAÑOL ( 11 – 19 ) ::: GUIDE D’UTILISATION RAPIDE ::: FRANÇAIS ( 20 – 28 ) ::: GUIDA RAPIDA ::: ITALIANO ( 29 – 37 ) ::: KURZANLEITUNG ::: DEUTSCH ( 38 – 46 ) ::: SNELSTARGIDS ::: NEDERLANDS ( 47 – 55 ) :::
BOX CONTENTS • VIDEO 2 GO • Multi-cable • 7" (17cm) USB extension cable • 2 CDs: o Drivers (PC and Mac) and VideoGlide software (Mac) o Cyberlink software (PC only) • Quickstart Guide • Safety Instructions & Warranty Information Booklet DRIVER & SOFTWARE INSTALLATION Before beginning, make sure your computer meets these system requirements: • Microsoft Windows XP/Vista/7 or Apple Mac OSX 10.
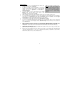
WINDOWS 1. Connect the device. Before doing anything else, use the included USB extension cable to connect VIDEO 2 GO to a free USB2.0 port on your computer. (We recommend connecting it to a port on the rear panel of your computer.) You may see several dialog boxes in the corner of the screen, indicating the computer has detected VIDEO 2 GO is connected. In some cases, you may see a message resembling an error message – this is normal. Click "OK" (if necessary) and proceed to Step 2. 2.
8. Begin! You can eject the CD and begin using VIDEO 2 GO and the software you installed. You can find the software by going to Start Menu f All Programs f Cyberlink PowerProducer or PowerDirector. (You may also double-click the shortcut icon on your computer's Desktop, if you created one during installation.) Note: Sometimes, the software will ask if you want to upgrade after you open it. This is optional but not required. MAC 1. Connect the device.
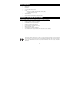
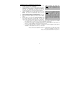
OVERVIEW COMPUTER VIDEO PLAYBACK DEVICE 1. USB CONNECTOR – Connect this end of VIDEO 2 GO to the included USB extension cable then connect the extension cable to an available USB 2.0 port on your computer (preferably a port on the rear panel). 2. MULTI-CABLE CONNECTOR – Connect this end of your included multi-cable into VIDEO 2 GO. The multi-cable will be connected to your playback device. 3.
GET STARTED! PowerProducer (PC; recommended for beginning users) Note: Sometimes, the software will ask if you want to upgrade after you open it. This is optional but not required. 1. Connect VIDEO 2 GO to your playback device and to your computer (as shown in the OVERVIEW). 2. Open PowerProducer. You can find the software by going to Start Menu f All Programs f Cyberlink PowerProducer. (You may also double-click the shortcut icon on your computer's Desktop, if you created one during installation.) 3.
PowerDirector (PC; recommended for advanced users) 1. Connect VIDEO 2 GO to your playback device and to your Note: Sometimes, the software will computer (as shown in the OVERVIEW). ask if you want to upgrade after you 2. Open PowerDirector. You can find the software by going to open it. This is optional but not Start Menu f All Programs f Cyberlink PowerDirector. required. (You may also double-click the shortcut icon on your computer's Desktop, if you created one during installation.) 3.
VideoGlide Capture (Mac) 1. Connect VIDEO 2 GO to your playback device and to your computer (as shown in the OVERVIEW). 2. Open VideoGlide Capture. You can find the software by going to Applications f VideoGlide f VideoGlide Capture. 3. The first time you open VideoGlide, you will be asked to enter a serial number into the "Serial Number" field. Find the number on the sleeve of the VideoGlide CD and enter it then click "OK.
QuickTime (Mac) 1. Connect VIDEO 2 GO to your playback device and to your computer (as shown in the OVERVIEW). 2. In order to use VIDEO 2 GO with QuickTime, you must first register your VideoGlide Capture software. Open VideoGlide Capture by going to Applications f VideoGlide f VideoGlide Capture. 3. 4. 5. Note: If your Mac is running an older OS (e.g., 10.4), your version of QuickTime may not have the option to record and save movie files.
SNAPSHOT BUTTON The circular button on VIDEO 2 GO can be used to capture an image of the current frame of your video. This is useful for using as a thumbnail/screenshot when posting your video online. Follow the steps below to use the SNAPSHOT BUTTON with the appropriate software: PowerDirector (PC) 1. Open PowerDirector. 2. Click "Capture From TV Signal" (the TV-with-antenna icon, third from the left). 3. When you see the frame you want to capture, click the SNAPSHOT BUTTON on VIDEO 2 GO. 4.
CONTENIDO DE LA CAJA • VIDEO 2 GO • Cable múltiple • Cable de extensión USB de 17 cm (7”) • 2 CD: o Drivers (PC y Mac) y software VideoGlide (Mac) o Software Cyberlink (sólo PC) • Guía de inicio rápido • Folleto de instrucciones de seguridad e información sobre la garantía INSTALACIÓN DEL DRIVER Y EL SOFTWARE Antes de comenzar, asegúrese de que su computadora cumpla estos requisitos de sistema: • Microsoft Windows XP/Vista/7 o Apple Mac OSX 10.
WINDOWS 1. 2. 3. 4. 5. 6. 7. Conecte el dispositivo. Antes de hacer nada más, use el cable de extensión USB incluido para conectar el VIDEO 2 GO a un puerto USB2.0 libre de la computadora. (Recomendamos conectarlo a un puerto del panel trasero de la computadora.) Es posible que vea varios cuadros de diálogo en la esquina de la pantalla, que le indican que la computadora detectó que está conectado el VIDEO 2 GO. En algunos casos, puede ver un mensaje que parece de error —es normal.
8. ¡Comience! Puede expulsar el CD y comenzar a usar VIDEO 2 GO y el software que instaló. Puede encontrar el software yendo al menú Start (Inicio) f All Programs (Todos los programas) f Cyberlink PowerProducer o PowerDirector. (También puede hacer doble clic en el icono del acceso directo del escritorio de la computadora, si creó uno durante la instalación.) Nota: Algunas veces, el software le preguntará si desea actualizarlo después de abrirlo. Esto es opcional pero no obligatorio. MAC 1.
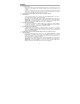
VISTA GENERAL DISPOSITIVO DE REPRODUCCIÓN DE VIDEO CONECTOR USB – Conecte este extremo del VIDEO 2 GO al cable de extensión USB incluido y luego conecte dicho cable a un puerto USB 2.0 disponible de la computadora (preferiblemente un puerto del panel trasero). COMPUTADORA 1. 2. CONECTOR MULTICABLES – Conecte este extremo de su cable múltiple incluido en el VIDEO 2 GO. El cable múltiple se conecta a su dispositivo de reproducción. 3.
PARA COMENZAR PowerProducer (PC; recomendado para usuarios principiantes) 1. 2. Conecte el VIDEO 2 GO al dispositivo de reproducción y a la computadora (como se muestra en la VISTA GENERAL). Nota: Algunas veces, el software le preguntará si desea actualizarlo Abra PowerProducer. Puede encontrar el software yendo al después de abrirlo. Esto es opcional menú Start (Inicio) f All Programs (Todos los programas) f pero no obligatorio. Cyberlink PowerProducer.
PowerDirector (PC; recomendado para usuarios avanzados) 1. Conecte el VIDEO 2 GO al dispositivo de reproducción y a la computadora (como se muestra en la VISTA GENERAL). 2. Abra PowerDirector. Puede encontrar el software yendo al menú Start (Inicio) f All Programs (Todos los programas) f Cyberlink PowerDirector. (También puede hacer doble clic en el icono del acceso directo del escritorio de la computadora, si creó uno durante la instalación.) 3.
VideoGlide Capture (Mac) *Nota: En algunos casos, según sea 1. Conecte el VIDEO 2 GO al dispositivo de reproducción y a la el sistema operativo de su computadora (como se muestra en la VISTA GENERAL). computadora, la imagen de su video 2. Abra VideoGlide Capture. Puede encontrar el software yendo en VideoGlide puede aparecer a Applications (Aplicaciones) f VideoGlide f VideoGlide "inestable" o "atascada". Esto no Capture. afecta a su video, en realidad se está 3.
QuickTime (Mac) 1. Conecte el VIDEO 2 GO al dispositivo de reproducción y a la Nota: Si en su Mac se está computadora (como se muestra en la VISTA GENERAL). ejecutando un sistema operativo 2. Para usar VIDEO 2 GO con QuickTime, debe registrar antiguo (como el 10.4), su versión de primero su software VideoGlide Capture. Abra VideoGlide QuickTime puede no contar con la Capture yendo a Applications f VideoGlide f VideoGlide opción de grabar y guardar archivos Capture. de películas. En este caso, 3.
BOTÓN DE INSTANTÁNEA El botón circular del VIDEO 2 GO se puede usar para capturar una imagen del cuadro de video que se ve en ese momento. (Esto resulta útil para usar como miniatura o instantánea de pantalla cuando publica su video en Internet.) Siga los pasos que se indican a continuación para usar el BOTÓN DE INSTANTÁNEA con el software apropiado: PowerDirector (PC) 1. Abra PowerDirector. 2.
CONTENU DE LA BOÎTE • VIDEO 2 GO • Multi-câble • Câble de prolongation USB de 7 po (17 cm) • 2 CD-ROM : o Pilotes (PC et Mac) et logiciels VideoGlide (Mac) o Logiciels Cyberlink (PC seulement) • Guide d’utilisation simplifié • Consignes de sécurité et informations concernant la garantie INSTALLATION DU LOGICIEL ET DES PILOTES Avant de commencer, veuillez vous assurer que votre ordinateur dispose de la configuration système requise suivante : • Microsoft Windows XP/Vista/7 ou Apple Mac OSX versi
WINDOWS 1. 2. 3. 4. 5. 6. 7. Raccordez l’appareil. Avant toute chose, utilisez le câble de prolongation USB inclus pour brancher le VIDEO 2 GO à un port USB 2.0 de votre ordinateur. (Nous vous recommandons de le brancher à un port USB sur le panneau arrière de l’ordinateur.) Il se peut que quelques boîtes de dialogue s'affichent indiquant que l’ordinateur a détecté le VIDEO 2 GO. Dans certains cas, il se peut qu’un message d’erreur s’affiche – ceci est normal.
8. Vous pouvez maintenant utiliser le VIDEO 2 GO. Vous pouvez éjecter le CD-ROM et utiliser le VIDEO 2 GO et le logiciel que vous avez installé. Vous trouverez le logiciel en cliquant sur Démarrer f Tous les programmes f Cyberlink PowerProducer ou PowerDirector. Vous pouvez également l’ouvrir en double-cliquant l'icône sur le bureau de votre ordinateur l’installation. Remarque : À l’occasion, il se peut que le logiciel vous invite à faire la mise à niveau. Ceci est facultatif, ce n’est pas requis.
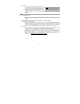
VUE D’ENSEMBLE ORDINATEUR PÉRIPHÉRIQUE DE LECTURE 1. CONNECTEUR USB – Branchez le câble de prolongation USB inclus pour brancher le VIDEO 2 GO à un port USB 2 de votre ordinateur, préférablement sur le panneau arrière. 2. CONNECTEUR MULTI-CÂBLE – Branchez ce connecteur du multi-câble dans le VIDEO 2 GO. Le multicâble doit être branché au périphérique de lecture. 3.
MISE EN ROUTE PowerProducer (PC; recommandé pour les débutants) 1. Branchez le VIDEO 2 GO au périphérique de lecture et à votre ordinateur (comme indiqué dans la section VUE D’ENSEMBLE). 2. Lancer l’application PowerProducer. Vous trouverez le logiciel en cliquant sur Démarrer f Tous les programmes f Cyberlink PowerProducer. Vous pouvez également l'ouvrir en double-cliquant l'icône sur le bureau de votre ordinateur si vous avez créé un raccourci durant l’installation. 3.
PowerDirector (PC; recommandé pour les utilisateurs avertis) 1. 2. 3. 4. 5. 6. • • • Remarque : À l’occasion, il se peut Branchez le VIDEO 2 GO à l’appareil de visionnement et à que le logiciel vous invite à faire la votre ordinateur (comme indiqué dans la section VUE mise à niveau. Ceci est facultatif, ce D’ENSEMBLE). n’est pas requis. Lancer l’application PowerDirector. Vous trouverez le logiciel en cliquant sur Démarrer f Tous les programmes f Cyberlink PowerDirector.
VideoGlide Capture (Mac) 1. Branchez le VIDEO 2 GO au périphérique de lecture et à * Remarque : Dans certains cas, votre ordinateur (comme indiqué dans la section VUE selon le système d’exploitation de D’ENSEMBLE). votre ordinateur, il se peut que la 2. Lancez l’application VideoGlide Capture. Vous trouverez capture d’image de votre vidéo puisse l’application dans le dossier Applications f VideoGlide f paraître un peu saccadée ou VideoGlide Capture. « gelée ». Ceci n’affectera en rien 3.
QuickTime (Mac) 1. Branchez le VIDEO 2 GO au périphérique de lecture et à Remarque : Si votre ordinateur Mac votre ordinateur (comme indiqué dans la section VUE utilise un système d’exploitation plus D’ENSEMBLE). âgé (p. ex., 10.4), il se peut que votre 2. Afin de pouvoir utiliser VIDEO 2 GO avec QuickTime, vous version QuickTime ne dispose pas devez d’abord enregistrer votre copie du logiciel VideoGlide d’options d’enregistrement des fichiers Capture.
TOUCHE SNAPSHOT La touche circulaire sur VIDEO 2 GO permet de capturer l’image en cours de la vidéo. Ceci vous permet d'utiliser l'image comme vignette lorsque vous publiez votre vidéo sur le Web. Suivez les étapes ci-dessous pour utiliser la touche SNAPSHOT selon le logiciel utilisé : PowerDirector (PC) 1. Lancer l’application PowerDirector. 2. Cliquez sur « Capture à partir d’un signal TV » (l’icône d’un téléviseur avec antenne, troisième de gauche). 3.
CONTENUTI DELLA CONFEZIONE • VIDEO 2 GO • Cavo multiplo • Prolunga USB da 17 cm • 2 CD: o Driver (PC e Mac) e software VideoGlide (Mac) o Software Cyberlink (solo per PC) • Guida rapida • Istruzioni di sicurezza e garanzia INSTALLAZIONE DRIVER E SOFTWARE Prima di iniziare, assicurarsi che il computer rispetti i seguenti requisiti di sistema: • Microsoft Windows XP/Vista/7 o Apple Mac OSX 10.
WINDOWS 1. 2. 3. 4. 5. 6. 7. Collegare il dispositivo. Prima di fare qualsiasi altra cosa, servirsi della prolunga USB in dotazione per collegare il VIDEO 2 GO ad una porta USB2.0 libera sul computer. (Si consiglia di collegarlo ad una porta sul pannello posteriore del computer.) Diverse finestre di dialogo possono comparire nell'angolo dello schermo a indicare che il computer ha percepito che il VIDEO 2 GO è collegato.
8. Cominciamo! Si può ora espellere il CD e iniziare a utilizzare il VIDEO 2 GO ed il software installato. Il software può essere reperito recandosi su Start Menu f Tutti i programmi f Cyberlink PowerProducer o PowerDirector. (Si può anche fare doppio clic sull'icona di scelta rapida presente sul Desktop del computer se ne è stata creata una durante l'installazione.) Nota bene: Talvolta il software chiederà se si desidera effettuarne l'aggiornamento dopo averlo aperto. Questo è opzionale, non richiesto.
PANORAMICA DISPOSITIVO DI RIPRODUZIONE VIDEO COMPUTER 1. CONNETTORE USB – Collegare questo capo del VIDEO 2 GO alla prolunga USB in dotazione, quindi collegare la prolunga ad una porta USB 2.0 disponibile del computer (preferiblmente una porta presente sul pannello posteriore). 2. CONNETTORE MULTI-CAVO – Collegare questo capo del cavo multiplo in dotazione al VIDEO 2 GO. Il cavo multiplo sarà collegato al dispositivo di riproduzione. 3.
PRIMI PASSI PowerProducer (PC; consigliato per i principianti) 1. Collegare il VIDEO 2 GO al dispositivo di riproduzione ed al computer (come illustrato nel paragrafo PANORAMICA). 2. Aprire il PowerProducer. Il software può essere reperito recandosi su Start f Tutti i programmi f Cyberlink PowerProducer . (Si può anche fare doppio clic sull'icona di scelta rapida presente sul Desktop del computer se ne è stata creata una durante l'installazione.) 3.
PowerDirector (PC; consigliato per utenti esperti) 1. Collegare il VIDEO 2 GO al dispositivo di riproduzione ed al Nota bene: Talvolta il software computer (come illustrato nel paragrafo PANORAMICA). chiederà se si desidera effettuarne 2. Aprire il PowerDirector. Il software può essere reperito l'aggiornamento dopo averlo aperto. recandosi su Start f Tutti i programmi f Cyberlink Questo è opzionale, non richiesto. PowerDirector .
VideoGlide Capture (Mac) 1. Collegare il VIDEO 2 GO al dispositivo di riproduzione ed al *Nota bene: In alcuni casi, a seconda computer (come illustrato nel paragrafo PANORAMICA). del sistema operativo del computer, 2. Aprire VideoGlide Capture. Si può trovare il software l'immagine del video in VideoGlide recandosi su Applicazioni f VideoGlide f VideoGlide può apparire "mossa" o "in stallo". Capture. Questo tuttavia non influirà 3.
QuickTime (Mac) 1. Collegare il VIDEO 2 GO al dispositivo di riproduzione ed al Nota bene: Se sul Mac è presente un computer (come illustrato nel paragrafo PANORAMICA). sistema operativo più vecchio (ad es., 2. Per utilizzare il VIDEO 2 GO con QuickTime, bisogna prima 10.4), la versione di QuickTime registrare il software VideoGlide Capture. Aprire il VideoGlide presente potrebbe non avere l'opzione Capture recandosi su Applicazioni f VideoGlide f di registrare e salvare filmati. In VideoGlide Capture.
TASTO SNAPSHOT Il tasto circolare sul VIDEO 2 GO può essere utilizzato per acquisire un'immagine del fotogramma corrente del video. Questo è utile come segnalibro/screenshot per quando si pubblica il video online. Procedere come segue per utilizzare il TASTO SNAPSHOT con il giusto software: PowerDirector (PC) 1. Aprire il PowerDirector. 2. Cliccare su "Capture From TV Signal" (acquisisci da segnale TV) (l'icona della TV con antenna, terza da sinistra). 3.
SCHACHTELINHALT • VIDEO 2 GO • Multi-Kabel • 7" (17cm) USB-Verlängerungskabel • 2 CDs: o Treiber (für PC und Mac) und VideoGlide Software (Mac) o Cyberlink-Software (nur PC) • Schnellstart-Anleitung • Sicherheitshinweise und Garantieinformationen TREIBER & SOFTWARE-INSTALLATION Bevor Sie beginnen, vergewissern Sie sich, dass Ihr Computer folgende Systemvoraussetzungen erfüllt: • Microsoft Windows XP/Vista/7 oder Apple Mac OSX 10.
WINDOWS 1. 2. 3. 4. 5. 6. 7. Schließen Sie das Gerät an. Noch bevor Sie irgendetwas anderes tun, verwenden Sie zuallererst das mitgelieferte USBVerlängerungskabel, um VIDEO 2 GO an einen freien USB2.0-Anschluss Ihres Computers anzuschließen. (Wir empfehlen Ihnen das Gerät mit einem Anschluss an der Rückseite Ihres Computers zu verbinden.) Es kann sein, dass mehrere Dialogfelder in einer Bildschirmecke aufscheinen, die anzeigen, dass der Computer die Verbindung mit VIDEO 2 GO erkannt hat.
Wenn dieses Fenster nicht automatisch aufscheint, doppelklicken Sie erst auf „Mein Computer“ und anschließend auf die „VIDEO 2 GO“-CD. Das Fenster sollte nun angezeigt werden. Wenn das Fenster immer noch nicht angezeigt wird, rechtsklicken Sie auf die „VIDEO 2 GO“-CD und wählen "Explorer". Sobald die Inhalte der CD angezeigt werden, doppelklicken Sie auf den Ordner "Treiber", auf den Ordner "2860" und danach auf "Setup.exe". 8.
ÜBERSICHT VIDEOWIEDERGABE-GERÄT COMPUTER 1. USB-ANSCHLUSS - Schließen Sie dieses Ende des VIDEO 2 GO an das mitgelieferte USBVerlängerungskabel an und schließen Sie das Verlängerungskabel an einen freien USB 2.0-Anschluss Ihres Computers an (vorzugsweise an einen Anschluss auf der Rückseite). 2. MULTI-KABELANSCHLUSS - Verbinden Sie dieses Ende Ihres mitgelieferten Multi-Kabels mit VIDEO 2 GO. Das Multi-Kabel wird an Ihr Wiedergabe-Gerät angeschlossen. 3.
ERSTE SCHRITTE PowerProducer (PC - für Neueinsteiger empfohlen) 1. 2. Verbinden Sie VIDEO 2 GO mit Ihrem Wiedergabe-Gerät und Ihrem Computer (wie in der ÜBERSICHT beschrieben). Hinweis: Manchmal wird Sie die Software nach dem Öffnen fragen, ob Öffnen Sie PowerProducer. Sie finden die Software, indem Sie aktualisieren möchten. Dies ist Sie Start-Menü f Alle Programme f CyberLink optional und nicht zwingend PowerProducer wählen. (Sie können auch auf das erforderlich.
PowerDirector (PC; für fortgeschrittene Benutzer empfohlen) 1. Verbinden Sie VIDEO 2 GO mit Ihrem Wiedergabe-Gerät Hinweis: Manchmal wird Sie die und Ihrem Computer (wie in der ÜBERSICHT beschrieben). Software nach dem Öffnen fragen, ob 2. Öffnen Sie PowerDirector. Sie finden die Software, indem Sie aktualisieren möchten. Dies ist Sie Start-Menü f Alle Programme f Cyberlink optional und nicht zwingend PowerDirector wählen. (Sie können auch auf das erforderlich.
VideoGlide Capture (Mac) 1. Verbinden Sie VIDEO 2 GO mit Ihrem Wiedergabe* Hinweis: In einigen Fällen - je nach Gerät und Ihrem Computer (wie in der ÜBERSICHT Betriebssystem Ihres Computers – kann es sein, beschrieben). dass Ihr Video in VideoGlide "ruckelig" oder "ins 2. Öffnen Sie VideoGlide Capture. Sie finden die Stocken geraten" wirkt. Dies wirkt sich jedoch Software, indem Sie Applikationen f VideoGlide nicht auf das Video aus – das Video selbst wird f VideoGlide Capture wählen. korrekt erfasst.
QuickTime (Mac) 1. Verbinden Sie VIDEO 2 GO mit Ihrem Wiedergabe-Gerät und Hinweis: Wenn Ihr Mac auf einem Ihrem Computer (wie in der ÜBERSICHT beschrieben). älteren Betriebssystem läuft (z.B. 2. Um VIDEO 2 GO mit QuickTime nutzen zu können, müssen 10.4), kann es sein, dass Ihre Sie zuerst die VideoGlide Capture-Software registrieren. QuickTime-Version keine Filmdateien Öffnen Sie VideoGlide Capture, indem Sie Applikationen f erfassen und speichern kann. Wenn VideoGlide f VideoGlide Capture wählen.
SCHNAPPSCHUSS-TASTE Mit der runden Taste am VIDEO 2 GO kann ein Schnappschuss vom aktuellen Frame Ihres Videos erfasst werden. Dies kann als Miniaturansicht /Screenshot bei bei Veröffentlichung Ihres Videos im Internet nützlich sein. Folgen Sie den unten angeführten Schritten, um die SCHNAPPSCHUSS-TASTE mit der entsprechenden Software zu verwenden: PowerDirector (PC) 1. Öffnen Sie PowerDirector. 2. Klicken Sie auf "Über TV-Signal erfassen" (das dritte Symbol von links: „TV-Gerät mit Antenne“). 3.
INHOUD VERPAKKING • VIDEO 2 GO • Multikabel • 17 cm USB extensiekabel • 2 CD’s: o Drivers (PC en Mac) en VideoGlide software (Mac) o Cyberlink software (alleen PC) • Snelstart Handleiding • Veiligheidsinstructies & Garantie Infobrochure DRIVER & SOFTWARE INSTALLATIE Alvorens te beginnen, verzeker uzelf ervan, dat uw computer aan deze systeemeisen voldoet. • Microsoft Windows XP/Vista/7 of Apple Mac OSX 104.
WINDOWS 1. 2. 3. 4. 5. 6. 7. Het toestel koppelen. Vóórdat u verder gaat, gebruikt u eerst de bijgevoegde USB extensiekabel om de VIDEO 2 GO aan een vrije USB2.0 poort van uw computer te koppelen. (We adviseren om deze met een poort te verbinden aan de achterkant van uw computer.) U zult diverse dialoogvensters onderaan het scherm, die aangeven of de computer de VIDEO 2 GO heeft ontdekt en verbonden. In sommige gevallen, zult u een waarschuwing zien dat op een foutmelding lijkt – dit is normaal.
8. Begin! U kunt nu de CD ejecteren en VIDEO 2 GO gebruiken met de geïnstalleerde software. U zult de software vinden via: Start Menu f Alle Programma’s f Cyberlink PowerProducer of PowerDirector. (U kunt ook op de snelkoppeling dubbelklikken op het bureaublad van uw computer, indien u deze tijdens de installatie heeft gecreëerd.) Opmerking: Soms zal de software vragen of u wilt upgraden na deze te hebben geopend. Dit is optioneel, maar geen vereiste. MAC 1. Het toestel koppelen.
OVERZICHT COMPUTER VIDEO PLAYBACK TOESTEL 1. USB CONNECTOR – Verbind dit uiteinde van de VIDEO 2 GO met de bijgevoegde USB extensiekabel en steek dan de extensiekabel in een vrije USB 2.0 poort van uw computer (bij voorkeur een poort aan de achterkant). 2. MULTI-CABLE CONNECTOR – Steek deze d.m.v. de bijgevoegde multikabel in VIDEO 2 GO. De multikabel wordt gekoppeld aan uw playbacktoestel. 3.
LATEN WE BEGINNEN! PowerProducer (PC; aanbevolen voor beginnende gebruikers) 1. 2. Verbind VIDEO 2 GO met uw playbacktoestel en met uw computer (zoals getoond in het OVERZICHT). Opmerking: Soms zal de software vragen of u wilt upgraden na deze te Open PowerProducer. U zult de software vinden via: Start hebben geopend. Dit is optioneel, Menu f Alle Programma’s f Cyberlink PowerProducer. maar geen vereiste.
PowerDirector (PC; aanbevolen voor geavanceerde gebruikers) 1. Verbind VIDEO 2 GO met uw playbacktoestel en uw computer Opmerking: Soms zal de software (zoals getoond in OVERZICHT). vragen of u wilt upgraden na deze te 2. Open de PowerDirector. U zult de software vinden via: Start hebben geopend. Dit is optioneel, Menu f Alle Programma’s f Cyberlink PowerDirector. (U maar geen vereiste.
VideoGlide Capture (Mac) 1. Verbind VIDEO 2 GO met uw playbacktoestel en uw computer *Opmerking: In sommige gevallen, (zoals getoond in OVERZICHT). afhankelijk van uw computersysteem, 2. Open VideoGlide Capture. U kunt de software terugvinden kunnen de videoafbeeldingen in via: Applicaties f VideoGlide f VideoGlide Capture. VideoGlide "schokkerig" or "stilstaand" 3. Als u VideoGlide voor het eerst opent, zal u gevraagd worden lijken.
QuickTime (Mac) 1. Verbind VIDEO 2 GO met uw playbacktoestel en uw computer Opmerking: Als uw Mac op een (zoals getoond in OVERZICHT). oudere OS (bv. 104.) werkt, zal uw 2. Om VIDEO 2 GO met QuickTime te kunnen gebruiken, zult u QuickTime versie misschien geen eerst uw VideoGlide Capture software moeten registreren. recordoptie hebben of films kunnen Open VideoGlide Exporter via Applications f VideoGlide f bewaren. In dit geval, adviseren we VideoGlide Capture. naar QuickTime Pro te upgraden om 3.
SNAPSHOT KNOP De ronde knop bij VIDEO 2 GO kan gebruikt worden om een beeld op te nemen van het huidige videofragment. (Deze is geschikt als thumbnail/screenshot, wanneer u de video online wilt plaatsen.) Volg de onderstaande stappen om de SNAPSHOT BUTTON te gebruiken met de relevante software: PowerDirector (PC) 1. Open PowerDirector. 2. Klik op "Capture From TV Signal" (met het TV-antenne icoontje, derde van links). 3.
www.ionaudio.com MANUAL VERSION 1.