
Daim Ntawv Qhia Tus Neeg Siv


2
iOptron Corp. | 6E Gill Street | Woburn, MA 01801 USA | (781) 569-0200 | Toll Free (866) 399-4587 | www.iOptron.com
Please read the full online instruction manual and FAQ for
detailed information.
1. Un-package the Mount
: Remove the AZ Mount Pro
TM
(AZMP) mount from the aluminum carrying case. Make
sure that the Altitude Lock is fully tightened. Charge the
mount using the included AC battery charger to fully
charge the mount, until the LED indicator on the AC
adapter changed to green. NEVER charge the battery
when it is below 0°C. DO NOT use any other AC/DC
adapter.
A slowly flashing battery status LED indicates the battery is
low, which you still have about 30 minutes of operation
time. You may keep using the mount by plugging in a 12V
DC power source. NEVER use the mount this way when it is
below 0°C. iOptron is NOT responsible for any damages
and consequences caused by misuse
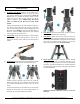
2. Tripod Setup
: Evenly extend tripod legs to a desired length.
Then lock legs using the locking knobs on sides. If set a
tripod on an uneven surface, make sure the tripod head is
leveled.
3. Attach Mount: Install three star-shaped adjustment screws
onto the tripod head. Raise the screws up about 5mm.
Carefully position telescope mount onto the tripod by
aligning the three holes on the bottom of the mount base
to the three level adjustment screws on the top of the
tripod.
Thread the tripod bolt into the bottom of the mount while
holding the mount with your hand. Slightly tighten the
tripod bolt by turning the tripod bolt lock knob.
4. Level Mount
: Adjust level adjustment screws to level the
mount using the bubble level on the base.
5. Lock Mount: Tighten the bolt lock knob to secure the
mount. Slide tripod support spreader onto the bottom of
bolt. Position the three edges to fit against the three tripod
legs. Then hand tighten tripod lock knob to secure the
tripod support spread in place. Re-check leveling.
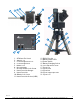
6. Attach Telescope: Attach a telescope to dual dovetail
saddle. Make sure that the telescope objective end is
pointing to the direction as the arrow mark on the dovetail
pointed to. The dovetail saddle can be rotated freely when
the altitude lock knob is released. Fully tighten the altitude
lock knob afterwards.
Tighten two dovetail saddle lock screws to secure the
telescope.