
Daim Ntawv Qhia Tus Neeg Siv


3
iOptron Corp. | 6E Gill Street | Woburn, MA 01801 USA | (781) 569-0200 | Toll Free (866) 399-4587 | www.iOptron.com
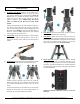
NOTE: Push the CW shaft out first if a counterweight is
needed.
7. Install Counterweight
: Make sure the altitude lock knob is
tightened. Back out CW shaft lock screw slightly. Push the
CW shaft out of the mount from the center of the dovetail
saddle. Retighten the CW shaft lock screw.
Slide the counterweight (optional) onto the CW shaft with
large opening hole facing inward. Insert the brass pin into
the hole on the CW. Secure the CW by tightening the CW
lock knob. (The groove on the CW shaft is designed for
secondary dovetail saddle use.)
(Note: if you have a small and light scope that weights a
few pounds, attach a CW is optional.)
8. Balance Payload
: After attaching scope and accessories,
the mount needs to be balanced. To balance in altitude
direction, release the altitude lock knob, rotate the scope
to horizontal position. Move the telescope back and forth
to find the balance point and lock the altitude lock knob.
CAUTION: The telescope may swing freely when the
altitude lock knob is released.
For azimuth balance, it can take up to 10lb of non-balanced
payload. Add one (1) 4.5kg if the scope at the primary side
is over 5kg, and add two (2) 4.5kg CWs if the payload is
over 10kg. (Note: This number is estimated and it is
telescope size dependent.)
A simple and safe method to estimate the CW and its
position is by calculating the torques (weight times the
distance to the center) of the payload and CW, and making
them equal or close.
(An optional secondary saddle is available for dual
balanced OTAs).
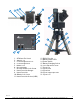
9. Connect Cable
: Connect the Go2Nova® 8407 Hand
Controller to the HBX port on the mount using the supplied
coiled control cable. Put the hand controller onto the hand
controller hanger. Double check the level of the mount.
10. Power the Mount On and GO:
Just flip the power switch
ON and wait! The mount will first perform the alignment
wizard. Just click ENTER button to let the mount find the
Zero position: Zenith and magnetic south. Ignore “verify
the following settings” screen and wait the mount pick up
the GPS signal. Then the mount will slew to a bright
star/planet for star calibration. Follow the instruction on
the hand controller screen to center the bright star in
azimuth direction using ► or ◄ button ONLY. This will
correct the declination between the magnetic south and
the true south. Press ENTER and then center the star in
your eyepiece using four arrow keys. If the star displayed is
blocked by a tree or building, just press the BACK button to
go to next one. Now you can use Select and Slew to go to
any objects!
Note: The date and time displayed on the hand controller
may differ from your local time. Just ignore it. You can
change it later, as indicated in Step 13.
Note: In the event that the mount fails to perform self-
calibration or you would like to skip this at all, please refer
to on-line Instruction Manuel for Set Up the mount
Manually.
11. Go to an Object:
Press MENU => “Select and Slew”. Select
a category (for example, “Solar System”), then select an
object of interest (for example, “Moon”). Press ENTER and
Groove