
Quick Start Guide


3
iOptron Corp. | 6E Gill Street | Woburn, MA 01801 USA | (781) 569-0200 | Toll Free (866) 399-4587 | www.iOptron.com
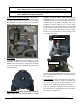
5. Install counterweight (CW) shaft: (1) Remove CW
Shaft Locking Screw. (2) Insert CW Shaft into the CW
Mounting House. (3) Thread in the CW Shaft Locking
Screw from the other side. (4) Tighten the Front CW
Position Screw.
[TIP: At very low latitudes (<10°), to avoid CW bumping
into tripod leg, retreat the Front CW Positioning Screw
while turn the Rear CW Position Screw (a hex head set
screw) to tilt the CW shaft outwards.]
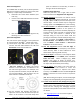
6. Install counterweight: Before putting on CW, make
sure the mount is at its zero position, i.e., CW shaft
points to the ground. Insert Allen wrench to lock the
RA axle and disengage the R.A. Gear Switch to set the
R.A. axis free before loading the CW. Remove the CW
Safety Cap at the end of CW Shaft. Glide the CW over
the shaft with the larger opening facing down.
Tighten the CW Locking Screw to hold the CW in
place. Place the Safety Cap back onto the shaft.
Move the CW to the bottom of the shaft and tighten
the CW locking Screw.
[TIP: CEM26 comes with a 10.4 lbs (4.7 kg) CW, which
should be sufficient for an 8” scope with total
payloads up to about 13 lbs (6kg). Use extra CW or
CW Extension Bar to balance higher payloads.]
7. Install telescope: CEM26 has a Vixen dovetail saddle,
with center adjusting block. Release the dovetail
Saddle Locking Knob and slide the telescope dovetail
plate into the saddle. Tighten the Saddle Locking
Knob.
Latitude Locking Lever
Push Button
Lat. Adj. Knob
Latitude Scale
Wrench
CW Shaft Locking Screw
CW Shaft Mounting House
(1)
(2)
Insert CW Shaft
into CW
Mounting House
(3)
(4)
Front CW Position Screw
Rear CW Position Screw