
Quick Start Guide


5
iOptron Corp. | 6E Gill Street | Woburn, MA 01801 USA | (781) 569-0200 | Toll Free (866) 399-4587 | www.iOptron.com
iPolar Polar Alignment
For a CEM26 with an iPolar, refer to iPolar Operation
Manual from iOptron’s website to perform the polar
alignment, or steps briefly outlined below:
Download and install iPolar Software (first
time use);
Connect a mini USB cable between the iPolar
and a computer USB port;
Click Connect and start polar alignment by
following on screen instructions.
Quick Polar Alignment
Fast and accurate polar alignment can be performed
for a mount with an AccuAlign
TM
optical polar scope.
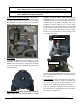
(1) Thread polar scope LED onto the polar scope.
Connect the LED cable between the LED and
DC12V OUT socket from the DEC unit.
(2) Use the Hand Controller (MENU => “Align” =>
“Pole Star Position”) to display the Polaris
Position on the LCD screen, as indicated in the
left side of the figure below. For example, June
22, 2014, 20:19:42 in Boston, US (alt N42°30’32”
and long W71°08’50”), 300 min behind UT, the
Polaris Position is 0h45.8m and 40.4m.
(3) Use the Azimuth and Latitude Adj. Knobs to
adjust the mount in both directions and put the
Polaris in the location on the Polar Scope Dial
(same as indicated on the HC LCD), as shown in
the right side of the above figures.
BrightStar Polar Alignment
When the pole star is not in sight, refer to online
Instruction Manual for BrightStar Polar Alignment.
12. Manual operation: The mount can now be used to
observe astronomical objects with the HC. Use arrow
keys (►, ◄, ▼, and ▲) to point the telescope to the
desired object. Use the number keys to change the
slewing speed. Press STOP/0 button to start tracking.
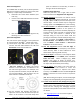
13. Set Zero Position: The Set Zero Position command
registers the current position as zero position. So
before registering, the mount should be physically set
at Zero Position either manually or slewed by hand
controller. The Zero Position is defined as the
telescope being on top of the mount head and
pointing to North Pole, with CW shaft pointing to the
ground. To register, press MENU => Zero Position =>
Set Zero Position. Press ENTER to confirm. One can
also use MENU => Zero Position => Search Zero
Position to set the Zero Position.
14. One Star Alignment: Perform One Star Align to
correct the Zero Position discrepancy and improve
GOTO accuracy. Refer to User’s Manual for more
details about improving GOTO accuracy.
15. Go to an object: The mount is now ready for GOTO
and tracking targets. Press MENU, select and ENTER
Select and Slew. Select a category (e.g., Solar
System), then select an object of interest (e.g.,
Moon). Press ENTER and the telescope will slew to
the object and automatically start tracking.
16. Sync to Target: If the object is not in the center of
the eyepiece, use this function to center and
synchronize the object to improve local GOTO
accuracy. Press MENU and select and ENTER Sync to
Target. Follow the on-screen instruction to perform
the sync.
[TIP: After slewing to an object, a list of nearby bright
object(s) can be displayed by pressing the ? button.]
17. Put the mount back into the package/carrying case:
It is recommended to return the mount to Zero
Position at the end of the observing session. Lay the
mount into the carrying case. Disengage the gear
system for transportation. Insert Allen wrench to lock
the RA axis.
Use support@ioptron.com for technical supports.