
User's Manual


2
1. Connect iPolar to a PC
(1) Connect the iPolar Electronic Polar Scope (iPolar) to one of your computer USB port;
(2) The iPolar has embedded driver. It will install the driver automatically if it is connected to the
computer first time. It may take some time to install the firmware. A icon should be shown on
Windows right bottom corner while firmware is installed.
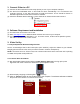
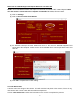
(3) Check the Windows Device Manager. There should be an iOptron iPolar under Camera
2. Software Requirement and Installation
(1) This instruction is for iPolar 2.50 or later
(2) Goto www.ioptron.com to download iPolar software and save on your computer
(3) The iPolar software needs Windows 7, 8.1, 10 or later version, 32 bit or 64 bit operation system,
with .NET Framework 4.8 or later version.
3. iPolar Set Up
3.1. Adjust Equatorial Mount Pointing Direction
Set the counterweight shaft at the lowest point (Zero Position). Adjust the altitude to your latitude.
Roughly point the mount to the north (or south if located in southern hemisphere).
NOTE: The iPolar has a 13° field of view, FOV. Please make sure that the mount RA axis is pointing
to TURE north (TRUE south) within ±6°.
3.2. Connect iPolar in Software
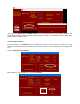
(1) Run downloaded iOptron iPolar software (3339_iOptron_iPolar.exe) to bring up the polar
alignment main menu. Resize the window to fit your computer screen.
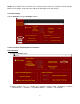
(2) Select display Language, either English or 中文(Chinese)
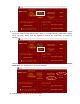
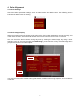
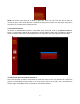
(3) Click on “Connect” button to connect the iPolar to the computer. The software will start to initialize
the process if the camera is connected successfully.