
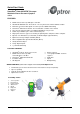
User Guide

iOptron Corp. | 6E Gill Street | Woburn, MA 01801 USA | (781) 569-0200 | Toll Free (866) 399-4587 | www.iOptron.com
Quick Start Guide for SmartStar
®
Solar 60 Telescopes
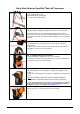
Step 1. Preparing the tripod
Unlock the tripod leg locks.
Extend tripod legs to full length
Lock the leg-locks afterwards.
Step 1a.
Stand the tripod upright by spreading the tripod's legs out uniformly.
Push down slightly on the Tripod Support Bracket to lock in place.
Attach the Accessory Tray to the Tripod Support Bracket via a screw on
the bottom of the tray. Turn the tray until hand tight – don’t over tighten
the tray.
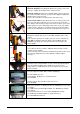
Step 2. Attaching the mount
Insert Azimuth Lock Screw into the hole on the tripod. (start from
underneath)
Position center of the mount base onto the threaded screw. Turn the
Azimuth Lock Screw to secure the mount.
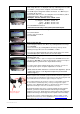
Step 3. Installing batteries (not included)
Pull off the battery compartment cover (see red arrow).
Gently pull the battery holder (shown next) out of the compartment. Be
careful not to pull out the attached wires.
Step 3a.
Insert 8 AA batteries (not included) according to the diagram on the
holder.**
Replace the holder back into the batteries compartment and replace the
cover.
Note: fit the batteries holder back into the compartment with the
attached wires at the bottom right corner (see arrow in the photo).
** Use only fresh batteries; do not mix fresh and old batteries; insufficient
battery power may cause error messages; optional AC Adapter and Car
Charger accessories are available at www.ioptron.com
Step 4. Attaching telescope
Attach telescope to mount using the dovetail lock knob (#2).
Thread of Azimuth
Lock
Dovetail
lock (#2)
Tripod leg locks
Accessory Tray
Tripod Support Bracket