
User Guide


iOptron Corp. | 6E Gill Street | Woburn, MA 01801 USA | (781) 569-0200 | Toll Free (866) 399-4587 | www.iOptron.com
Step 11. Setup site info
Now “Setup Site Info:” is displayed at the top. A blinking cursor is at the
second line. (“Longi” means longitude; “Lat” means latitude.)
Use ▲/▼ keys to change the numbers and letters. Use ◄/► keys to
scroll through the fields.
The last line of this screen is for setting time zone information (add or
subtract 60 minutes (Mins.) per time zone).
Examples: minutes “behind” UT or “ahead” of UT
New York: 300 Mins. “behind” UT
Los Angeles: 480 Mins. “behind” UT
Rome: 60 Mins. “ahead” of UT
Sydney: 600 Mins. “ahead” of UT
Press ENTER when finished.
The mount is now ready to find (GOTO) and track objects.
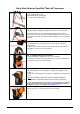
Step 12. Select and Slew to an object
Press Menu button.
Scroll to “Select and Slew”
Press ENTER.
Step 13. Goto the Sun
Select category “Planets, Sun, Moon” by scrolling with the arrow keys.
Press ENTER.
Then select “Sun”) by scrolling with the arrow keys. A beep and a
warning message will occur. Press ENTER to confirm.
The telescope will automatically slew to the object and lock on. It will
automatically begin to track once it locks on to the object.
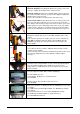
Step 14. Sync to Target (Use this to center and synchronize the object
selected in Step 12).
Press MENU. Scroll to “Sync. To Target”. Press ENTER. Next use the
arrow keys (▲▼◄►) to center the object in the eyepiece. Then press
ENTER again to synchronize the object with the memory.
To slew to other objects simply repeat steps 12 and 13. You do not
need to repeat step 14 except for adjustments as needed.
(Refer to the full online manual for 1-star and 2-star alignments. Sync to
Target is the same as 1-star Alignment except that you choose the
object to align to.)
Step 15. Use Electronic Eyepiece. (Optional)
Remove cap from end of electronic eyepiece and insert electronic eyepiece into
the telescope tube opening (Remove optical eyepiece first). Next, plug each end
of the USB cable into the electronic eyepiece and your computer.
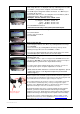
Your computer will detect the electronic eyepiece as new hardware and install
the camera driver automatically. Next, you can open image/video capture
programs such as Window Movie Maker or other webcam program, select the
right camera and begin to view a live feed from the telescope.
An electronic eyepiece works just as a short focal length (few mm) eyepiece.
Therefore, you need to start the observation with the longer focal length
eyepiece. In most cases, directly replace an optical eyepiece with an electronic
eyepiece will not bring an clear image onto the computer screen immediately.
If your PC does not have a webcam application software installed, you may
download one from internet, such as VitualDub from
www.VirtualDub.com, or
Future WinJoe at www.ioptron.com/future.rar.
November 2011 V1.0
Plug USB connector
into your computer.