iRobot Create ® Owner’s guide SAVE 15% on accessories. See back for details. www.irobot.
Important Safety Instructions GENERAL SAFETY INSTRUCTIONS • • • • • Read all safety and operating instructions before operating iRobot Create. Retain the safety and operating instructions for future reference. Heed all warnings on iRobot Create, battery, charger and in owner’s manual. Follow all operating and use instructions. Refer all non-routine servicing to iRobot. Create USE RESTRICTIONS • Roomba is for indoor use only. • Do not sit or stand on this device.
Table of Contents About iRobot Create..................................................... 4 Anatomy...................................................................... 5 Demos........................................................................ 7 Powering iRobot Create................................................. 8 Cargo Bay Connector.................................................... 10 Open Interface Commands........................................... 11 Sending OI Commands from a PC........
About iRobot® Create iRobot® Create is a complete robot development kit that allows you to program new robot behaviors without having to worr y about mechanical assembly and low-level code. iRobot Create’s Open Interface (OI) provides you with a set of commands, such as “drive” commands, demo commands, song commands and sensor commands, that encourage your own inventiveness.
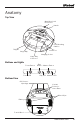
Anatomy Top View Omnidirectional IR Receiver Handle 6-32 Mounting Cavities Tailgate Serial Port Cargo Bay Cargo Bay Connector Charging Socket Buttons and Lights Power Button Power LED Play Button Advance Button Play LED Advance LED Bottom View Cliff Sensor Openings Contact Points for Home Base Wheel Clips Battery Fourth Wheel www.irobot.
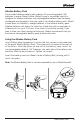
Wheel Clips iRobot Create comes equipped with wheel clips that hold its main wheels in the Retracted position. You can remove the wheel clips, which automatically places the wheels into the Released position. Save them in case you later want to use iRobot Create with the wheels in the Retracted position. There are advantages to both the Retracted and Released wheel positions. • The Retracted wheel position (clips in place) provides iRobot Create with greater stability.
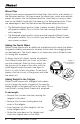
Demos iRobot Create comes with ten built-in demos to provide inspiration for your own robot programming adventures. • Press the power button and wait for the power LED to stop flashing. • To select a demo, press the Advance button . iRobot Create beeps the number of the selected demo. One long, low beep is equal to five short, high beeps. For example, when you select demo number 8, iRobot Create plays long-short-short-short (_...).
Powering iRobot Create iRobot Create can be powered with the included alkaline batter y pack, which takes “AA” alkaline batteries, or with any of the iRobot rechargeable batteries available for purchase at www.irobot.com. iRobot Create’s power light indicates the charge state of the batteries. It is green when the batteries are fully charged or new, and gradually turns red as the batteries discharge. WARNING: Do not use rechargeable AA batteries in iRobot Create.
Alkaline Battery Pack The included alkaline battery pack requires 12 non-rechargeable “AA” batteries to power iRobot Create. iRobot Create’s low-voltage shutoff is designed for alkaline batteries only; rechargeable batteries can be deeply discharged and damaged if they are used in the alkaline battery pack. iRobot Create does not attempt to charge batteries in the alkaline battery pack. Alkaline batteries will power the robot (on a hard floor with no payloads or attachments) for up to 1.
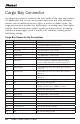
Cargo Bay Connector The cargo bay connector, located in the front middle of the cargo bay contains 25 labeled pins that you can use to attach electronics and other peripheral devices such as additional sensors, lights, or motors to iRobot Create. The cargo bay connector provides four digital inputs, an analog input, three digital outputs, three low-side driver outputs (useful for driving motors), a charging indicator, a power toggle, serial Tx and Rx, a 5V reference, battery ground and battery voltage.
Open Interface Commands iRobot Create comes with a serial protocol called the Open Interface (OI) which consists of a set of commands that you can use to control the robot and read its sensors. The types of commands available include: • Demo commands • Driving commands • Song commands • Sensor commands • Cargo Bay Connector commands • Scripting commands A description of all the OI commands can be found in the iRobot® Create Open Interface (OI) Specification found at www.irobot.com/create.
• To make iRobot Create sing: Send these command sets separately: 128 132 (Puts the robot in Full mode) 140 0 4 62 12 66 12 69 12 74 36 (Defines the song) 141 0 (Plays the song) • To make iRobot Create drive forward: CAUTION - place iRobot Create on the ground and be ready to grab it when it reaches the end of its serial cable tether! Send these two command sets separately: 128 131 137 0 100 128 0 You can also write scripts of commands, freeing your robot from the serial cable tether.
Creating a Script for iRobot Create iRobot Create’s Open Interface (OI) supports a simple scripting language. A script consists of a sequence of commands, including drive commands and commands that wait for an event such as a button press, elapsed time, or sensor trigger. These commands are documented in detail in the iRobot® Create Open Interface (OI) Specification. Scripts are stored in iRobot Create’s RAM, which is cleared when the robot loses power.
Accessories Available for iRobot Create The Following accessories are compatible with iRobot Create: • • • • Virtual Walls® Self Charging Home Base™ Roomba Standard Remote iRobot Command Module • iRobot Rechargeable Battery Options Virtual Wall® A Virtual Wall creates an invisible barrier that iRobot Create will not cross by emitting infrared signals that iRobot Create sees with its Omnidirectional IR receiver. The invisible barrier can range from three to eight feet long.
Self Charging Home Base™ The Self Charging Home Base has three infrared transmitters that you can use in your own applications. See the iRobot® Create Open Interface (OI) Specification for details on how to read the signals from these transmitters. The Self Charging Home Base also enables iRobot Create to automatically charge its iRobot rechargeable battery. During two demos, iRobot Create will automatically return to the home base.
iRobot Command Module With the iRobot Command Module, you can control iRobot Create with programs you write in C or C++. And when you add custom hardware to the iRobot Command Module, you can invent almost any kind of robot you want. The iRobot Command Module plugs into iRobot Create’s Cargo Bay connector and screws down for a secure connection. Its four DB-9 expansion por ts (ePor ts) make adding your own sensors, lights, and motors both inexpensive and easy.
• The iRobot Create robot (without a payload or other attachments) will run for up to 3.5 hours with a fully charged APS battery. • When you charge an iRobot rechargeable battery for the first time, or if iRobot Create has been left on and not charging, the robot initiates a special 16-hour reconditioning charge cycle. During this type of charge cycle, the power light pulses quickly.
Index Accessories, 14 Fourth Wheel, 5, 6 Advance button, 5 iRobot Command Module, 16 Advanced Power System (APS) battery, 16 Open Interface Commands, 11 16 hour refresh charge, 17 Battery Options, 16 Sending from a Microprocessor, 12 Sending from a PC, 12 iRobot Command Module, 16 Play button, 5 Working with Demos Play LED, 5 Play a demo, 7 Power button, 5 Select a demo, 7 Power LED, 5 Stop the demo, 7 Demo Commands, 7 Demos, 7 Control buttons, 15 Banjo-cheating, 7 Script, 13 Banjo-ha
iRobot Customer Care If you have questions or comments about iRobot Create, please contact iRobot before contacting a retailer. Please visit our web site at www.irobot.com for support tips, frequently asked questions, or information about accessories and other iRobot products. We would like to hear from you. Should you need assistance, visit the iRobot support web site at www.irobot.com/support. www.irobot.
iRobot Create Accessories ® TM Register your iRobot® Command Module today and SAVE 15% on all accessories.* iRobot Command Module Plugs into Create and controls the robot with your own programs. Virtual Wall® Home BaseTM IR transmitter conveniently placed at robot eye-level. Can be used as an invisible wall or beacon Recharges the iRobot rechargeable battery while in iRobot Create.