
User's Manual

6
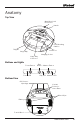
iRobot Create Owner’s Guide
Wheel Clips
iRobot Create comes equipped with wheel clips that hold its main wheels in
the Retracted position. You can remove the wheel clips, which automatically
places the wheels into the Released position. Save them in case you later
want to use iRobot Create with the wheels in the Retracted position. There
are advantages to both the Retracted and Released wheel positions.
• The Retracted wheel position (clips in place) provides iRobot Create
with greater stability. This is useful if you are running iRobot Create
with a payload.
• The Released wheel position (clips removed) provides iRobot Create
with greater mobility. This is useful if you want iRobot Create to travel
over uneven surfaces.
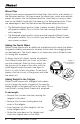
Adding the Fourth Wheel
iRobot Create comes with an additional unattached fourth wheel that allows
for greater stability and prevents the back of the robot from dragging when
you add payloads. The fourth wheel is not necessary unless iRobot Create
is running with a payload.
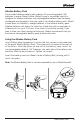
Figure 1.
iRobot Create’s
fourth wheel
To attach the fourth wheel, remove all payloads
from iRobot Create and turn it over so you can
see the underside. Slide the fourth wheel into
the grooves at the back of the robot, with the
wheel angled toward the back (see figure 1).
Push it in until it clicks into place. To remove it,
depress the tab in front of the grooves and slide
the wheel out.
Adding Weight to the Tailgate
iRobot Create comes with a tailgate that enables
you to change the center of gravity of the robot by
adding weight to the back portion of the robot. This is
useful when running iRobot Create with a payload.
To add weight:
• Remove the 2 screws that are securing the
tailgate to the robot.
• Remove the 5 screws holding down the
cover of the tailgate.
• Insert pennies (or other weights) into the
inside tailgate slots.
• Screw the cover back on the tailgate and
screw the tailgate back on the robot.
Tailgate