Gutter Cleaning Robot Model 330 Owner’s Manual www.irobot.
iRobot Looj 300 Series Owner’s Manual
Welcome ® Dear iRobot® Looj Owner, Welcome to the world of iRobot. As an owner of the iRobot Looj Gutter Cleaning Robot, you join a growing group of people around the globe who, like you, are discovering an easier way to clean their gutters. The use of practical robots that help you in and around your home is a new reality. We encourage you to share your feedback as we continue to develop new and groundbreaking robots.
IMPORTANT: Make sure you read and follow all safety instructions and labels from your ladder manufacturer before attempting to use Looj. Failure to do so may result in serious injury or death. Ladder Safety • i Robot Looj enables you to clean a single run of gutter with one ladder position. Choose the safest ladder position possible along each run. Safe ladder positions are away from power lines, tree limbs, or other hazards, and provide a level surface to rest the ladder.
Important Safety Instructions Looj is a gutter cleaning device; use only as intended. For residential use only. Read all instructions before using Looj. • T his device has been tested and complies with FCC rules. Changes or modifications not expressly approved by the manufacturer will void your warranty. • Always wear safety glasses when operating. • L ooj throws material clear of the gutter. Keep yourself and others out of path of flying debris.
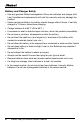
Battery and Charger Safety • Use only genuine iRobot rechargeable Lithium-Ion batteries and charger with Looj. Unauthorized replacements will void the warranty and may damage the product. • Under normal conditions, the battery should charge within 3 hours. If not fully charged in 10 hours, discontinue charging. • Charge between 5 to 35°C (40 to 95°F .) • If corrosion or odor is detected upon first use, return the product immediately • Do not pierce, puncture, disassemble or alter the battery.
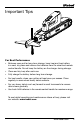
Important Tips For Best Performance • B etween uses and for long-term storage, keep Looj and Looj battery in a cool, dry place and remove the batteries from the robot and remote control handle. Do not keep the battery on the charger during storage. • Clean and dry Looj after each use. • Fully charge the battery before long term storage. • F or best results, clean your gutters at least once per season. Clean regularly in areas where heavy debris collects.
Table of Contents Ladder Safety................................................................... 4 Important Safety Instructions........................................... 5-6 Important Tips.................................................................. 7 Table of Contents............................................................. 8 Components..................................................................... 9 Product Description.........................................................
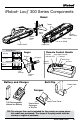
® iRobot Looj 300 Series Components ® Robot Treads Nose Cone Battery Door Latch Robot Power LED Battery Door Wheel Power Switch Included Ejectors Auger Axle Auger Standard 6 5 4 Remote Control Handle 3 Ejectors F 2 Auger Spin Direction Remote Indicator LED Forward 1 F Sweepers Compact 6 Agitate Scoop Auto-Clean Reverse E E Optional Ejectors 1 2 3 4 5 Handle Release F D D E C C B The Breaker A 6 B D 5 Breaker Bars 4 6 63 South Ave Burlington, MA 01803 (781) 34
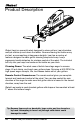
Product Description iRobot Looj is a powerful robot designed to clean gutters. Looj eliminates multiple climbs up and down the ladder. No more moving the ladder every six feet, or overreaching at dangerous heights. Looj has a number of features designed to make gutter cleaning simple and easy. Looj’s ergonomic handle detaches for wireless control of the robot. The included belt clip lets you keep two hands on the ladder as you climb.
Charging and Installing the Battery Looj ships with a Lithium-Ion battery. Be sure to fully charge the battery before first use. Fully charging the battery before every use will provide best performance. Looj batteries are designed to power Looj through up to 200 linear feet of gutter on a single charge. Between uses and for long term storage, remove the battery from the robot, and store in a cool, dry place. Always use the correct line cord and plug that work with your type of electrical outlet.
The Remote Control Handle TIP: Push any button to power on the remote. A green LED will flash to indicate that the remote has power. The remote control handle detaches from Looj and is used to command the robot from a distance of up to 45 feet, depending upon environmental conditions. The remote control handle keeps your hands clean and makes it easy to place the robot in and out of the gutter using only one hand. Install two AAA alkaline batteries in the remote control handle before operating.
To remove the remote control handle from Looj: 6 5 F Push down handle release button and slide remote control handle away from auger. 4 3 2 Handle Release Button 1 2. F 1. E E D D C C Attaching the Looj Scraper B B 63 South Ave Burlington, MA 01803 (781) 345-0200 www.irobot.com THIS PRINT IS THE PROPERTY OF iROBOT. THE INFORMATION CONTAINED THEREON MAY NOT BE USED, OR THE PRINT REPRODUCED WITHOUT WRITTEN PERMISSION FROM iROBOT.
Attaching the Auger Push the auger onto the robot auger axle until you feel it snap into place and hear a click. Removing the Auger Grasp auger at the finger indentation and pull. CAUTION: Grabbing and pulling the auger at the ejectors could cause a tear. TIP: I f the auger is difficult to attach or remove, try wetting the auger axle with a small amount of water.
Changing the Auger Ejectors Ejector Styles Your Looj comes with a set of standard ejectors that are capable of handling the most common gutter cleaning conditions. Additional ejector styles can be purchased separately. When you first open your new Looj you will need to assemble the auger with the ejectors of your choice. Follow the instructions below for proper assembly. Included Ejectors Standard Compact Optional Ejectors Agitate Scoop The Breaker Use a Phillips® screwdriver to remove the breaker.
Attaching the Looj Belt Clip The Looj belt clip is designed to hold Looj while you climb up and down the ladder. Always use the belt clip when using Looj on a ladder. Hook the belt clip over your belt where Looj will be secure and easy to reach. Attach the robot to the robot hook. 6 5 4 3 2 1 F E Robot Hook D C B Belt Clip 63 South Ave Burlington, MA 01803 (781) 345-0200 www.irobot.com THIS PRINT IS THE PROPERTY OF iROBOT.
® Using iRobot Looj ® IMPORTANT: The robot is only intended to clean in the forward direction. Always have the auger spinning when moving the robot. Tip: L earn about Looj on the ground first, not on a ladder. 1. Drive it forward and backward on the ground. Verify that the lights on the remote control handle and on the robot blink when buttons are pressed. 2. Spin the auger in both directions. Read about and practice operating all the buttons and controls before use.
CAUTION: Wear safety glasses when using Looj to protect your eyes from debris. CAUTION: Do not stand underneath the gutter while Looj is operating. 5. Press the power button on the robot to turn it on. The power light should be green to indicate that its battery is charged. A slow blinking red light indicates that you should charge Looj’s battery. (For all LED indicators please see the indicator lights section on Page 22.) 6. Detach the remote control handle. 7. Select your auger direction.
11. The LED on the remote control handle will display different messages depending on what the robot is doing. For a list of all LED indicators, please see the indicator lights section on page 22. 12. Once Looj reaches the end of the gutter, drive it back to you. Keep the auger spinning to help drive under the gutter straps. TIP: S hould the robot ever turn sideways or flip over in your gutter, spin the auger in the opposite direction and back the robot up to right itself.
Handling Dense Clogs Looj can handle most debris found in your gutter. Occasionally, there may be heavy debris that will not clear in a single pass. Should this situation arise, it’s important not to force the robot into the debris. To handle heavy clogs, leave the auger on and drive the robot slowly forward until the auger contacts the clogged debris. Press the forward button twice and hold to proceed at half speed. Allow the auger to eject a small amount of debris.
Maintenance Cleaning Looj Make sure the battery door is securely closed before cleaning. Looj is designed to be easily cleaned with a hose or under a faucet. No chemicals should be used to clean Looj. Prior to cleaning, remove the remote control handle and treads from the robot. Clean any debris from Looj’s wheels. Looj’s remote control handle should be cleaned with a damp cloth only. The remote control handle is not waterproof. Damage may occur to the electronics if it is sprayed with water or submerged.
Indicator Lights Remote Control Handle LED: What it means Solid Green This indicates that the power is on, battery is charged, and all communication is okay. This light will only be on when robot is moving. This occurs for 5 seconds to indicate that the remote has connected to the robot. This indicates that the robot and remote have a low signal strength. Stop forward progress and return the robot to you. Driving the robot out of range risks losing communication and control of the robot.
Charger Light What it means Slow Blinking Green The battery is connected to the charger and is charging. Fast Blinking Green There is an error and the battery is not charging. Please make sure the battery is properly seated in the charger and is making proper contact. If the problem persists, contact customer care. The battery is fully charged. Solid Green Troubleshooting Refer to the chart below to resolve Looj’s problem. If the problem is not resolved, visit www.irobot.com/support.
Robot Controls Robot buttons and controls Robot Action Handle Release Button Detaches the handle from the robot Auger Spin (Direction Left) Spins the auger to the left Auger Spin (Direction Right) Spins the auger to the right Auger Neutral Position (Button in Center Position) Press and Hold Forward Button Auger will not spin (Do not use while driving in gutter) Moves the robot forward Press and Hold Reverse Button Moves the robot backward Click once and Hold Forward Button Double Click Reverse B
LIMITED WARRANTY TO ORIGINAL PURCHASER LIMITED WARRANTY TO ORIGINAL PURCHASER This iRobot brand product, as supplied and distributed by iRobot Corporation, and delivered as manufactured, in the carton to the original customer purchaser, is warranted by iRobot Corporation against manufacturing defects in materials and workmanship for the qualifying limited warranty period as follows: One year LABOR AND PARTS: This limited warranty begins on the original date of purchase, and is valid only on products purchas
IROBOT CORPORATION. IROBOT CORPORATION SHALL NOT BE LIABLE FOR LOSS OF REVENUE OR PROFITS, FAILURE TO REALIZE SAVINGS OR OTHER BENEFITS, OR ANY OTHER SPECIAL, INCIDENTAL OR CONSEQUENTIAL DAMAGES CAUSED BY THE USE, MISUSE OR INABILITY TO USE THIS PRODUCT, REGARDLESS OF THE LEGAL THEORY ON WHICH THE CLAIM IS BASED, AND EVEN IF IROBOT HAS BEEN ADVISED OF THE POSSIBILITY OF SUCH DAMAGES.
This device complies with RSS-210 of the Industry Canada Rules. Operation is subject to the following two conditions: (1) This device may not cause harmful interference, and (2) this device must accept interference received, including interference that may cause undesired operation. www.irobot.
Get iRobot accessories at: 800.727.9077 or visit store.irobot.com International customers visit global.irobot.com. 2008-2012 iRobot Corporation, 8 Crosby Drive, Bedford, MA 01730 | All rights reserved. iRobot and Looj are registered trademarks of iRobot Corporation. U.S. Pat. http://www.irobot.com/patent | Patents pending.