5000-Lb. 12 Volt DC Electric ATV Winch Owner’s Manual WARNING: Read carefully and understand all ASSEMBLY AND OPERATION INSTRUCTIONS before operating. Failure to follow the safety rules and other basic safety precautions may result in serious personal injury.
Thank you very much for choosing an Ironton™ product! For future reference, please complete the owner’s record below: Serial Number/Lot Date Code: ________________________________ Purchase Date: ____________________________________________ Save the receipt, warranty, and this manual. It is important that you read the entire manual to become familiar with this product before you begin using it. This electric winch is designed for certain applications only.
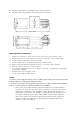
Table of Contents Intended Use .......................................................................................................................................... 4 Technical Specifications ...................................................................................................................... 4 Important Safety Information ............................................................................................................... 5 Specific Operation Warnings .......................
Intended Use Ironton’s 5000-Lb. 12 Volt DC Electric ATV Winch is ideal for ATV use. The single-stage planetary gear system is useful for fast line speed and the automatic load-holding brake for maximum safety. The unit has free spooling, fast line-out 8 feet handlebar control, and a 12 feet ergonomic handheld remote control. The winch has a roller fairlead with nylon bushing and aircraft grade wire rope.
Important Safety Information ⚠WARNING Read and understand all instructions. Failure to follow all instructions may result in fire, serious injury and /or DEATH. The warnings, cautions, and instructions in this manual cannot cover all possible conditions or situations that could occur. Exercise common sense and caution when using this winch. Always be aware of the environment and ensure that the winch is used in a safe and responsible manner.
⚠WARNING WORK AREA SAFETY Inspect the work area before each use. Keep work area clean, dry, free of clutter, and well-lit. Cluttered, wet, or dark work areas can result in injury. Using the winch in confined work areas may put you dangerously close to other cutting tools and rotating parts. Keep children and bystanders away from the work area while operating the winch. Do not allow children to handle the winch.
GENERAL SAFETY To prevent injury or property damage, read and understand all instructions before operating winch. Wear ANSI Z87.1 compliant safety goggles and heavy duty leather work gloves during operation. Do not exceed the rated load capacity. Be aware of dynamic loading! Sudden load movement may briefly create excess load causing product failure. INSTALLATION SAFETY Choose a mounting location that can support the winch and rated load capacity.
Disconnect battery cables before working near the wire rope, drum, fairlead or load, to prevent accidental starting. Keep wire rope straight to avoid kinking the wire rope. Keep children and bystanders away while operating. Hook onto the object using a pulling point, tow strap or chain. Do not wrap the wire rope around the object and hook onto the wire rope itself. Do not use a recovery strap while winching. Secure the load after moving. Do not lock the mechanism.
4. Drill holes appropriate for the hardware at the marked locations. 5. Install the winch using hardware described under Specifications. Mounting Winch Components: 1. a) Mount t h e solenoid box, switch controller, and socket lead in proper location so that: Winch components are close enough to each other to allow wires to be routed properly. b) Vehicle component operation is not interfered with. c) Vehicle components are not damaged by drilling or driving screws.
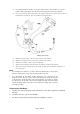
2. 3. If you drill through the bumper or any part of the body to route the wires, be sure to install a rubber grommet in the hole to prevent fraying of the wires at that point. Route the Cables from the Solenoid to the battery and from the Solenoid to the winch, following the precautions discussed earlier. See below picture. Wiring Connection 4. 5. 6. 7. 8. Attach the wire from the solenoid to the terminals on the Winch. Attach the circuit breaker to the positive terminal on the battery.
Before Each Use ⚠WARNING Inspect winch rope, hook, and slings before operating winch. Frayed, kinked or damaged winch rope must be replaced immediately. Damaged components must be replaced before operation. Wrap the wire rope under 500 lbs. of tension before use. Otherwise, the wire rope may bind during operation. Ventilate area well before and while working on battery. Explosive hydrogen gas can accumulate and explode when ignited by a spark or open flame.
7. Hook onto the object using a pulling point, tow strap, tree strap, or chain. See the picture below. ⚠WARNING Leave at least five full turns of wire rope on the drum. Do not wrap the wire rope around the object and hook onto the wire rope itself. This can damage the object being pulled, and kink or fray the wire rope. 8. Attachment point must be centered in loop of hook and the hook’s safety clasp must be fully closed. See below picture. 9. Do not use a recovery strap while winching.
it is under power. If the wire rope should slip or break, it can suddenly whip back towards the winch, causing a hazard for anyone in the area. Stand far to the side while winching. 12. Operate the controls briefly to ensure they work properly. • The IN position should retract the winch cable. • The OUT position should power out the cable. If operation is reversed, the power cables may be connected backwards, Correct any such issue before use. 13.
the rated load. Do not maintain power to the winch if the motor stalls. Double line rigging will help prevent overloading and should be used whenever practical. 18. When finished pulling the load, reverse the direction of the winch just enough to release tension on the wire rope so that you can unfasten the hook from the load and reel in the wire rope. 19. Disconnect the Pendant Controller after use.
Troubleshooting ⚠WARNING • Follow all safety precautions whenever diagnosing or servicing the tool. • Disconnect power supply before service. If the problem continues after troubleshooting, call your local dealer for assistance. Failure Motor overheats Possible Cause Corrective Action 1. Incorrect power cords 2. Winch running time too long 1. Remote battery dead 2. Loose battery cable connections 3. Vehicle battery needs charging 4. Solenoid malfunctioning Motor does not turn on 5.
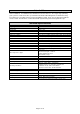
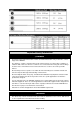
Parts List Part Number 1 2 3 4 5 6 7 8 9 10 11 12 13 14 15 16 17 18 19 20 21 22 23 24 25 26 27 28 Description Screw M6 x 18 Clutch Knob Gearbox End Cover Paper Washer O-Ring 26 x 1.5 Clutch Knob Base Screw ST 4X9 Fork Pin End Location Ring Planetary Gear 1 Plastic Washer 1 Clip 8 Joint Gear Planetary Gear 2 Plastic Washer 2 Planetary Gear 3 Drive Shaft Spline Spring Gear Housing O-Ring 95 x 1.
Part Number 29 30 31 32 33 34 35 36 37 38 39 40 41 42 43 44 45 Description Brake Motor Screw M6 X 20 Winch Mounting Hardware Wire Rope Mounting Plate Fairlead Fairlead Mounting Hardware Hook Hook Strap Switch Controller Solenoid Electric Wire (red) Electric Wire (black) Electric Wire (blue) Electric Wire (yellow) Circuit Breaker Quantity 1 1 2 2 1 1 1 2 1 1 1 1 1 1 1 1 1 Replacement Parts For replacement parts and technical questions, please call Customer Service at 1-800-222-5381.
Limited Warranty Northern Tool and Equipment Company, Inc. ("We'' or "Us'') warrants to the original purchaser only ("You'' or “Your”) that the Ironton product purchased will be free from material defects in both materials and workmanship, normal wear and tear excepted, for a period of one year from date of purchase. The foregoing warranty is valid only if the installation and use of the product is strictly in accordance with product instructions.
Distributed by: Northern Tool & Equipment Company, Inc. Burnsville, Minnesota 55306 www.northerntool.