
Product Manual

Page 10 of 19
2. If you drill through the bumper or any part of the body to route the wires, be sure to
install a rubber grommet in the hole to prevent fraying of the wires at that point.
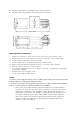
3. Route the Cables from the Solenoid to the
battery
and from the Solenoid to the
winch,
following the
precautions discussed earlier. See below picture.
Wiring Connection
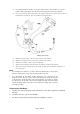
4. Attach the wire from the solenoid to the terminals on the Winch.
5. Attach the circuit breaker to the positive terminal on the battery.
6. Attach the red battery cable to the circuit breaker.
7. Attach the black battery cable directly to the negative terminal of the battery.
8. Wire in the switch controller (and socket lead, if required) according to the diagrams on
the facing page.
Note:
• If not attaching the winch to a vehicle, attach the ignition wire to the positive
battery terminal. If this is not done, the winch will not operate.
• The attachment of the Motor Cables determines the operation of the
Remote's button. After the unit is mounted and powered, check the direction
of the Power In and Power Out on the Remote button. If you wish to change
the direction on the Remote, disconnect the Battery Cables from the battery,
switch the Motor Cable connections on the Motor Assembly, then reconnect
the Battery Cables.
Preparing the Wire Rope:
1. The wire rope must be properly coiled under tension, to be able to support a load without
damage.
2. Uncoil the wire rope, expect for 5 full warps.
3. Recoil the rope back into the winch under at least 500 lb. of tension.