
Product Manual

Page 9 of 19
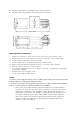
4. Drill holes appropriate for the
hardware
at the marked
locations.
5. Install the winch using
hardware described
under
Specifications.
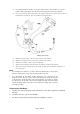
Mounting Winch Components:
1.
Mount the solenoid box, switch controller, and socket lead in proper
location
so
tha
t:
a) Winch components are close
enough
to
each
other to allow wires to be routed properly.
b)
Vehicle
component
operation
is not
interfered with.
c) Vehicle
components
are not
d
a
m
age
d
by drilling or driving
sc
r
e
ws.
d) Winch components will not be damaged
b
y
stresses caused by vehicle
operation.
2.
Mark the locations where the screw holes will
be.
3.
Verify that
the
installation
surface has no hidden components or structural
p
iece
s
that will be
damaged before
d
r
illi
n
g.
4.
Drill pilot holes for the mounting
scr
e
ws.
5. Secure in place with mounting
screws.
Wiring:
To prevent serious injury from explosion, due to sparking at the battery connection, disconnect the
Battery Cables before making other wiring connections.
To prevent serious injury from leaking battery acid, do not use a dirty, corroded or leaking battery.
Only use a 12V automotive (or equivalent) battery, in good condition.
1.
Plan a route for the wiring from the point of
the
vehicle where the winch will be
mounted, or used, to the battery. This route must be
secure
out of the way of
moving parts, road debris, or any possibility of being damaged by
operation
or
maintenance of the vehicle. For
example
, you may wish to route the wires under
the
vehicle
, attaching it to the frame using suitable
fasteners
Do not attach the
wires to the exhaust
system, drive shaft, emergency brake cable, fuel line, or
any
other components which may create damage
the
wiring through heat or
motion, or create a fire
hazard.