
Instructions / Assembly
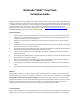
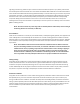
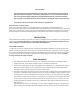
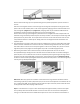
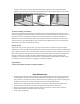
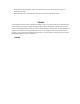

Diagram 1a Diagram 1b
Start the second row using 1/3rd of a plank allowing 1/4 inch (6.35mm) expansion space at the start of
the row.
Place the cut end against the wall. Insert the tongue on the long side of the plank into the groove of the
plank in the first row. Hold the plank in a 20° to 30° angle while applying pressure inward and down until
they lock together (diagram 1a) and (diagram 1b). A tapping block may be needed for additional force.
Complete the second row inserting the end joints first, then the length joints.
Start the third row using a 2/3rd length of a plank with the cut end against the wall. Complete each row
thereafter using a random layout with end joints off-set by at least 8”. Plan the layout to avoid using small
planks (less than 6”) at the walls. The cut piece at the end of the row can often be used to start the next
row provided it achieves a random layout. Always place the cut end against the wall and allow for the
expansion space.
4. Vinyl Plank planks are unique in that they can also be installed with a pull bar or tapping block and rubber
mallet or hammer in difficult areas such as the last row, and when fitting under door trim. Use a pull bar
and rubber mallet or hammer to lock the joints together in the last row. Always use a pull bar on the cut
edge of the plank. Factory edges can be damaged if the pull bar is used directly against them.
5. When fitting around door trim it will be necessary to slide the plank under the trim. This can be
accomplished easily by starting the row on the side of the room with the door trim and then sliding the
plank into place once it is attached. The row can be completed by inserting the tongue into the groove or
the groove into the tongue depending on the direction. A tapping block and pull bar (Diagrams 2a & 2b)
can also be used to lock the joints together while the planks are in a flat position. Use a series of light taps
until the joint is gradually locked together.
Diagram 2a Diagram 2b
Bathrooms: When Vinyl planks are installed in a bathroom the flooring should be installed around the
toilet leaving a 1/8 inch (3.175mm) expansion space, do not continue into adjacent rooms without the use
of a T molding. Use 100% silicone caulking to fill the expansion space at the tub, shower and all wet areas
to help prevent surface water seepage under the floor.
Pipes: In rows where there is a pipe or other vertical object through the subfloor, make sure the object
lines up exactly where two boards will meet on the short ends. Take care to measure carefully before
cutting, so the two boards end at the middle of the object. Use a drill or hole bit that is the diameter of