
Use and Care Manual


iSpring WCB/WGB Series Premium Whole House Systems
Version 2020-03
The filter should be placed on the main water supply line near where it enters the house at any
point past the main shutoff valve for the whole house, but before pipes branch off into multiple
directions. However, you may choose to locate the filter after the line branches to the inside and
outside plumbing depending on your filtration needs. Your filter should be located in a
dry, level area and protected from freezing temperatures and direct sunlight.
Notice:
The filter housing comes with a 1'' NPT Male inlet/outlet and will require additional fitting to
adapt to your plumbing. A shutoff valve is recommended prior to the system.
Step 1 - Measure the System and Cut the Pipe
Determine location and water flow direction for the system.
Notice:
If the water flow of the pre-installed caps union points conversely to your water flow, you can
converse the caps union by unscrewing the bolts that connect it with the bracket.
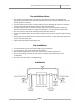
Measure, cut, and remove the section of water line
where the system is to be installed. When determining
the length of pipe to cut, account for filter width,
shutoff valves, union fittings, nipple fittings, pressure
gauges (if used) and bypass valve (if used).
Allow the cut line to drain. Smooth the newly cut ends
down to avoid jagged points or edges.
Step 2 - Mount the Filter Bracket
Securely mount the whole house filter bracket and ensure the system is level.
Attach your plumbing to the INLET and OUTLET with 1'' male threaded adapter (not included).
Step 3 - Add on Shutoff Valve and Pressure Gauge (Optional)
Place a shutoff valve and/or a pressure gauge on either side of the filter for ease of monitoring
and ease of service.
1) You may need to adjust pipe length or distance.
Fit a pipe union onto the cut section of the main
water line.
Page 7