Digital Wireless Portable Station Instruction Manual (Pre-Release Edition)
Omegatrek is a trademark of Iwatsu America, Inc. Iwatsu America, Inc., 430 Commerce Boulevard, Carlstadt, NJ 07072, (201) 935-8580,email: info@iwatsu.com, www.iwatsu.com © 2000 by Iwatsu America, Inc. All rights reserved. Second Edition (Version 4.0) October 2000 Pre-Release Edition October 2000 Printed in the United States of America All rights are reserved. No part of this manual or accompanying software may be reproduced, in any form or by any means, without the permission of Iwatsu America, Inc.
Table of Contents 1. INTRODUCTION................................................................................................................................................................1 PART NAMES AND DESCRIPTIONS.............................................................................................................................................. 1 LCD DISPLAY....................................................................................................................................
DELETING AN ITEM FROM INCOMING CALL HISTORY.......................................................................................................... 45 DELETING ALL ITEMS FROM INCOMING CALL HISTORY...................................................................................................... 46 ONE-TOUCH DIAL......................................................................................................................................................................
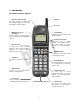
1. Introduction Part Names and Descriptions Indicator/Charge Lamp The lamp flashes red when the phone rings. It lights up red when the battery is being charged. • Multipurpose Keys (Line Keys) Various functions can be assigned to these keys by programming the system. • • Antenna • Receiver LCD Display It displays phone numbers and different statuses. • Volume/Search Keys Use these keys to adjust receiver volume, ringer volume, or speaker volume. Use these keys also to search through a menu.
LCD Display 1 2 3 4 5 8 1 Telephone 2 3 Speaker Antenna 4 Signal Strength 5 6 Scroll Feature 7 Battery 8 9 10 11 Silent Vibration Alarm Dot Matrix Area 9 10 6 7 11 Blinks while the personal station is trying to establish a communication with a base station and stays on once it is established. Indicates that the speaker is on. Indicates that the portable station can communicate with the base station. Shows the strength of the signal received from the base station.
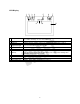
LED Status Indicators Type Multipurpose Keys Dial Pad Indicator/Charge Lamp Lamp Pattern Flashing (Green) Steady ON (Red) Slow Long ON–Short OFF Flashing (Red) Slow Short ON–Long OFF Flashing (Red) Three Quick Blinks and Steady ON (Green) Steady ON (Green) Steady ON (Green) Steady ON (Red) Slow Flashing (Red) Flashing (Red) 3 Status You are talking on the portable station. Someone else is talking on another extension. Your portable station is receiving a call. A call is on hold on another extension.
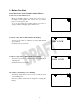
2. Before You Start You Cannot Use Your Portable Station When— You do not see the Antenna icon. When the portable station is outside the service area or receiving a weak signal in the service area, you cannot place or receive phone calls. Go to an area where the portable station can receive a stronger signal for bringing up the Antenna icon. You press a key and see KEY LOCK on the display. The Key Lock feature is enabled to prevent unintentional key operations. KEY LOCK Disable the Key Lock feature.
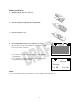
Battery Installation 1. Plug the battery into the connector. Red (+) 2. Place the battery snugly into the compartment. 3. Place the battery cover. 4. Press and hold [Power] for more than two seconds. Black (–) All icons will come up on the display for a moment. You will hear a beep at the same time. • The characters on the top line can be set in database programming. • The characters on the middle line can be changed by programming the portable station.
Charging the Battery Use the supplied charger only. 1. Plug the charger into an AC outlet. 2. Place the portable station snugly into the charger. Make sure that the Charge lamp lights up red. Leave it for more than seven hours. NOTES: • When the battery is almost fully charged, the red lamp turns green. • The portable station and the charger may feel warm to the touch. This warming is normal. • You cannot turn the power on while the battery is being charged.
Hand Strap We recommend you to wrap the hand strap around your wrist while carrying around the portable station. 1. Put the thin string of the hand strap through the hole in the portable station as shown on the right. 2. Put the other end through the thin string and pull it tight.
Extension Number Display You can verify your own extension number. 1. When the portable station is idle, press [Menu] [0]. MENU:0 EXT. NO. MENU TO PROG 2. Press [Menu]. The display shows the extension number. EXT. NO. 2200 3. Press [End] to go back to the idle state. NOTES: • The prompt MENU TO PROG tells you to press [MENU] to program (or to go one step further into menu item). • Press [End] to exit from any menu screen to the idle state.
Signal Strength The Antenna icon indicates that the portable station can communicate with the base station. It shows the level of signal strength in four steps. Strong • You may not be able to place or receive phone calls in a weak-signal area. • There may be a chance that the portable station cannot temporarily receive a phone call in a strong-signal area during a registration operation with a base station. • Extend the antenna for better reception until you feel a click.
Clock and Calendar The system clock information will automatically be sent to the portable station. However, you can also program clock and calendar yourself as follows. 1. When the portable station is idle, press [Menu] [5] [1]. MENU:5 1 TIME MENU TO PROG 2. Press [Menu]. 01/ 01 / 2 0 0 0 1 2 :0 0 MENU TO PROG 3. Enter the current time. Enter Month à Date à Year à Time. Use [* right. ] to move the cursor to the left, and [# ] to the Hours are denoted in military time (24-hour cycle). 4.
Operating Menus You can find the desired menu by either entering the menu number or searching through the menus. The following examples are for selecting the PS Quick mode (Menu 52). Entering the menu number 1. Press [Menu] [5] [2] [Menu]. The setup menu for the PS Quick mode will be displayed. 2. QUICK MODE When the setup is complete, press [Menu]. ON OFF The portable station goes back to the idle state. Searching through the menus 1. Press [Menu]. 2.
3. Basic Features Placing a CO Call 1. Lift the portable station from the charger and press [Send]. The [Send] key flashes green. ICM Clear Hist Send 2. Power End Press a line key. Wait for the dial tone. The line key flashes green. OPTIMIZED 3. 1 2 3 4 5 6 7 8 Dial the phone number. You will hear a ring back tone in a moment. CO# 1 GP.1 2015558580 4. Talk on the portable station when the call is answered. Elapsed time of the call is displayed on the bottom line. CO# 1 GP.1 0 :0 5 5.
Receiving a CO Call When a line receives a CO call, the corresponding line key on your portable station flashes red. If the portable station is specified in database programming to ring for incoming calls on that particular line, the Indicator lamp will flash and a ringer will go off. 1. A line key flashes red. 1 2 3 4 5 6 7 8 Lift the portable station from the charger and press the flashing line key. 1 2 3 4 The line key turns green and intermittently blinks.
Exclusive Hold You can place an outside call on hold that cannot be picked up by another extension. 1. Tell the other party to hold. 2. Press the Feature key twice. 0 :2 3 The letter F appears as you press the Feature key once, and it disappears as you press the Feature key for the second time. 9725551080 0 :2 4 9725551080 3. Press [Hold]. The other party will hear a holding tone. 1 2 3 4 5 6 7 8 The line key slowly flashes green. The [Send] key lights intermittently blinks. 4.
Group Park By placing a call on Group Park, all extensions with the appearance of that Group Park key will have a flashing indication and be able to pick up that call. The Group Park key needs to be assigned to a line key in database programming. 1. Press the Group Park key. The other party will hear a holding tone. The Group Park key ( 6 in this example) slowly flashes green. The line key ( 1 lights up red.
Transferring a Call to Another Extension You can transfer a CO call or an intercom call to another extension. (The TRAN key needs to be assigned to a line key in database programming.) 1. Tell the other party to hold. 2. Press the TRAN key. The other party will hear a holding tone. 1 2 3 4 5 6 7 8 The line key ( 1 in this example) slowly flashes green. The [Send] key lights up and intermittently blinks. The TRAN key ( 5 in example) rapidly flashes red. 3.
Placing an Intercom Call 1. Lift the portable station from the charger and press [Send]. The [Send] key lights intermittently blinks. 2. up Clear Hist Send and Power End ICM Dial the desired extension number. You will hear a ring back tone in a moment. You can press [#] and call to that party with your voice instead. 3. Talk on the portable station when the call is answered. 4. When you finish talking, press [End] and place the portable station back in the charger.
Hands-Free Answerback on Intercom When you receive a call from another extension, you can ans wer the call with your voice with the microphone turned on. The microphone can be turned on or off when the portable station is idle or when you are receiving an intercom call. (The MIC OFF key needs to be assigned to a line key in database programming.) The microphone is on by default. When the microphone is on, the light on the MIC OFF key is off. 1.
Additional Features By combining the Feature key and a code, you can access an advanced feature that is not assigned to an individual key. Press [Feat] [Feat] + Code to access a feature. The list of codes is shown below.
Flexible Call Forwarding (for CO Line and Intercom) This feature allows you to send incoming calls to another extension or external line (using Personal Speed Dial numbers 90–99). You can also separate call forward destinations for intercom calls and CO calls. For instance, you could set all intercom calls to your cell phone, and all CO calls to be forwarded to your voice mail. (The FWD key needs to be assigned to a line key in database programming.) 1.
Optimized Routing (for CO Line Only) With the use of a one-touch optimize key, you can allow the system to automatically select the least expensive way to make an outgoing call. When a one-touch optimized key [FLT00] is allocated on your portable station enabled for optimized routing, you can make an optimized call by simply pressing [FLT00]. 1. Press [FLT00]. The [FLT00] key flashes green. 2. 1 2 3 4 5 6 7 8 OPTIMIZED Dial the phone number. OPTIMIZED 2015558580 4.
Prime Line to Optimized (for CO Line Only) When you place a CO call, an open line can automatically be accessed. (Prime Line to Optimized needs to be configured in database programming.) 1. When the portable station is idle, press [Send]. A line key lights up green and intermittently blinks. 2. 1 2 3 4 5 6 7 8 OPTIMIZED Dial the phone number. 9725550242 NOTE: • If there is no open line for the moment, you cannot place a CO call. Try again later.
Conference Call (for CO Line and Intercom) When you are on a call, you can have one or two extensions join you in a three-party call or a four-party call. (The [TRAN] and [ADD] keys need to be assigned to line keys in database programming.) Adding Another Extension to a CO call 1. When you are on a CO call, press [TRAN]. Wait for the intercom dial tone. 1 2 3 4 5 6 7 8 The line key slowly flashes green. The [Send] key lights up and intermittently blinks. 2.
Adding Another Extension to an Intercom Call 1. When you are on an intercom call, press [TRAN]. 1 2 3 4 5 6 7 8 Send 2. Clear Hist ICM Power End Dial the desired extension number. CALLING 2100 KATHY 3. When the call is answered, tell the party to join you in a conference call. ICM 2100 KATHY 4. Press [ADD]. The outside line caller and the extension caller will hear a notification tone. Repeat Steps 1–4 to add another extension to the conference call.
Paging (for Intercom Only) You can make an announcement through the speakers in the key telephones or the external paging speakers. 1. When the portable station is idle, press [Send]. Wait for the intercom dial tone. The [Send] key lights up and intermittently blinks. 2. Enter the access code. Enter the All Call access code to page through the speakers in the key telephones and the external paging speakers. Enter a Group Call access code to page through the speakers in the key telephones in a group.
4. Advanced Features System Select This portable station can be used as an intercom telephone with line keys, communicating with the base station connected to the key service unit of the system. The portable station can be registered to up to nine systems. If you move from one system to another, the portable station switches over automatically. If the service areas of two or more systems overlap, you can select one of them as follows. 1.
NOTES: • If you select AUTO, a system will be automatically selected. • When the Range Notify feature (Menu 42) is ON, you will hear a warning tone when you walk out of the service area. • The eight line keys can be assigned to various functions with database programming. The line keys light up red or green to indicate different statuses. • The key service unit provides you with various services. The display on your portable station shows you the statuses of the services.
The following features are shared by all operation modes. Character Entry You can enter alphabet, numbers, and symbols. Use the dial pad to enter the desired characters. 1. Enter characters. To enter George, press [4GHI] once, [3DEF ] five times, [6MNO] six times, [7PQRS] seven times, [4GHI] four times, and [3DEF ] five times. ENTER NAME B 2. Press [Menu] to finalize the entry.
Available characters and operations are listed below. Key [1 Characters ] 1 [2ABC ] A B C a b c 2 [3DEF ] D E F d e f 3 [4GHI] G H I g h I 4 [5JKL] J K L j k l 5 [6MNO] M N O m n o 6 [7PQRS] P Q R S p q r s 7 T U V t u v 8 [9WXYZ ] W X Y Z w x y z 9 [0OPER] – . & / [ ] # * (Space) ” ! ? 0 [* Moves the cursor to the left. [8TUV] ] [# ] [Clear] [Clear] for 1 sec Moves the cursor to the right. Deletes one character. Deletes all the characters.
Making an Entry in Directory You can register up to 500 phone numbers in the Directory. One entry includes a name (12 characters) and a phone number (24 digits). You can also select a group to store the entry in. 1. When the portable station is idle, press [Menu] and [Dir]. ENTER NAME The display prompts you to enter a name. Pressing [Dir] for more than one second also takes you to this menu. 2. B Enter a name. ENTER NAME Ge o rge 3. Press [Menu]. You will be prompted to enter a number.
5. Press [Menu]. The display shows the Group Selection menu. 6. SELECT GROUP Press [ ] or [ ] to bring up the desired group. You can also use the dial pad (0–9) to select a group. 7. Gro up 0 Press [Menu]. The display prompts you to confirm the selection. REGISTER? ENTRY EDIT 8. Press [ ] or [ ] to select ENTRY or EDIT, and then press [Menu]. You will hear two quick beeps when the entry has been successfully made. ENTRY SAVED Selecting EDIT will take you back to Step 2.
Editing an Entry in Directory You can edit a selected entry in the Directory. 1. Search and select an entry you wish to edit. IATTSU 97 25550242 2. Press [Menu]. IATTSU EDIT DELETE 3. Press [Menu]. The previously entered name will be displayed. If you do not have to edit the name, skip to Step 5. ENTER NAME IATTSU 4. Use [* ] or [# ] to move the cursor over a character and then insert another character on the left. You can also move the cursor over a character and then press [Clear] to delete it.
7. Press [Menu]. The previously selected group number will be displayed. If you do not have to change the group number, skip to Step 9. 8. Press [ ] or [ ] to select a different group number. 9. Press [Menu]. The display asks you if you would like to overwrite the previous entry with new changes. 10. Press [ ] or [ ] to select YES, SAVE AS NEW, or EDIT. SELECT GROUP Gro up 0 OVERWRITE? YES SAVE AS NEW 11. Press [Menu].
Deleting an Entry in Directory You can delete a selected entry in the Directory. 1. Search and select an entry you wish to delete. IWATSU 9725550242 2. Press [Menu]. IWATSU EDIT DELETE 3. Press [ ] or [ ] to select DELETE. IWATSU EDIT DELETE 4. Press [Menu]. DELETE? YES NO 5. Press [ ] or [ ] to select YES or NO. 6. Press [Menu]. DELETED If you select YES, you will hear two quick beeps to indicate that the entry has been deleted. If you select NO, you will see NOT DELETED on the display.
Deleting All Entries in Directory You can delete all entries in the Directory. 1. When the portable station is idle, press [Menu] [2] [3] to bring up the Delete All Directory menu. MENU:2 3 DEL. ALL DIRC MENU TO PROG 2. Press [Menu]. If a password is not registered, you will hear a warning tone and see NOT REGIST on the display. You cannot delete all entries in that case. 3. PASSWORD Enter the four-digit password.
Directory Group Name You can name a directory group. 1. When the portable station is idle, press [Menu] [5] [8] to bring up the Directory Group Name menu. MENU:5 8 DIR. GRP. NAME MENU TO PROG 2. Press [Menu]. 3. Press [ ] or [ ] to select a directory group. GROUP0 Gro up 0 MENU TO PROG 4. Press [Menu]. ENTER G. NAME Gro up 0 5. Edit the directory group name and press [Menu]. You will hear a confirmation tone to indicate that the change has been successfully made. ENTER G.
Registering a Phone Number from Call History to Directory You can register phone numbers recorded in the Call History into the Directory. 1. Select the data you wish to register. OUT: 1 1 2 :3 4 P 9725550242 2. Press [Menu]. 9725550242 DELETE SAVE 3. Press [ ] or [ ] to select SAVE. 9725550242 DELETE SAVE 4. Press [Menu]. You will be prompted to enter a name. The rest of the procedure is the same as in Making an Entry in Directory.
Dialing a Phone Number in Directory with an Access Code 1. Dial the access code (e.g., 0) you wish to combine with a phone number in the Directory. 9 2. Press [Dir]. 3. Search and select the phone number from the Directory. IWATSU 9725550242 4. Press [Send] the combined numbers. CO# 1 GP.
Dialing a Phone Number in Directory with an Additional Number 1. Press [Dir]. 2. Search and select the phone number from the Directory IWATSU 9725550242 3. Press [* ]. 9725550242 4. Enter the number (e.g., 201) you wish to add to the phone number. 9 725550242201 5. Press [Send] to dial the combined numbers. CO# 1 GP.
Redialing Previously Dialed Phone Numbers (Outgoing Call History) The 10 most recent phone numbers you dialed are recorded. You can select and redial a phone number from the list. (Up to 24 digits can be recorded as a phone number.) 1. When the portable station is idle, press [Hist]. If no outgoing phone numbers are recorded, the Incoming Call History will be displayed.
Deleting an Item from Outgoing Call History 1. Select the item you wish to delete from the Outgoing Call History. OUT: 1 1 2 :3 4 P 9725550242 2. Press [Menu]. Confirm that DELETE is selected. 9725550242 DELETE IN DIRECTRY 3. Press [Menu] again. You will hear a confirmation tone to indicate that the selected item has been deleted. The portable station will go back to the idle state.
Deleting All Items from Outgoing Call History 1. Bring up the Outgoing Call History. OUT: 1 1 2 :3 4 P 9725 550242 2. Press [Menu]. 9725550242 DELETE IN DIRECTRY 3. Press [ ] or [ ] to select ALL CLEAR. 9725550242 IN ONE TOCH ALL DELETE 4. Press [Menu]. DELETE? YES NO 5. Press [ ] or [ ] to select YES or NO. 6. Press [Menu]. If you select YES, you will hear a confirmation tone to indicate that all the items in the Outgoing Call History have been deleted.
Dialing Phone Numbers of Previously Received Calls (Incoming Call History) When you receive an incoming call along with the caller’s phone number, the phone number is recorded in the Incoming Call History. Up to 10 most recent phone numbers can be recorded. (Up to 24 digits can be recorded as a phone number.) 1. When the portable station is idle, press [Hist]. If any outgoing phone numbers are recorded, the Outgoing Call History will be displayed. Press [Hist] again to bring up the Incoming Call History.
• If you did not answer an incoming call that contained the caller’s phone number, the ringing phone symbol shown on the right will be displayed in the idle state. SYSTEM 1 Ge o rge 1 2 :3 4 P • In the Incoming Call History, a call you did not answer is indicated with the letter A (for Abandoned Call) on the left side of the date. IN:A 5 1 :4 5 P 2015558580 • To place a CO call, you need to press a line key (after you press [Hist]) to access a CO line.
Deleting an Item from Incoming Call History 1. Select the item you wish to delete from the Incoming Call History. IN: 1 1 2 :3 4 P 2015558580 2. Press [Menu]. Confirm that DELETE is selected. 2015558580 DELETE IN DIRECTRY 3. Press [Menu] again. You will hear a confirmation tone to indicate that the selected item has been deleted. The portable station will go back to the idle state.
Deleting All Items from Incoming Call History 1. Bring up the Incoming Call History. IN: 1 1 2 :3 4 P 2015558580 2. Press [Menu]. 2015558580 DELETE IN DIRECTRY 3. Press [ ] or [ ] to select ALL CLEAR. 2015558580 IN ONE TOCH ALL DELETE 4. Press [Menu]. DELETE? YES NO 5. Press [ ] or [ ] to select YES or NO. 6. Press [Menu]. If you select YES, you will hear a confirmation tone to indicate that all the items in the Incoming Call History have been deleted.
One-Touch Dial If the one-touch dial feature is assigned to a line key, etc., up to 24 digits (including a telephone number, [Send], etc.) can be registered to the key for one-touch dialing. (The One-Touch Dial key needs to be assigned to a line key, if necessary, in data settings of the portable station.) 1. When the portable station is idle, press the One-Touch Dial key ( 5 in this example). The line key lights up green and intermittently blinks. 1 2 3 4 5 6 7 8 GP.
3. Press [ ] or [ ] to select a Speed Dial key/key combination. Then press [Menu]. If you select EAR-MIC, you can register a phone number to the switch on the earpiece microphone. ENTER NAME P 4. Enter the name you wish to register. 5. Press [Menu]. ENTER NUMBER 6. Enter the phone number you wish to register. The entered digits will show up from bottom-right. 2015558580 7. Press [Menu]. You will hear a confirmation tone to indicate that the registration has been successfully made.
Deleting a Phone Number from a Speed Dial Key 1. When the portable station is idle, press [Menu] [7]. MENU:7 ONE TOUCH MENU TO PROG 2. Press [Menu]. ONE TOUCH FEAT+ 9 * EAR– MIC 3. Press [ ] or [ ] to select a Speed Dial key/key combination from which you wish to delete a phone number. IWATSU 9725550242 Press [Menu] again or wait two seconds to go to the next menu screen. IWATSU EDIT DELETE 4. Press [ [Menu].
Registering a Phone Number from Call History to a Speed Dial Key You can register phone numbers recorded in the Call History into the Speed Dial keys. 1. Select the data you wish to register from the Incoming Call History or the Outgoing Call History. OUT: 1 1 2 :3 4 P IWATSU 2. Press [Menu]. IWATSU DELETE IN DIRECTRY 3. Press [ ] or [ ] to select Speed Registration, and then press [Menu]. IWATSU IN DIRECTRY IN ONE TOCH 4.
Registering a Phone Number from Directory to Speed Dial Key 1. Select the data you wish to register from the Directory. IWATSU 9725550242 2. Press [Menu]. IWATSU EDIT DELETE 3. Press [ ] or [ ] to select Speed Registration, and then press [Menu]. IWATSU DELETE IN ONE TOCH 4. Press [ ] or [ ] to select a Speed Dial key/key combination to which you wish to register the phone number, and then press [Menu].
Listening to Ring Back Tone and Called Party’s Voice on Speaker 1. Dial the phone number. 2015558580 2. Press and hold the Speaker key for more than one second. CO# 1 GP.1 2015558580 3. Press the Speaker key again to speak to the called party. CO# 1 GP.1 2015558580 NOTES: • The called party will not hear your voice when the speaker is on. • If you want to turn the speaker on during a phone conversation, press the Speaker key. (The Speaker key toggles on/off the speaker.
Receiver Volume Control You can adjust the receiver volume in five steps. 1. Press [ ] or [ ] during a phone conversation. 2. Press [ ] to increase the volume, or press [ ] to decrease the volume. 3. The portable station goes back to the idle state in two seconds after you release the key. RECEIVE VOL. Louder RECEIVE VOL. RECEIVE VOL. RECEIVE VOL. Softer RECEIVE VOL. NOTE: • The receiver volume setting will not change after the phone conversation.
Speaker Volume Control You can adjust the speaker volume in five steps. 1. Press [ ] or [ ] during a phone conversation (while using the speaker). 2. Press [ ] to increase the volume, or press [ ] to decrease the volume. 3. The portable station goes back to the idle state in two seconds after you release the key. SPEAKER VOL. Louder SPEAKER VOL. SPEAKER VOL. SPEAKER VOL. Softer SPEAKER VOL. NOTE: • The speaker volume setting will not change after you turn off the speaker.
Ringer Volume Control You can adjust the ringer volume in three steps. You can also turn off the ringer. 1. When the portable station is idle or receiving a call, press [ ] or [ ]. 2. Press [ ] to increase the volume, or press [ ] to decrease the volume. 3. The portable station goes back to the idle state in two seconds after you release the key. RINGER VOL. STEP TONE Louder RINGER VOL. RINGER VOL. RINGER VOL.
Ring Option 1. When the portable station is idle, press [Menu] [3] [2] to bring up the Ring Option menu. 2. Press [Menu]. MENU:3 2 RING OPTION MENU TO PROG 3. Press [ ] or [ ] to select a ringer type or Alarm, and then press [Menu]. You will hear the currently selected tone. RING OPTION ICM CO 4. Press [ ] or [ ] to select a tone type. Every time you press [ ] or [ ], you will hear the current tone indicated on the display. ICM RING OPTION2 OPTION3 5. Press [Menu].
Vibrate Alert You can set the Vibration Alert feature to notify you of all incoming calls. 1. When the portable station is idle, press [Menu] [3] [1] to bring up the Vibrate menu. MENU:3 1 VIBRATE MENU TO PROG 2. Press [Menu]. 3. Press [ ] or [ ] to select ON or OFF. VIBRATE ON OFF 4. Press [Menu]. You will hear a confirmation tone to indicate that the change has been successfully made.
Personal Ringing Mode To minimize the inconvenience to people around you, you can temporarily change the settings for the ringer, confirmation/warning tones, and vibration to the ones programmed in the Personal Ringing settings. 1. When the portable station is idle, press and hold [# for one second. Pers ] The confirmation tone may or may not sound, depending on the Personal Ringing setting.
4. Press [ ] or [ ] to select Confirmation Tone/Warning Tone ON or OFF. CONF. TONE ON OFF 5. Press [ ] or [ ] to select Vibration ON or OFF. VIBRATE ON OFF 6. Press [Menu]. You will hear a confirmation tone to indicate that the Personal Ringing settings have been successfully made. The portable station will go back to the idle state. PERSONAL RNG SAVED NOTES: • When vibration is ON, the portable station will vibrate regardless of the ringer volume setting.
Key Lock The Key Lock feature keeps you from inadvertently operating the portable station by hitting a key while carrying the portable station. 1. When the portable station is idle, press and hold Lock [* ] for one second. You will hear a confirmation tone to indicate that Key Lock has been successfully activated. The portable station will go back to the idle state. KEY LOCK ON NOTES: • Key Lock will be disabled once you turn off the portable station.
Registering/Changing Password To activate/deactivate Dial Lock or Directory Lock, you need to register a four-digit password in advance. 1. When the portable station is idle, press [Menu] [5] [5] to bring up the Password menu. MENU:5 5 PASSWORD MENU TO PROG 2. Press [Menu]. PASSWORD 3. If a password is already registered, enter the four-digit password (0000–9999). PASSWORD *** 4. Enter a new four-digit password. PASSWORD NEW: 5. *** Reenter the new four-digit password.
If you enter the wrong password, you will hear a warning tone. PASSWORD INCORRECT NOTES: • The password is required to activate/deactivate Dial Lock or Directory Lock. Write it down and try not to lose it. If you do lose it, contact your dealer. • • • • You cannot delete the password. When you enter a password for the first time, you will not have to enter an old password. The password you entered will not be lost even when you turn off the portable station. Asterisks will replace the digits you enter.
Dial Lock If you activate the Dial Lock feature, you can prevent other people from making unauthorized phone calls using your portable station. While the Dial Lock feature is activated— • • • • 1. You cannot place outgoing calls (except for 911). You can receive incoming calls. You can turn on or off the portable station. You cannot activate/deactivate features except for the Key Lock feature. When the portable station is idle, press [Menu] [2] [1] to bring up the Dial Lock menu.
You will hear a confirmation tone to indicate that the Dial Lock feature has been successfully activated. The portable station will go back to the idle state. DIAL LOCK ON If you enter the wrong password, you will hear a warning tone.
Disabling Dial Lock 1. Enter the four-digit password. DIAL LOCK **** 2. Press [Menu]. You will hear a confirmation tone to indicate that the Dial Lock feature has been successfully disabled. DIAL LOCK OFF If you enter the wrong password, you will hear a warning tone. PASSWORD INCORRECT NOTES: • Press [End] if you would like to stop disabling the Dial Lock feature. • If you press an invalid key while the Dial Lock feature is ON, the words DIAL LOCK will appear on the display.
Directory Lock If you activate the Directory Lock feature, you can prevent other people from looking in your Directory. While the Directory Lock feature is activated— • You cannot look in your Directory. • You can still place or receive calls. • You can turn on or off the portable station. 1. When the portable station is idle, press [Menu] [2] [2] to bring up the Lock Directory menu. MENU:2 2 DRCTRY LOCK MENU TO PROG 2. Press [Menu].
4. Press [ ] or [ ] to select ON or OFF. DRCTRY LOCK 5. Press [Menu]. You will hear a confirmation tone to indicate that the Directory Lock feature has been successfully turned on or off. The portable station will go back to the idle state. ON OFF If the Directory Lock feature is turned on, the word ON appears on the display. DRCTRY LOCK ON If the Directory Lock feature is turned off, the word OFF appears on the display.
Alarm Clock 1. When the portable station is idle, press [Menu] [1] [1] to bring up the Alarm Clock menu. MENU:1 1 ALARM CLOCK MENU TO PROG 2. Press [Menu]. 3. Press [ ] or [ ] to select ON or OFF. ALARM CLOCK ON OFF 4. Press [Menu]. If you have selected OFF, you will hear a confirmation tone. The portable station will go back to the idle state. ALARM CLOCK OFF 5. Set the alarm time. ALARM CLOCK 1 2 :0 0 MENU TO PROG 6. Press [Menu]. 7. Press [ ] or [ ] to select ONE TIME or EVERY DAY.
NOTES: • The letter A (for Alarm) appears on the display when alarm is set. • You will hear the tone selected in Tone Selection. • The alarm tone volume is the same as the ringer volume. An alarm tone may or may not be heard in the Personal Ringing mode, depending on the Personal Ringing setting. • An alarm tone lasts one minute. • Press [End] to stop an alarm tone (even while the Key Lock feature is ON). • The Alarm setting will not be lost even if you turn off the portable station.
Placing a Call with Earpiece Microphone With an optional earpiece microphone attached to your portable station, you can place or receive calls by pressing the switch on the earpiece microphone. If you have registered a phone number to the switch on the earpiece microphone, you can call that number by pressing the switch on the earpiece microphone. 1. Connect an earpiece microphone to the portable station. Insert the plug of the earpiece microphone into the earpiece microphone jack on the portable station.
Programming the Portable Station You can program the portable station to your liking with various menus. • Press [End] to exit from any menu screen to the idle state. • If you do not press a key during an operation for 30 seconds, the portable station will go back to the idle state. Start the operation over from the beginning. Press [Clear] to go back to the previous menu screen. • If you receive a call during an operation, the operation will be canceled and the portable station will ring.
Disabling Keypad Tone 1. When the portable station is idle, press [Menu] [4] [1] to bring up the Keypad Tone menu. MENU:4 1 2. KEYPAD TONE Press [Menu]. MENU TO PROG 3. Press [ ] or [ ] to select ON or OFF. KEYPAD TONE ON OFF 4. Press [Menu]. You will hear a confirmation tone, and the portable station will go back to the idle state.
PS Quick Mode (Charger Unit) If the PS Quick mode is ON, you can pick up the portable station from the charger to answer a call and put it back to the charger to hang up the call. 1. When the portable station is idle, press [Menu] [5] [2] to bring up the Quick Mode menu. MENU:5 2 2. QUICK MODE Press [Menu]. MENU TO PROG 3. Press [ ] or [ ] to select ON or OFF. QUICK MODE ON OFF 4. Press [Menu]. You will hear a confirmation tone, and the portable station will go back to the idle state.
User Name 1. When the portable station is idle, press [Menu] [5] [7] to bring up the User Name menu. MENU:5 7 USER NAME MENU TO PROG 2. Press [Menu]. USER NAME Ge o rge 3. The currently registered user name will be displayed. Use [* ] or [# ] to move the cursor, and enter a new name. 4. Press [Menu]. You will hear a confirmation tone to indicate that the registration has been successfully made. The portable station will go back to the idle state.
Any Key Answer When the Any Key Answer feature is ON, you can answer a call by pressing any key (including 0–9, * , and #). 1. When the portable station is idle, press [Menu] [5] [4] to bring up the Any Key Answer menu. MENU:5 4 ANYKEY ANS. 2. Press [Menu]. 3. Press [ ] or [ ] to select ON or OFF. MENU TO PROG ANYKEY ANS. ON OFF 4. Press [Menu]. You will hear a confirmation tone, and the portable station will go back to the idle state. ANYKEY ANS.
Modem Connection When the Modem Connection feature is ON, you can engage in data communications by connecting a commercially available modem to the earpiece microphone jack. 1. When the portable station is idle, press [Menu] [1] [5] to bring up the Modem menu. MENU:1 5 MODEM 2. Press [Menu]. 3. Press [ ] or [ ] to select ON or OFF. MENU TO PROG MODEM ON OFF 4. Press [Menu]. You will hear a confirmation tone, and the portable station will go back to the idle state.
Range Notify If you walk out of the service area with the portable station while the Range Notify feature is ON, the portable station will give off a warning tone. 1. When the portable station is idle, press [Menu] [4] [2] to bring up the Range Notify menu. MENU:4 2 RANGE NOTIFY 2. Press [Menu]. 3. Press [ ] or [ ] to select ON or OFF. MENU TO PROG RANGE NOTIFY ON OFF 4. Press [Menu]. You will hear a confirmation tone, and the portable station will go back to the idle state.
Charger Tone The charger tone lets you know that the portable station has been properly placed in the charger. 1. When the portable station is idle, press [Menu] [4] [3] to bring up the Charger Tone menu. MENU:4 3 CHARGER TONE 2. Press [Menu]. 3. Press [ ] or [ ] to select ON or OFF. MENU TO PROG CHARGER TONE ON OFF 4. Press [Menu]. You will hear a confirmation tone, and the portable station will go back to the idle state.
Quick Mode Guard The PS Quick mode can be configured in database programming so that you get a dial tone (right after you pick up the portable station from the charger) without pressing [Send]. However, the line will be automatically disconnected if Quick Mode Guard is ON and if you do not press any key for 30 seconds after you pick up the portable station from the charger. 1. When the portable station is idle, press [Menu] [5] [3] to bring up the Quick Mode Guard menu. MENU:5 3 Q. MODE GUARD 2.
Help Display Browse this list if you have forgotten how to operate Omegatrek. When an item is displayed, press [Menu] to change the setting. 1. When the portable station is idle, press [Menu] [9] to bring up the Help Display menu. MENU:9 HELP DISPLAY MENU TO PROG 2. Press [Menu]. DATA REVIEW MENU TO PROG 3. Press [ ] or [ ] to select a programming item. ALT.
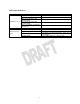
5. General Information List of Available Programming Items Press [Menu] and enter the desired menu number. You can also press [Menu] and press [ ] or [ ] repeatedly to bring up the desired menu.
Replacing Battery The life of the battery in the portable station varies with usage, but is generally about one year. If the battery cannot be recharged by the battery charger included with the portable station, or if it drains quickly after a full recharge, it should be replaced with a new battery. 1. If the portable station is on, press and hold [Power] for more than two seconds to turn it off. 2. Remove the battery cover. 3. Unplug the connector and remove the old battery. 4.
Battery Low Warning When the battery becomes low, you will hear a warning tone and the Battery icon starts to blink. It is time to recharge the battery. If this happens during a call, end the conversation promptly and place the portable station back in the charger. NOTES: • If you keep talking on the portable station after hearing a battery low warning tone, the call will be disconnected in a minute or so.
Out of Area If you walk outside of the service area while the portable station is in the idle state, the Antenna icon on the display will disappear. If this happens, go to an area where you can see the Antenna icon again to receive or place a call. If you walk outside of the service area while you are talking on the portable station, you will lose the voice of the other party or start hearing a Range Notify tone.
Troubleshooting Check the items listed below before sending the portable station for repair. Basic Operation Symptom You cannot turn on the portable station. The portable station does not operate. You cannot place a call. You cannot use the Directory. The call has been suddenly disconnected. The call is noisy and intermittent. Probable Cause You are not pressing [Power] long enough. The battery is exhausted. The battery is not connected properly. Remedy Press and hold [Power] for more than two seconds.
Specifications Item Size Weight Power Supply Power Consumption Talk Time Standby Time Handset 1.7” x 0.9” x 5.5” (excluding antenna and projections) 3.7 oz. (including battery) DC 3.6 V Lithium Ion Battery Charger 3.0” x 3.0” x 2.8” 4.7 oz. (including power cord) AC 120 V, 60 Hz 0.4 W 96 W 4.5 Hours 320 Hours — — • The talk time is a calculated value based on the normal temperature condition. It may vary with the ambient temperature and the condition of the battery.