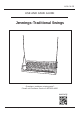
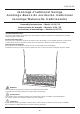
H-24 / H-25 USE AND CARE GUIDE Jennings ™ Traditional Swings Questions, problems, missing parts? Please call Customer Service:1-800-800-4950 warranty © 2018 Jack-Post Corporation SH-ZI-5306 10/18
H-24 / H-25 Contents Do Not Return ......................................................................................03 Use & Care / Wood Care Guide..........................................................04 Instructions ...........................................................................................05 Customer Service Contact Info..........................................................
H-24 / H-25 DO NOT RETURN THIS ITEM TO THE STORE If you experience any difficulty with assembly, missing parts or use, please DO NOT return this item to the store. Retail stores are unable to properly assist you. Contact our Customer Service Department directly for assistance. Call toll-free 1-800-800-4950, Monday-Friday, between the hours of 8 a.m. and 8 p.m. (EST). Our friendly Customer Service Agents will be happy to assist you.
H-24 / H-25 USE & CARE WARNINGS: THIS PRODUCT DESIGNED FOR A MAXIMUM CAPACITY OF 400 POUNDS. NOTE: Save assembly instruction sheet for future reference. OIL-BASED PAINTED WOOD CARE GUIDE PLEASE READ THIS INFORMATION CAREFULLY - IT WILL HELP YOU TO MAINTAIN YOUR FURNITURE This furniture has been made from seasoned wood and has already been factory primed and finished with an oil-based paint. With proper maintenance, it will give you years of enjoyable service.
H-24 / H-25 Jennings ™ Traditional Swings Jennings ™ Banco de oscilación tradicional Jennings ™ Balancelle traditionnelle Assembly Instructions – Model H-24 / 25 Instrucciones de armado – Modelo H-24 / 25 Instructions d'assemblage – Modèle H-24 / 25 FINISHING INSTRUCTIONS To preserve and beautify the wooden parts, they should be painted or varnished on all sides before assembly with good quality exterior finish.
H-24 / H-25 IMPORTANT UNLESS NOTED, DO NOT TIGHTEN ANY BOLTS UNTIL LAST STEP. IMPORTANTE A MENOS QUE SE LE INDIQUE, NO APRIETE NINGúN PERNO HASTA EL úLTIMO PASO. IMPORTANT À MOINS D'INDICATION CONTRAIRE, NE RESSERREZ PAS LES BOULONS AVANT LA DERNIÈRE ÉTAPE. TOOLS . HERRAMIENTAS . OUTIL Hammer and 10 mm wrench, or adjustable wrench, pliers, and a standard screwdriver. Martillo y llave inglesa de 10mm, o llave ajustable, alicates, y destornillador estándar.
H-24 / H-25 STEP 1 Position and insert 65 mm screws in 2 holes in back. Place screws through 2 holes in seat using washer and lock nut. NOTE: Do not mount back assembly incorrectly. PASO 1 Posicionar y insertar los pernos de 65mm a través los agujeros del respaldo y del asiento. Inserte las arandelas y tuercas en cada lado. NOTA: No ensambla el respaldo incorrectamente. ETAPE 1 Positionner et insérer les boulons de 65 mm dans les trous du dossier et du siège.
H-24 / H-25 STEP 2 Attach each arm to back by placing70 mm screws through chain, thenthrough the hole in tapered end of the arm (straight edge of the arm facing in), then attach to back with a washer and a nut. PASO 2 Conectar cada brazo con el respaldo, colocando primero los Tornillo de 70mm a través de la cadena, después a través de los agujeros del brazo lateral cónica (lado derecho hacia el interior). Además, conectar el respaldo con una arandela y tuerca.
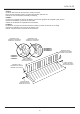
H-24 / H-25 STEP 3 Place arm supports between each arm and seat at the front of the swing. Hook link of chain on each side on 12" eye bolts and slide eye bolts through arms, supports, and seat as shown. Using nuts and washers,tighten eye bolts until they indent the surface.This will prevent the chain from coming loose from the eye. PASO 3 Colocar los brazos de soporte entre el asiento y cada brazo en la parte delantera del banco de oscilación.
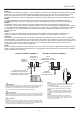
H-24 / H-25 STEP 4 2 STEP Your package contains two eyebolts. These should be screwed into a solid material (ceiling joists) as shown in Figure A. The screws should be spaced 46 inches apart for the H-24, and 58 inches apart for the H-25. Drill a 1/4 inch pilot hole for each eyebolt and lubricate the threads with wax, oil, or soap for easiest installation. Be sure to screw the ceiling hook completely into the ceiling joists so that no threads are visible.
H-24 / H-25 Customer Service Questions, problems, missing parts? Please call Customer Service: 1-800-800-4950 For more information about warranty, please visit WWW.JACK-POST.COM / Warranty . CORPORATION 800 EastThird Street Buchanan, Michigan 49107-1803 Customer Service 1-800-800-4950 Mon. thru Fri. 8:00am – 8:00pm EST E-mail cs@jack-post.