
Installation Guide


Pure Air
®
Bath
Page 10 www.jacuzzi.com Installation and Operation
English
Fuzion™ Frame Installation
If you are installing a Fuzion™ bathtub, please
refer to the Fuzion™ Frame Installation Guide
(#GL44000) before proceeding any further. Complete
the installation and assembly steps according to the
Fuzion™ Frame Installation Guide.
Fuzion™ Control Panel Installation
The following cutouts must be clear and free of any dirt
or adhesive:
- Control panel cutout in the assembled wood frame
- Control panel cutout in the assembled counter
- Control panel cutout in the bathtub
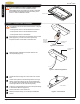
1
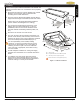
Insert the wire connector(s) into the back of the control
panel (Figure 4). The J5 LCD control panel only
requires insertion of the black control box wire.
2
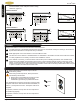
Sparingly apply adhesive around the base of the
control panel (Figure 5).
3
Thread the wire through the cutout and to the control
box.
4
Orient control panel in the following manner: the logo
will be on the right side of the J4 control panel when
you are sitting in the bathtub (the power button will be
on the right side of the J5 LCD control panel).
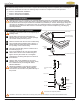
5
Lowerthecontrolpanelintothecutoutandpressrmly
to embed the adhesive (Figure 6).
6
Connect the wire to the control box.
7
Please proceed to Step 3 in the Drop-In Installation
section.
Fuzion™ Frame
Blower Wire
(Grey Wire;
not applicable for
J5 control panel)
Control Box Wire
(Black Wire)
Figure 6 - Control Panel
Figure 5 - Adhesive Application
Figure 4 - Control Panel
Control Box Wire
Adhesive)
Inside of Bathtub