
Installation Guide


Pure Air
®
Bath
Installation and Operation www.jacuzzi.com Page 9
English
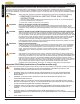
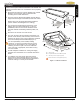
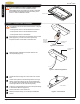
OverowFitting
Apply sealant/caulking
(commercially available)
Flat Rubber
Washer
Lock Nut
DirectWasteOverowDrain
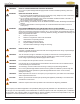
Assemble in accordance with the local plumbing or
building codes.
1
Identifydrainoverowkitprovidedwithyour
bathtub.Removeandopentheoverowpackage
andconrmthatallpartsarepresent.
2
Removewashersandnutsfromtheoverowtting.
3
Place a small bead of plumbers putty, silicone, or
similar approved sealant around the underside of
thetopangeoftheoverowtting.
4
Placetheoverowttingintotheoverowholeof
the bathtub (Figure 3).
5
From the underside of the unit, place the rubber
washerthenlocknutontheoverowttingand
tighten securely. Be careful not to overtighten.
6
Assemble the remaining drain pieces as shown in
the illustration.
7
After the drain is fully installed, test for proper
drainage. If the unit does not drain properly, rectify
this condition before proceeding with further
bathtub installation.
Watertightinstallationofthedrainandoverow
is the installer’s responsibility. Drain leakage is
excluded from the Jacuzzi Luxury Bath warranty of
this product
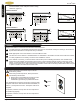
PVC Flex Pipe
PVC Tee
PVC Pipe
DirectWasteOverow
Drain
Overow
Drain
Assembly
Twist and
Turn Drain
Assembly
Waste Seal Gasket
Waste Elbow
PVC Pipe
Fuzion™ Specic Material
Fuzion™ Overow Drain Installation
Figure 3 - Overow Installation
The additional design features of the Fuzion™ require that the following steps be completed prior to installing the
bathtubintheconstructedsurround.Thefollowingstepsmustalsobecompletedintheorderspecied:
•
Fuzion™Overow/DrainInstallation
•
Fuzion™ Wood Frame Installation
•
Fuzion™ Control Panel Installation
You will not use all pieces provided.
OPTIONAL - If the Fuzion™ Wood Frame is not being used, please proceed to Step 2 in the Undermount Installation section.
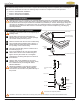
Fuzion™ Faucet Installation
Selecting a faucet for rim mounting: The combined thickness at the rim of the bathtub shell and optional
wooddeckis2˝(50mm)nominal.Thelengthofthefaucettailpiece(s)mustbelongenoughtoextendpast
this dimension and have ample clearance to assemble any hardware (i.e. locknut, water supply fittings, etc.)
necessaryforinstallation.Forundermountunits,thecombinedthicknessofthebathtubshellis½˝(12mm)
nominal and the undermount deck should not exceed the length of the faucet tailpiece(s), including any
assembly hardware.