
Full Product Manual


General
Product
Information
Working
Safely
Tools for
Cutting and
Fastening
General
Installation
Requirements
General
Fastener
Requirements
Finishing and
Maintenance
HardieTrim
®
Boards/Battens
HardieWrap
®
Weather Barrier
HardieSoffit
®
Panels
HardiePlank
®
Lap Siding
HardieShingle
®
Siding
HardiePanel
®
Vertical Siding
ESR-1844 &
2290 Report
Appendix/
Glossary
88
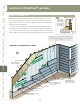
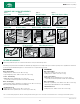
BLIND NAILING (nailing through top of plank)
Blind nailing is recommended for installing
any type of HardiePlank
®
lap siding
including ColorPlus
®
siding. With blind
nailing, each course covers the fasteners
on the course below, which provides a
better looking installation.
For blind nailing HardiePlank lap siding,
James Hardie recommends driving
fasteners 1 in. from the top edge of the
Although blind nailing is recommended by James Hardie, face nailing may
be required for certain. installations including: installations in high wind areas,
fastening into OSB or equivalent sheathing without penetrating a stud, or
when dictated by specific building codes . Refer to Appendix D for related
code matters.
Fasteners are
hidden by the
course above.
Nails are
driven
through the
sheathing
into the
studs.
Keep nails
3
/8 in from
ends of
boards.
Nails for blind nailing shall
be between 3/4 in and
1 in. from the top of the
board.
Blind nailing
Exposed
fasteners
are driven
through the
face of the
boards.
Drive fasteners
only where
planks overlap
Face nailing
Blind nailing measurments
FACE NAILING (nailing through the overlap at the bottom of the plank)
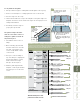
For walls longer than 12 ft, it is necessary to butt joint additional
lengths of HardiePlank siding. These butt joints should be staggered
to avoid noticeable patterns, which is determined by the placement
of the first course. Butt joints between consecutive courses should
be spaced apart by at least two stud bays for 16 in., o.c. framing or
one bay for 24 in. o.c. framing.
While random placement of the planks is usually the most
aesthetically pleasing, a progressive stagger pattern can make the
job easier and faster without the pattern becoming too noticeable.
With this strategy, the cut off piece for one course becomes the
starter piece for a course above, making efficient use of materials
and ensuring that all butt joints land on studs. The pattern can be
modified for different stud placement.
For walls longer than 12 ft
land butt joints over studs,
staggering the joints at least
24 in (for 24 in. o.c. framing)
or 32 in. (two stud bays for
16 in. o.c. framing).
Cutoff pieces
form the
starter pieces
for courses
above.
STAGGERING THE BUTT JOINTS
10.5 10.6
10.7
10.8
plank. Additionally fasteners should be placed no closer than 3/8 in. from the ends of the plank.
Avoid placing fasteners near the top edge of the plank. This practice, called “high nailing”, may lead to loose
planks, unwanted gaps or rattling. Pin-backed corners may be done for aesthetic purposes only. Finish nails
are recommended for pin-backs. Headed siding nails are allowed. Place pin-backs no closer than 1 in.
from plank ends and 3/4 in. from plank edge into min. 3/8 in. wood structural panel. Pin-backs are not a
substitute for blind or face nailing
Installation of HardiePlank
®
Lap Siding (cont.)