
Installation Guide


TR1502_P7/9 03/15
Fastener Requirements
Trim Application for Windows, Doors & Other Openings
For Corners, Band Boards, Windows, and Door Applications:
HardieTrim boards may be installed with HardieTrim™ Flat Tabs and HardieTrim™ Corner Tabs which provide concealed fastening. Only HardieTrim Flat and Corner
Tabs can be used with HardieTrim boards to create a concealed fastening.
Step 1: Attach HardieTrim Flat Tabs to the back side of the trim using four, 18 ga. 1/2 in. L x 1/4 in. W narrow crown corrosion resistant staples, equally spaced in
one row, positioned no closer than 1/2 in. from trim edges using a pneumatic staple gun. (figures 21, 22)
Step 2: For wood frame construction, attach the trim to the building with minimum 2, 6d siding nails fastened through the HardieTrim Flat Tabs (figure 23). ET&F or
equivalent fasteners may be used to attach the HardieTrim Flat Tabs to steel frame construction.
Fastener spacing will vary based on application. Refer to fastener table on page 9. Refer to specific sections in these instructions for required fastener spacing by
application (window, band board, etc.)
For Fascia, Rake, and Frieze board Applications:
HardieTrim tabs cannot be used in fascia, rake, or frieze board applications. Follow Face nailing fastening specifications.
Installation of HardieTrim tabs in Coastal Regions:
James Hardie requires that stainless steel staples & fasteners be used when installing HardieTrim Tabs in coastal regions.
Installation of HardieTrim Tabs over Pressure Treated Lumber:
HardieTrim tabs shall not come in direct contact with ACQ or CA preservative-treated
wood. Refer to the General Fastening section of this document for further information.
HardieTrim boards with ColorPlus Technology: Remove the laminate sheet as soon as possible after attaching the trim to the building.
Figure 23
Fasten HardieTrim
Flat Tab to
minimum 7/16 in.
OSB with min 2, 6d
siding nails
Min 2 in.
Min 1/2 in.
NOTE: Follow your window/door manufacturers installation instructions for caulking guidance between window and trim.
Do not
under
drive nails.
HardieTrim
Flat and Corner Tabs
HardieTrim
Flat and
Corner Tabs
Only use staples to
fasten HardieTrim Flat and
Corner Tabs to the trim boards.
Siding nail
attaches tab
to the wall.
Flush
HardieTrim
™
Tabs
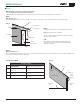
Trim the opening prior to the installation of the siding. Place a Flat Tab at the end of each trim board and one tab every 16 in. OC. Attach the trim boards and Flat Tabs
around the opening as shown in figure 24. Use 16 ga. galvanized 2 in. long finish nails to ensure proper fastening if needed.
Figure 21
Figure 22
Fasten 4 staples minimum ¼ in. from trim edge
HardieTrim Flat Tabs
16 in. O.C. max
Back view
Front view
INSTALLATION (cont.)
Figure 24
1
2
3
2