
Installation Guide


TR1121_P2/6 6/13
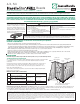
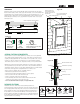
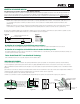
CLEARANCES
corner
studs
Figure 2 Figure 3
water cut
22.5º - 45º
Figure 4
6" min.
† The illustration (figure 10) was reprinted with permission of THE JOURNAL OF LIGHT CONSTRUCTION. For subscription information, visit www.jlconline.com.
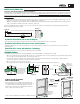
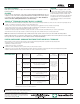
Because of the volume of water that can pour down a sloped roof, one of
the most critical flashing details occurs where a roof intersects a
sidewall. The roof must be flashed with step flashing. Where the roof
terminates, install a kickout to deflect water away from the siding.
It is best to install a self-adhering membrane on the wall before the
subfascia and trim boards are nailed in place, and then come back to
install the kickout.
Figure 10
KICKOUT FLASHING
Figure 10, Kickout Flashing† To prevent water from dumping behind the siding and the end of the roof
intersection, install a "kickout" as required by IRC code R905.2.8.3 : “…flashing shall be a min. of 4” high and
4” wide.” James Hardie recommends the kickout be angled between 100° - 110° to maximize water deflection.
Self-adhering
membrane
Step flashing
Housewrap
Drip edge
Kickout
flashing
Self-adhering
eaves membrane
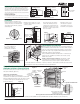
Maintain a minimum 1" gap
between gutter end caps and
siding & trim.
Install siding and trim products in
compliance with local building code
requirements for clearance between the
bottom edge of the siding and the adjacent
finished grade.
Figure 5
Figure 6
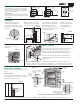
At the juncture of the roof and vertical
surfaces, flashing and counterflashing
shall be installed per the roofing
manufacturer’s instructions. Provide a
1-2" clearance between the roofing and
the bottom edge of the trim.
Figure 7
1-2"
min.
Maintain a minimum 1-2" clearance
between James Hardie
®
trim products
and decks, paths, steps and driveways.
joist
1-2" min
water
resistive
barrier
siding
flashing
deck material
ledger
trim
flashing
siding
1/4" gap
flashing
Do not
Caulk
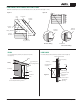
Figure 8
Maintain a 1/4" clearance
between the bottom of James
Hardie
®
products and
horizontal flashing. Do not
caulk gap.
flashing
Figure 9
trim
fascia
siding
1"
gutter and end cap
TRIMMING CORNERS
When installing corners or other vertical trim, position
boards on the wall and attach (fig. 2). Use weather cuts
sloped away from the wall to join (fig. 4). Alternatively
corners can be pre-built (fig. 3).
Pre-Built Corners
Corners can be pre-built off the wall using 2" finishing
nails. Each side of the pre-built corner must be secured
to the wall (fig. 2).
2" Finish nail
2" Finish nail
corner
studs
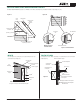
Butt to Siding
Horizontal
Flashing
leave a minimum 1/8" gap
between siding and trim,
then caulk.
Figure 11
flashing
required
over trim
do not
caulk along
top edge
HardieTrim
®
board
water-
resistive
barrier
siding
16" max.
NOTE: Follow your window/door manufacturer’s installation instructions.
trim
1/4" gap
flashing
siding
Figure 12
TRIM APPLICATION FOR WINDOWS,
DOORS & OTHER OPENINGS
Flashing over trim is required for all installation methods.
(fig. 11)
Butt Joint to Siding
Trim the opening prior to the installation of the siding.
Position trim boards on the wall and secure. Allow proper
fastener spacing at edges and ends.