
Installation Guide


TR1121_P5/6 6/13
* Refer to your paint manufacturer for washing and recoating requirements related to paint performance.
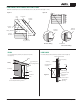
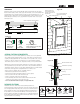
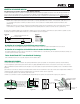
Flashing needs to be
tucked under the water
resistive barrier and over
the Flat Tabs.
Water-resistive Barrier
1/4" gap
Do not caulk between the
siding and the flashing.
1/8" caulked gap is left between
siding and the side trim pieces.
Figure 28
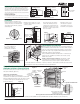
BAND BOARD
Figure 30
Figure 31
Flat Tabs
Caulk
HardieTrim
®
boards
Flashing
1/4" gap. Do not caulk.
HardiePlank
®
Lap Siding
Weather-resistive barrier
Sheathing
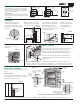
Fasten 4 staples to the tab as shown.
Flat Tabs
16" o.c. max
Blocking
Flat Tabs
16" o.c. max
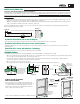
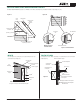
Do not
under
drive nails.
Flat and Corner Tabs
Flat and
Corner Tabs
Only use staples to
fasten Flat and Corner Tabs
to the trim boards.
Siding nail
attaches tab
to the wall.
Flush
Figure 32
Figure 29
GENERAL FASTENING REQUIREMENTS
• Drive fasteners perpendicular to trim and framing.
• Fastener heads should fit snug against siding (no air space). (fig. B )
• Do not over-drive nail heads or drive nails at an angle.
• If nail is countersunk, caulk nail hole and add a nail.
• For wood framing, under driven nails should be hit flush to the trim with
a hammer (For steel framing, remove and replace nail).
• Do not use aluminum fasteners, staples, or clipped head nails.
Fasteners must be corrosion resistant, galvanized, or stainless steel. Electro-galvanized
are acceptable but may exhibit premature corrosion. James Hardie recommends the use
of quality, hot-dipped galvanized nails. James Hardie is not responsible for the corrosion
resistance of fasteners. Stainless steel fasteners are recommended when installing
James Hardie
®
products near the ocean, large bodies of water, or in very humid climates.
Manufacturers of ACQ and CA preservative-treated wood recommend spacer materials or
other physical barriers to prevent direct contact of ACQ or CA preservative-treated wood
and aluminum products. Fasteners used to attach HardieTrim Tabs to preservative-treated
wood shall be of hot dipped zinc-coated galvanized steel or stainless steel
and in accordance to 2009 IRC R317.3 or 2009 IBC 2304.9.5.”
A flashing is required over the trim and Flat Tabs. (Figure 29) Terminate ends of the Band
Board into Trim or Siding or miter cut the edges of the trim at the corners of the building. Place
a Flat Tab at the end of each trim board and one tab every stud at a maximum of 16" o.c. The
Flat Tabs should be attached to the trim in an alternating pattern to the top and bottom of the
band board (Figure 30 and 31). Use 16 ga. galvanized 2" long finish nails to ensure proper
fastening if needed.
PNEUMATIC FASTENING
HardieTrim
®
Trim can be hand nailed or fastened with a pneumatic tool.
Pneumatic fastening is highly recommended. Finish nails should be driven flush
to the trim (fig. A). When using siding nails set air pressure so that the fastener is
driven snug with the surface of the siding (fig. B). A flush mount attachment on
the pneumatic tool is recommended. This will help control the depth the nail is
driven. If setting the nail depth proves difficult, choose a setting that under drives
the nail. (Drive under driven nails snug with a smooth faced hammer - Does not
apply for installation to steel framing).
Figure B
Siding Nail
do not
under
drive nails
Figure A
Finish Nail
Flush Snug Flush
do not over
drive siding
nails