
Installation Guide


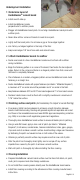

Underlayment Installation
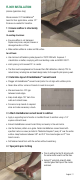
1 | Determine layout of
HardieBacker
®
cement board
• Install smooth side up.
• Install HardieBacker boards
perpendicular to suboor panels.
• Stagger all HardieBacker board joints. Do not align HardieBacker board joints with
suboor joints
• Never allow all four corners of boards to meet at one point.
• Lightly butt the board joints. Do not leave a gap or force edges together.
• Join factory-cut edges together in the body of the oor.
• Keep board edges 1/8” back from walls and cabinet bases.
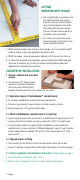
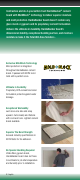
2 | Attach HardieBacker boards to subfloor
• Fasten one board at a time. HardieBacker boards must be ush with suboor
during installation.
• Begin the fastening pattern in a corner of the board, then fasten the two adjacent
edges. Return to the corner and fasten in a diagonal pattern from that corner until
the board is completely fastened.
• Place fasteners in a random, staggered pattern across HardieBacker board. Avoid
fastening in a straight line.
• Fasten HardieBacker boards with proper fasteners (as listed in “Materials Required”)
a maximum of 3” on center around the perimeter and 6” on center in the eld.
• Keep fasteners between 3/8” and 3/4” from board edges and 2” in from board corners.
• Fastener heads/crowns must be ush with or slightly countersunk a maximum of
1/16” below the surface.
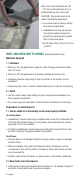
3 | Finishing surface and joints (not necessary for carpet or wood flooring)
• If necessary, lightly hand-sandseams to achieve a smooth transition between
boards. Avoid over-sanding. Sanding will generate signicant respirable silica dust
and those in the immediate area must wear NIOSH-approved respiratory protection
(e.g. N95) in accordance with applicable government regulations.
• Thoroughly clean HardieBacker board surface to remove all debris prior to patching.
• Using a wide at trowel, apply a skim coat of patch (as listed in “Materials
Required”) to all seams, sanded areas, hammer indentations, holes, gaps, gouges,
chips and voids to achieve a smooth surface. Avoid building a ridge over the seams
by feathering the patch out several inches on both sides of the seams.
• Obtaining a perfectly smooth surface may require more than one coat of patch.
• After the patch has thoroughly dried, lightly sand or scrape off any surface
imperfections caused by the patch to achieve a smooth surface.
• Wait until patch is thoroughly dry before installing the oor covering.
4 | Flooring installation
• Prepared HardieBacker cement board surface must be free of all debris, oil, paint,
caulk, joint compound and other foreign substances.
• Do not install oor covering seams directly over the HardieBacker board seams.
• Install oor covering according to the adhesive and oor covering manufacturers’
instructions.
English | 6