
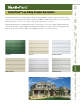
Installation Guide


85
General
Product
Information
Tools for
Cutting and
Fastening
General
Installation
Requirements
General
Fastener
Requirements
Finishing and
Maintenance
HardieTrim®
Boards/Battens
HardieWrap®
Weather Barrier
HardieSoffit®
Panels
HardiePlank®
Lap Siding
HardieShingle
®
Siding
HardiePanel
®
Vertical Siding
ESR-1844 &
2290 Report
Appendix/
Glossary
Working
Safely
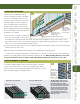
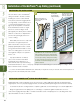
Pull from across the stack
Do not go down the stack
TIP: When taking planks from the
pallet installation, avoid repeating
the texture pattern by working
across the pallet. Two to four planks
can be removed from a stack at one
time. But then material should be
taken from adjacent stacks, again
working across the pallet. Texture
repeat is typically a concern on
large walls with few breaks such as
windows or doors.
Pull from accross the stack Do not go down the stack
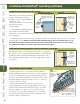
The first course of HardiePlank
®
siding is
critical to the proper installation of the plank
on the rest of the building. The first course
should start at the lowest point of the house
and within required clearances. Special at-
tention should be made to ensure that it’s
straight and level. Attention should also be
paid to staggering any butt joints in the planks
so that the installation is attractive while mak-
ing efficient use of material.
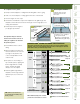
1) Use a level (4-ft. or longer) or chalked level
line to be sure that the first course is level.
Snapped chalk line guides the rst course.
Use a level 4-ft. or
longer level to check
the rst course.
Keep bottom
edge of the rst
course even with
the bottom of
the corner trim.
INSTALLING THE PLANKS
End plank
courses
1
/8 in.
from vertical
trim and
ll gap with
permanently
exible caulk.
PLANK ALIGNMENT AT CORNERS
10.3
10.4
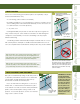
As installation proceeds up the wall, periodically check the level and straightness of the courses. When correct-
ing for flatness over products such as exterior insulation, use drywall shims. It is good practice to snap a chalk line
every 3 to 5 courses to keep the planks straight and level.
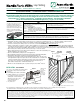
2) Position the bottom edge of the first course of siding a minimum 1/4-in. below the edge of the starter strip (maintain
required clearances) and secure.
3) Run the siding to the HardieTrim
®
board leaving a
1
/8-in. gap between the siding and trim.
The bottom of the siding should be kept even with the bottom of the trim, or if desired, the trim may extend below
the bottom of the siding. But the siding should never hang below the trim. *When installing the first course make
sure ground clearances are in accordance with James Hardie requirements and those of local codes.
For the best looking installation, make sure that the heights of the plank
courses match on both sides of a corner. Use a framing square, speed
square or a level to match up the plank heights. Check every few courses to
make sure proper heights are being maintained.
6 in. min.